Overview
X-Ray Pixel
X-Ray Pixel Installation Guide
Customizing X-Ray Capture Settings
Contact Suppression
X-Ray SDK for Custom Events
How to Activate the Upgraded Version of X-Ray
Leads & Audiences
Create Audience Segments
Import SMS/Email Contact List
How to Turn on Lead Alerts for X-Ray Website Visitors
Email Automation Builder
Enable Email Suppression List
Clay Integration via Webhooks
How to Activate Customers.ai ESP
Integrations
Email Integration
CRM Integrations
Mailchimp Integration
Klaviyo Integration Part 1: Connect Customers.ai to Klaviyo
Klaviyo Integration Part 2: Activate Klaviyo Signal to Boost Flows
Sendlane Integration
HighLevel Integration
Google Sheets Integration
JSON Webhooks
Integration via Shopify's Custom API
Connect Your Salesforce Account
Connect to Applications via Zapier
Connect Bloomreach to Customers.ai
Braze Integration Guide
Connect Attentive to Customers.ai
HubSpot Integration
Meta Ads Tools
Google Ads Tools
Create Google Ads Custom Audience
Automate Data Import from Google Sheets to Google Ads
Sync Customers.ai Audience to Google Ads
Finding your Google Ads Client ID, Secret Token
Analytics
How to Build a Custom Report of Sales by Customers.ai Revealed Contacts Synced to Klaviyo
Bot Analytics
Public API
FAQs
Bot Issues
I Cannot Login or Sign Up for a Bot with Facebook Login
I Cannot Connect My Page Page to MobileMonkey Bot
Web Chat Isn't Showing On My Website
Bot Send Credits
Increase in my Number of Contacts
How Does Unsubscribe Work?
My bot is Responding with the Default Message or a Different Message
My Bot Won't Respond at all
Bot Response Issues Overview
Send Overage Automatic Upgrades
I Can't Find My Old Bot or my Dialogues
How to redeem your Facebook Ads Coupon
MobileMonkey Bot Legacy Subscriptions
What's a Main Menu?
MobileMonkey Bot Pricing Plans
Can I Use SMS on My Subscription Plan?
Facebook Messenger Issues
Handover Protocol
How Do I Create a Lookalike Ads Audience from Bot Contacts?
How to Get Approved for Facebook Subscription Messaging
Can't Find my Messages / Customer Conversations Are Not in My Messenger Inbox
Why am I getting Product Alerts from my Facebook Page?
Facebook Permissions Issues
Edit Your Facebook Permissions
How to Test Synced Ads on Facebook Ads Manager
My Facebook page doesn't show up on the list of pages to connect
Why Do I Have To Sign Up With Facebook?
Remove other Connected Apps on your Business Integrations
Refreshing Your Facebook Connection
Facebook's 24-Hour Rule
FAQs about the CAN-SPAM Act
FAQs about the CCPA
Known Issues
Report a Bug
Too Many Bananas!
Refresh Page Access Token Error/ Update Permissions
Issues with Ad Blockers & Privacy Extensions
Website Widget Not Appearing on iOS 12.1
InstaChamp
Connecting your Instagram account to a Facebook page
Pre-requisites in Connecting an Instagram Page
Why do I need to sign up for InstaChamp with my Facebook login?
Why Do I Have to Sign Up for Instagram Messaging with My Facebook Login?
I cannot connect my Page to InstaChamp
InstaChamp Sign-up Process
My Facebook Page is connected to MobileMonkey. Can I still use InstaChamp?
How to Create Autoresponders on InstaChamp
How do I link my Instagram Account to a Facebook Page?
Troubleshoot: Autoresponders not sending
How do I switch to an Instagram Business Account?
Basic Guide to Autoresponders
How do I enable third-party access to messages?
How do I find my InstaChamp Ambassador referral link and get credit for sales I make?
How to Use the InstaChamp Ambassador Share Banner Library to Monetize Your Audience
WordPress Plugin
- All Categories
-
- Use your Sponsored Message to opt users in for a one time notification
Use your Sponsored Message to opt users in for a one time notification
When you have contacts that haven't engaged in the past 24 hours, Facebook requires that you use a Sponsored Message to send any promotional messages to these contacts. This is treated like an ad, so there is no guarantee that your message will be delivered to all contacts in your audience.You will need to compete with other advertisers for each impression.
To make your Sponsored Message worthwhile, you can include a one time notification (OTN) opt-in in your Sponsored Message dialogue. This will allow you to send a FREE promotional message to these users in the future. With the one-time notification, delivery rate is also much higher since the customer gave your page permission to send them a message.
Most of these contacts messaged your page a long time ago and some or most of these messages haven't been responded to, due to lack of automated responses.
Set up a Sponsored Message via MobileMonkey.
In setting up the Sponsored Message flow, take note of the following:
1. Make sure that you are straightforward with why you are messaging them. This will help ensure they respond to your message. Here's an example:
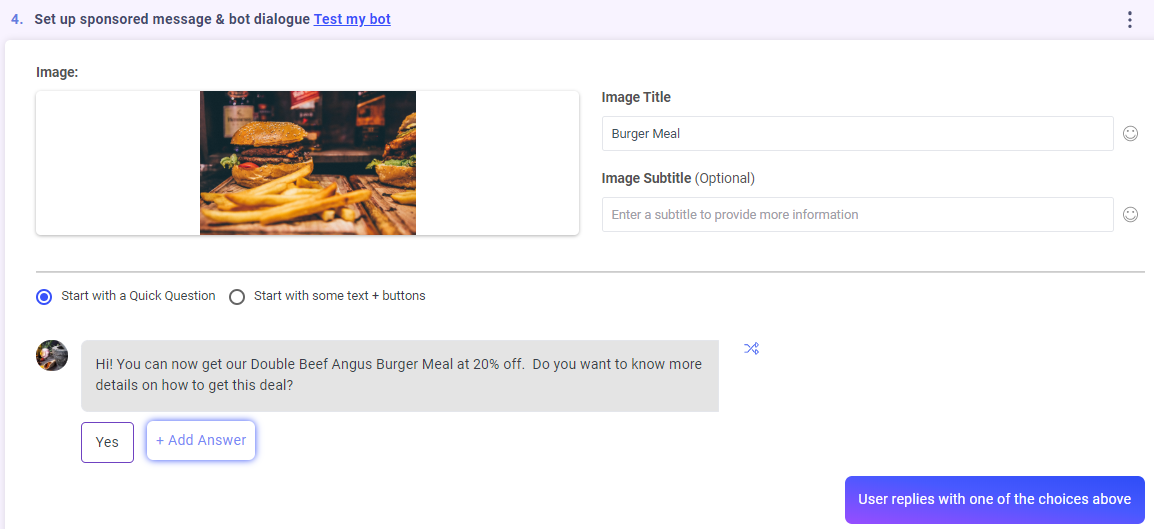
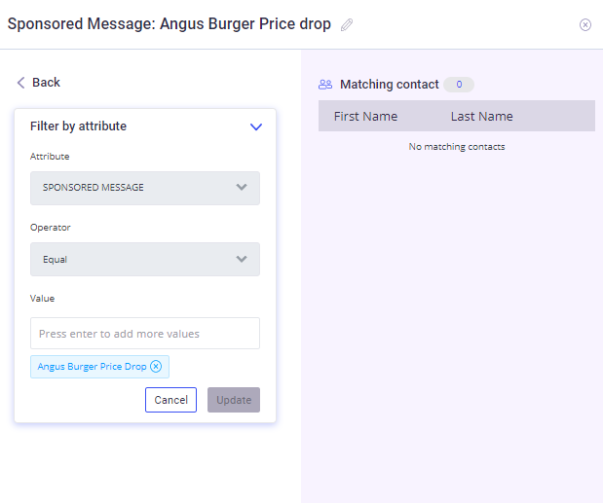
2. Use the attribute widget with the Attribute name "Sponsored Message" then the Value can be the name of the Campaign. This will help you create an audience later.
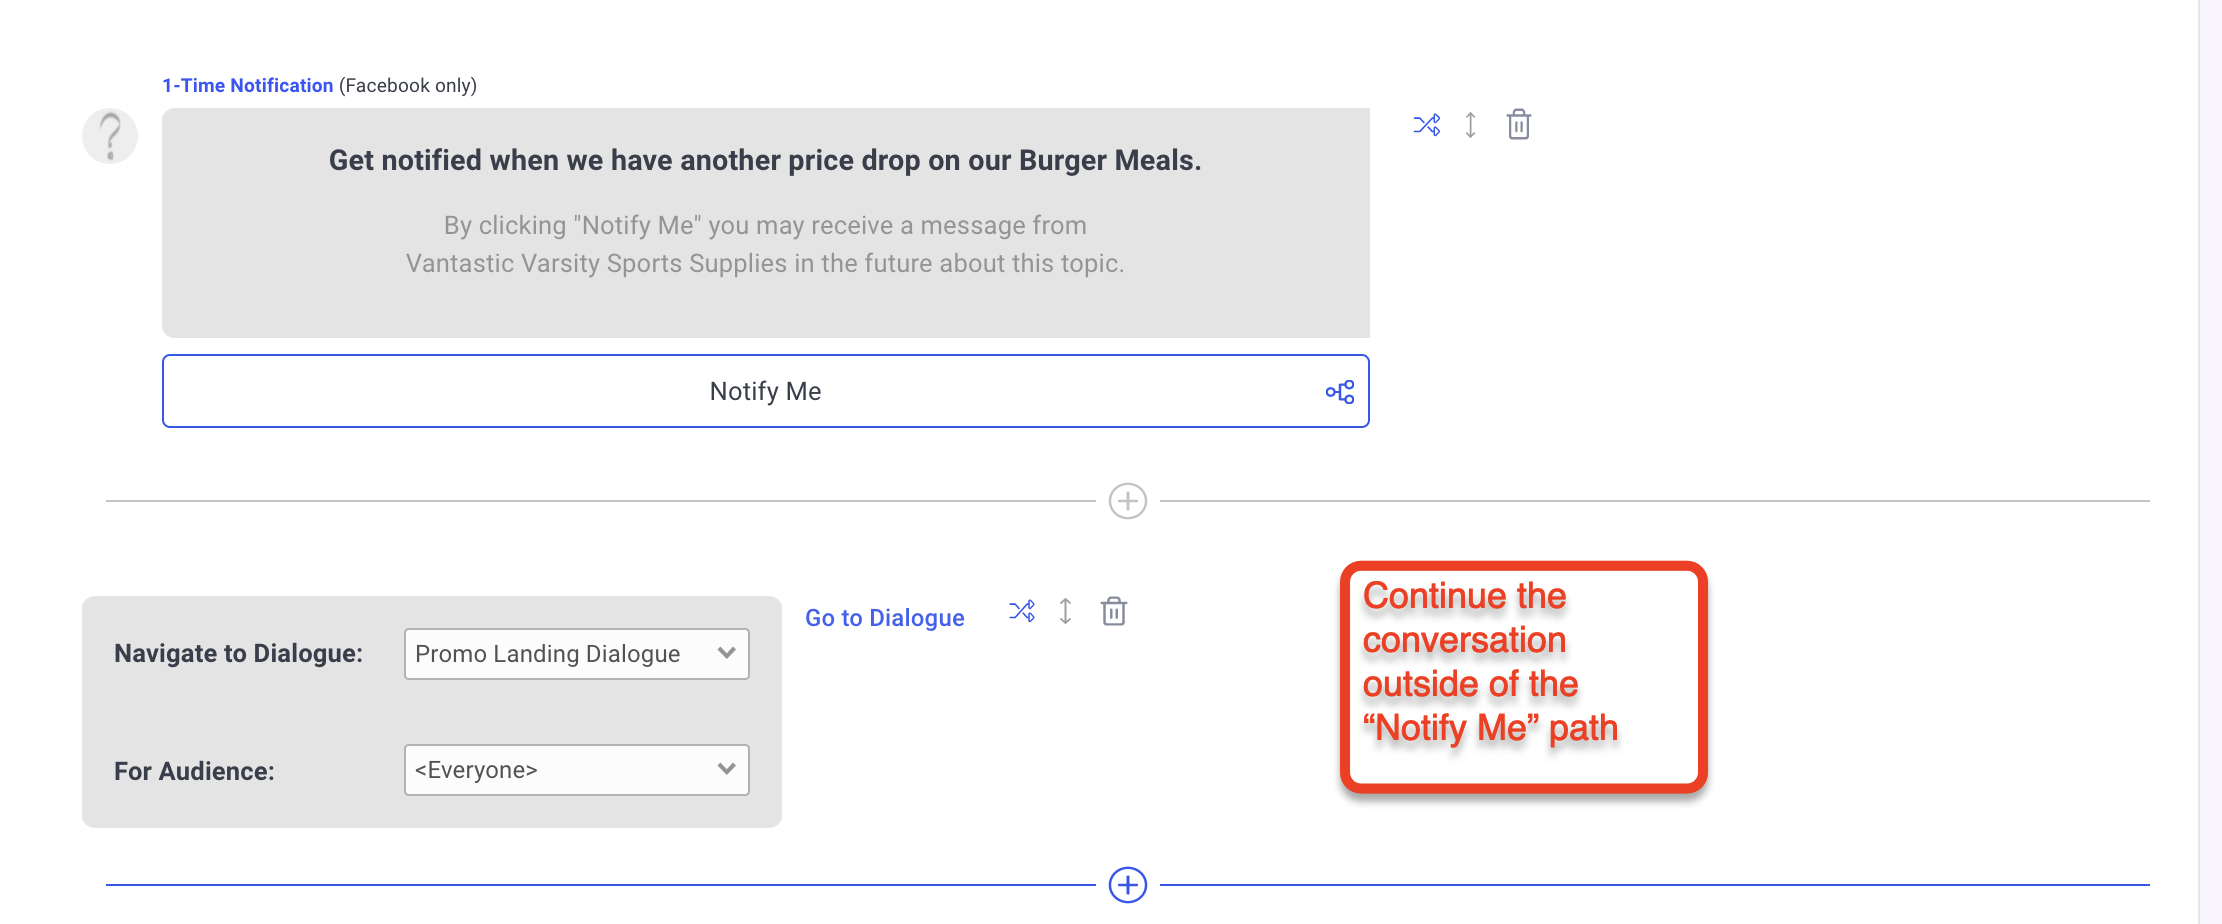
3. Use the 1-time notification widget.
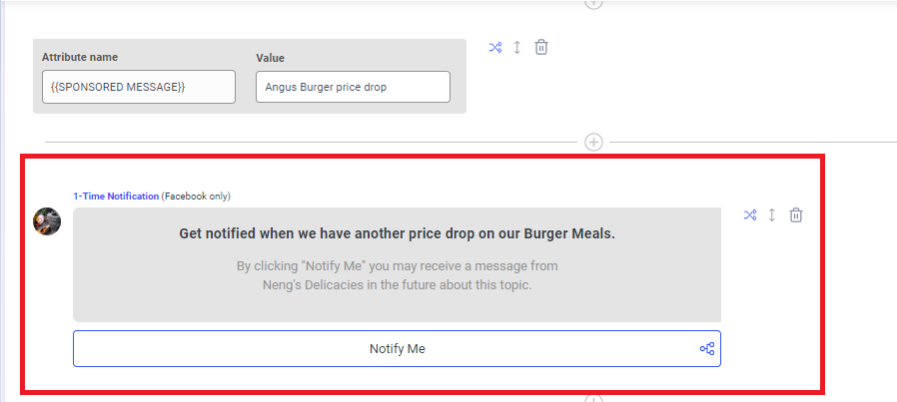
When you set up the 1-time notification widget, make sure you apply a OTN tag for the OTN request.
4. Continue building dialogue with the details of the "promo". At this point, there are 2 paths that the user can take. They can either click the "Notify Me" button to opt into the OTN request OR they can enter a text response (most likely "No thanks"). Make sure you have dialogues in place to handle both scenarios.
You can use the Navigate widget to take them to a dialogue you already created or you may continue in the Chat Starter.
To navigate the user to a new dialogue after they click on "Notify Me", make sure include the Navigate widget within the path:
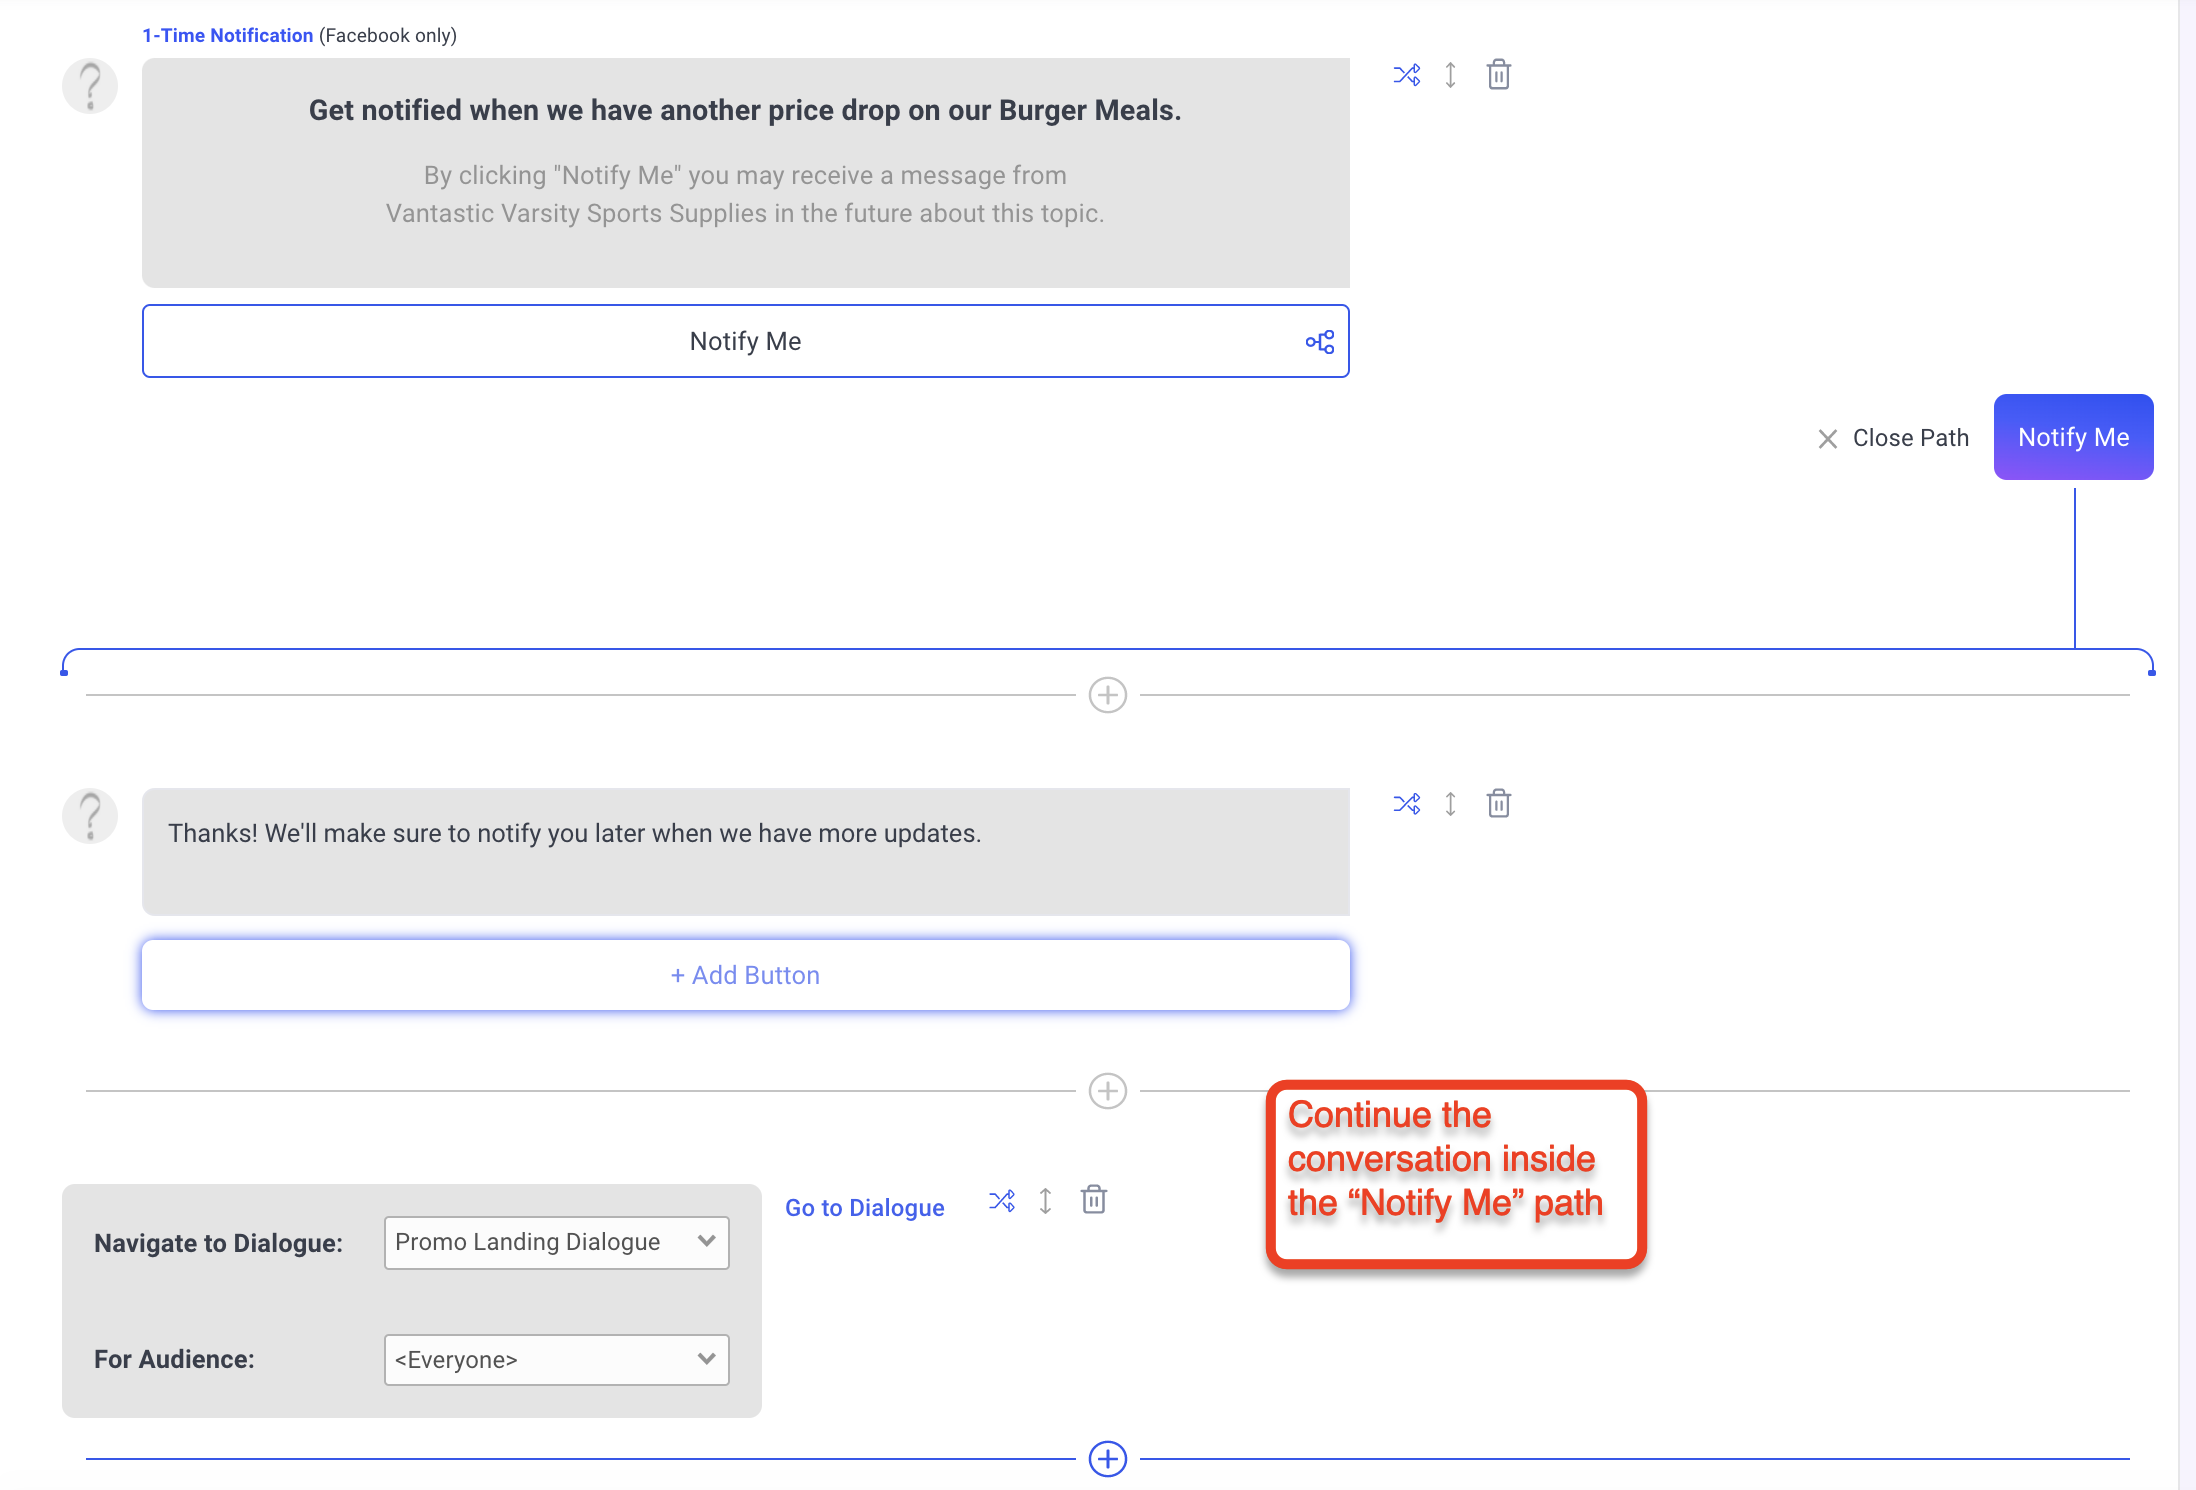
To cover the case where the user does not click on "Notify Me", insert the Navigate widget outside of the path. Make sure you close the path before adding the next widget:
5. Next, create an Audience using the attribute and value you assigned for this Sponsored Message.

6. Setup a Drip Campaign to maximize the 24-hour period that you are allowed to reach out to contacts who engaged with your Sponsored Message. The Audience in this campaign will be composed of contacts who interacted with your Sponsored message.
7. Create an Audience for contacts who clicked on NOTIFY ME on your 1-time notification widget. Filter by TAG and select the 1-time notification tag you assigned. Every 1-time notification tag will have (otn).
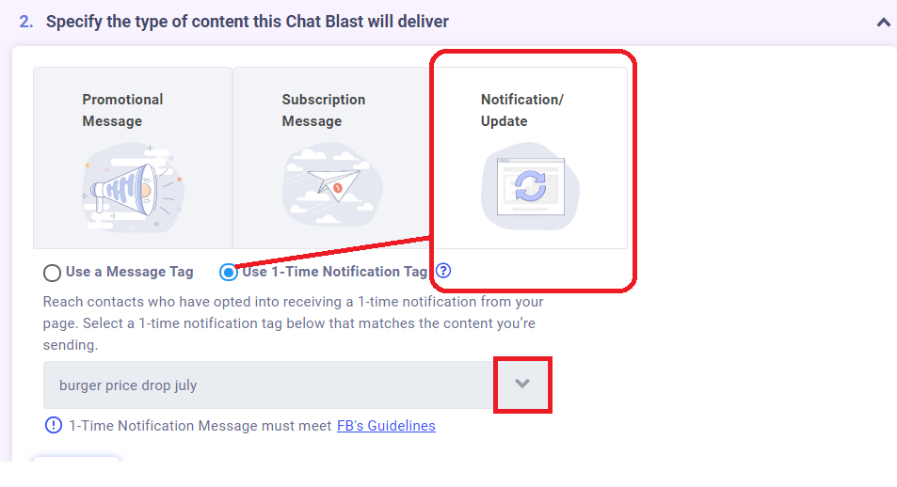
8. Create a Chat blast once you have a specific message corresponding to the "TAG" you created on the 1-time notification widget.
You have 365 days to use a 1-time notification tag. Make sure that the message you will be sending is associated with the "tag" you will use for this chat blast.
Take note that when you are using a 1-time notification tag, select Notification Update, 1-tine notification tag.
Select the TAG you will be using for this chat blast. NOTE: This tag will be DELETED on each contact once the chat blast was sent.
This is Facebook's safety feature to make sure you will only use it 1-time.