Overview
X-Ray Pixel
X-Ray Pixel Installation Guide
Customizing X-Ray Capture Settings
Contact Suppression
X-Ray SDK for Custom Events
How to Activate the Upgraded Version of X-Ray
Leads & Audiences
Create Audience Segments
Import SMS/Email Contact List
How to Turn on Lead Alerts for X-Ray Website Visitors
Email Automation Builder
Enable Email Suppression List
Clay Integration via Webhooks
How to Activate Customers.ai ESP
Integrations
Email Integration
CRM Integrations
Mailchimp Integration
Klaviyo Integration Part 1: Connect Customers.ai to Klaviyo
Klaviyo Integration Part 2: Activate Klaviyo Signal to Boost Flows
Sendlane Integration
HighLevel Integration
Google Sheets Integration
JSON Webhooks
Integration via Shopify's Custom API
Connect Your Salesforce Account
Connect to Applications via Zapier
Connect Bloomreach to Customers.ai
Braze Integration Guide
Connect Attentive to Customers.ai
HubSpot Integration
Meta Ads Tools
Google Ads Tools
Create Google Ads Custom Audience
Automate Data Import from Google Sheets to Google Ads
Sync Customers.ai Audience to Google Ads
Finding your Google Ads Client ID, Secret Token
Analytics
How to Build a Custom Report of Sales by Customers.ai Revealed Contacts Synced to Klaviyo
Bot Analytics
Public API
FAQs
Bot Issues
I Cannot Login or Sign Up for a Bot with Facebook Login
I Cannot Connect My Page Page to MobileMonkey Bot
Web Chat Isn't Showing On My Website
Bot Send Credits
Increase in my Number of Contacts
How Does Unsubscribe Work?
My bot is Responding with the Default Message or a Different Message
My Bot Won't Respond at all
Bot Response Issues Overview
Send Overage Automatic Upgrades
I Can't Find My Old Bot or my Dialogues
How to redeem your Facebook Ads Coupon
MobileMonkey Bot Legacy Subscriptions
What's a Main Menu?
MobileMonkey Bot Pricing Plans
Can I Use SMS on My Subscription Plan?
Facebook Messenger Issues
Handover Protocol
How Do I Create a Lookalike Ads Audience from Bot Contacts?
How to Get Approved for Facebook Subscription Messaging
Can't Find my Messages / Customer Conversations Are Not in My Messenger Inbox
Why am I getting Product Alerts from my Facebook Page?
Facebook Permissions Issues
Edit Your Facebook Permissions
How to Test Synced Ads on Facebook Ads Manager
My Facebook page doesn't show up on the list of pages to connect
Why Do I Have To Sign Up With Facebook?
Remove other Connected Apps on your Business Integrations
Refreshing Your Facebook Connection
Facebook's 24-Hour Rule
FAQs about the CAN-SPAM Act
FAQs about the CCPA
Known Issues
Report a Bug
Too Many Bananas!
Refresh Page Access Token Error/ Update Permissions
Issues with Ad Blockers & Privacy Extensions
Website Widget Not Appearing on iOS 12.1
InstaChamp
Connecting your Instagram account to a Facebook page
Pre-requisites in Connecting an Instagram Page
Why do I need to sign up for InstaChamp with my Facebook login?
Why Do I Have to Sign Up for Instagram Messaging with My Facebook Login?
I cannot connect my Page to InstaChamp
InstaChamp Sign-up Process
My Facebook Page is connected to MobileMonkey. Can I still use InstaChamp?
How to Create Autoresponders on InstaChamp
How do I link my Instagram Account to a Facebook Page?
Troubleshoot: Autoresponders not sending
How do I switch to an Instagram Business Account?
Basic Guide to Autoresponders
How do I enable third-party access to messages?
How do I find my InstaChamp Ambassador referral link and get credit for sales I make?
How to Use the InstaChamp Ambassador Share Banner Library to Monetize Your Audience
WordPress Plugin
- All Categories
- Google Ads Tools
- Create Google Ads Custom Audience
Create Google Ads Custom Audience
Updated
by Raquel Bartolome
Step 1: Prepare Your Data in Google Sheets

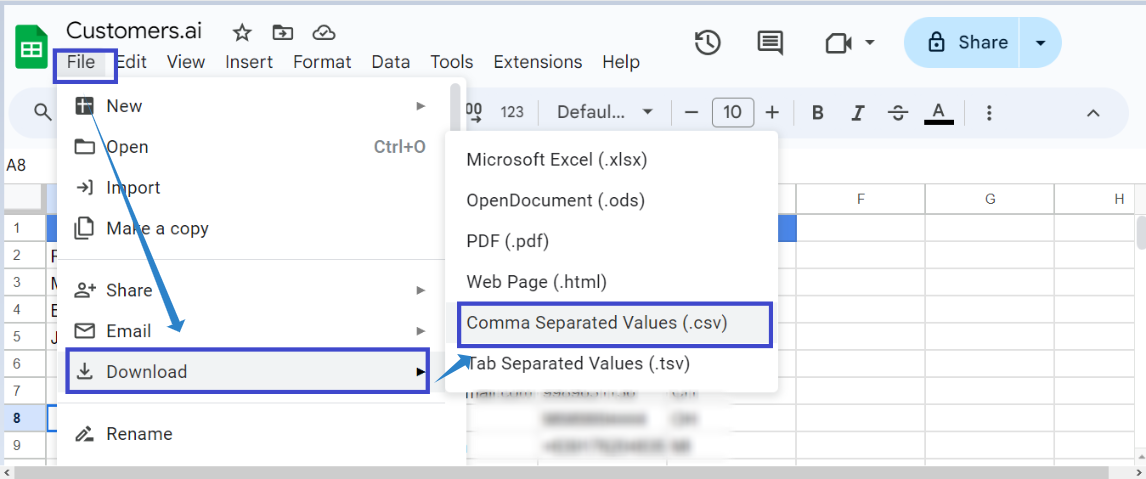
Step 2: Download the Google Sheet as a CSV File

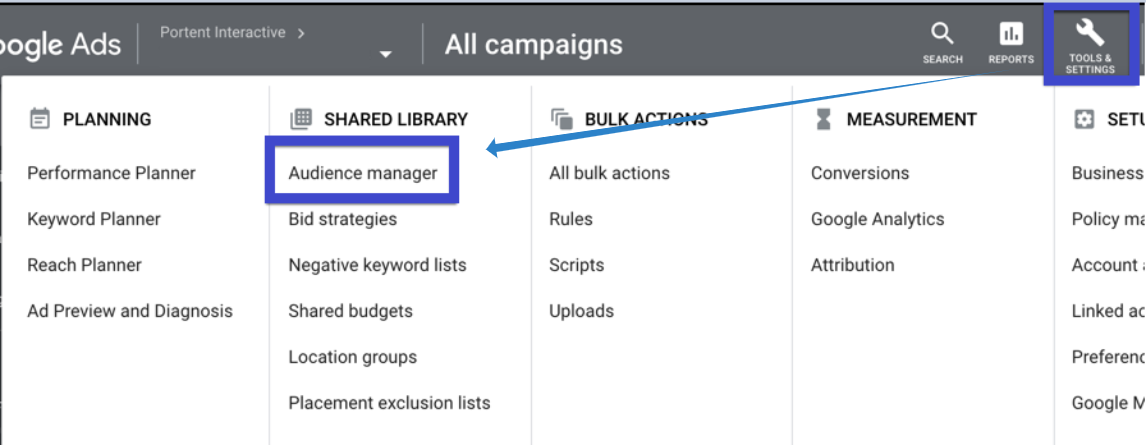
Step 3: Upload the CSV File to Google Ads
 * Navigate to Tools & Settings > Shared Library > Audience Manager.
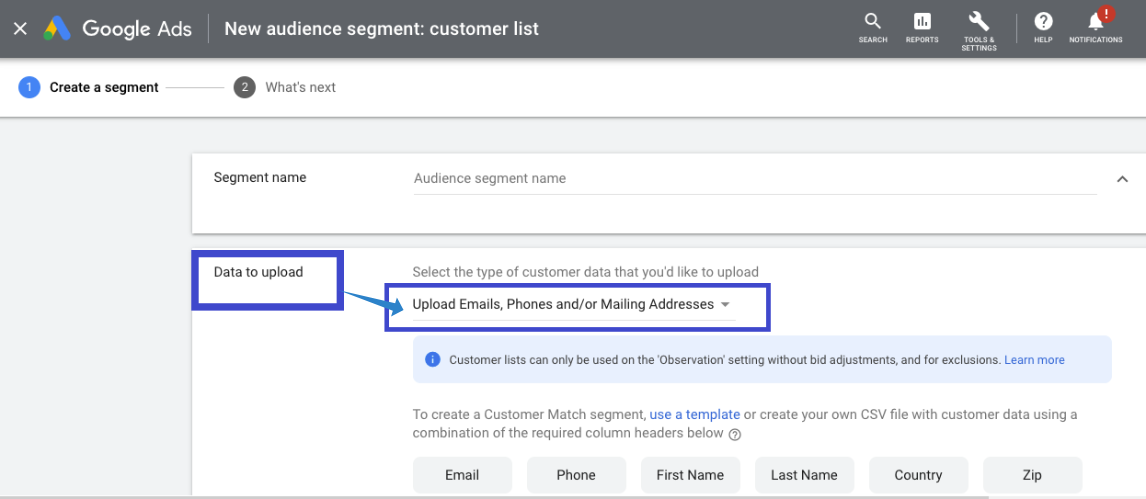
 * Click on the blue plus button (+) and select Customer list.
 * Upload your CSV file: On Data to Upload, select Upload Emails, Phones and/or Mailing Address. You will be asked to select the CSV file and to map the columns in your CSV to the required fields in Google Ads.
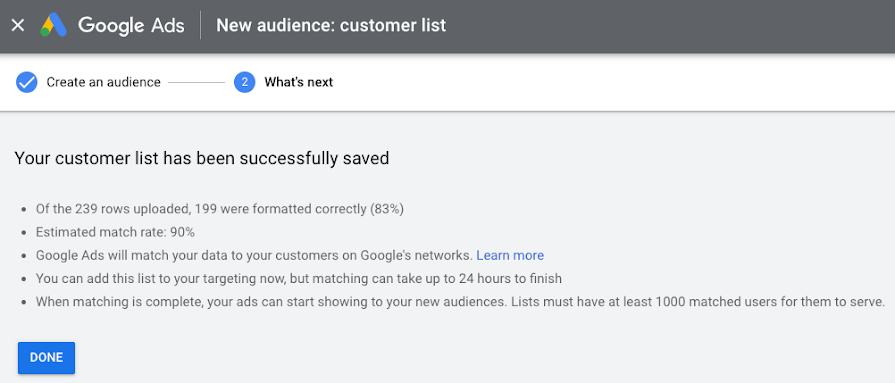
 * Give your audience a name, and agree to the terms and conditions. Check the box 'This data was collected and is being shared with Google in compliance with Google's Customer Match policies'.
