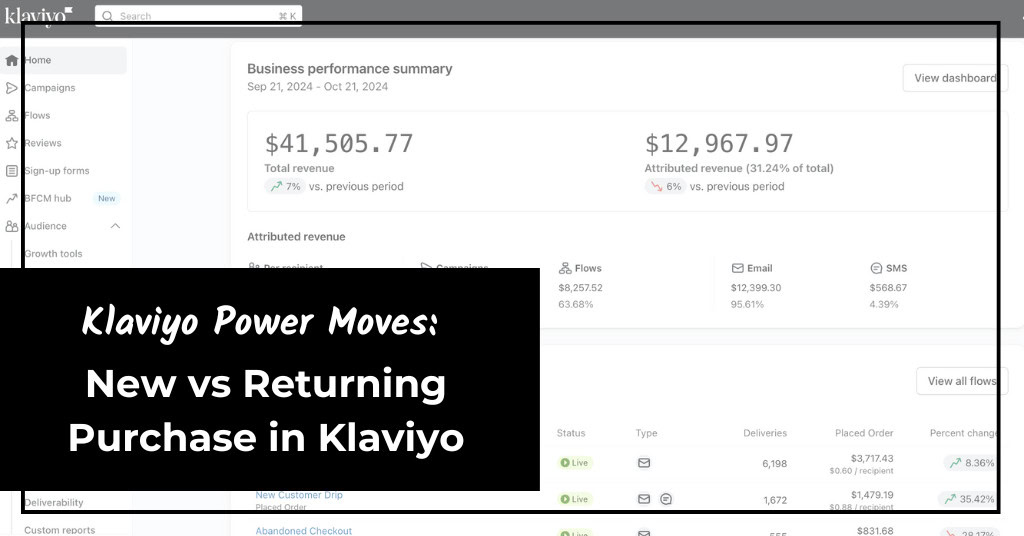
It takes an average of 2 to 3 purchases for a DTC business to break even or start making a profit on the cost to acquire a customer. So, making the most of those repeat customers is where the real growth happens.
To do that, you need to be able to segment new vs. returning purchases. This allows you to send the right message to the right customer at the right time, whether they’re a first-time buyer or a loyal repeat shopper.
By digging into order metrics, you can generate detailed reports, set up personalized flows, and even identify returning visitors that might otherwise go unnoticed.
With Customers.ai and Klaviyo, you’ll capture more return visitors and ensure those high-value customers don’t slip through the cracks—even if Klaviyo’s cookie expires.
We’ll show you exactly how to make this work, just like we’ve done for dozens of clients using Customers.ai’s anonymous visitor identification in Klaviyo.
Jump to each section below or continue reading for the full breakdown of how to supercharge your new vs. returning customer strategies with Klaviyo:
- Part 1: How to Trigger Flows to Repeat Shoppers
- Part 2: How to Segment Customers in New vs Returning Purchase Klaviyo Flows
- Part 3: How to Generate Reports for New vs Returning Purchases with Klaviyo
1. How to Trigger Flows to Repeat Shoppers
For businesses looking to target their repeat shoppers, triggering automated flows can be a powerful way to engage and drive repeat purchases.
There are two main ways you can set up these flows: using Klaviyo directly or leveraging the advanced capabilities of Customers.ai in combination with Klaviyo.
Method 1: Standard Klaviyo Setup
Setting up flows in Klaviyo is pretty straightforward, but there are several steps you’ll need to follow to make sure everything is set up correctly.
While Klaviyo’s intuitive interface makes it easy to build automated flows, especially for repeat shoppers, it’s important to ensure each step is completed properly for the best results.
Here’s a step-by-step breakdown on how to trigger flows for repeat shoppers:
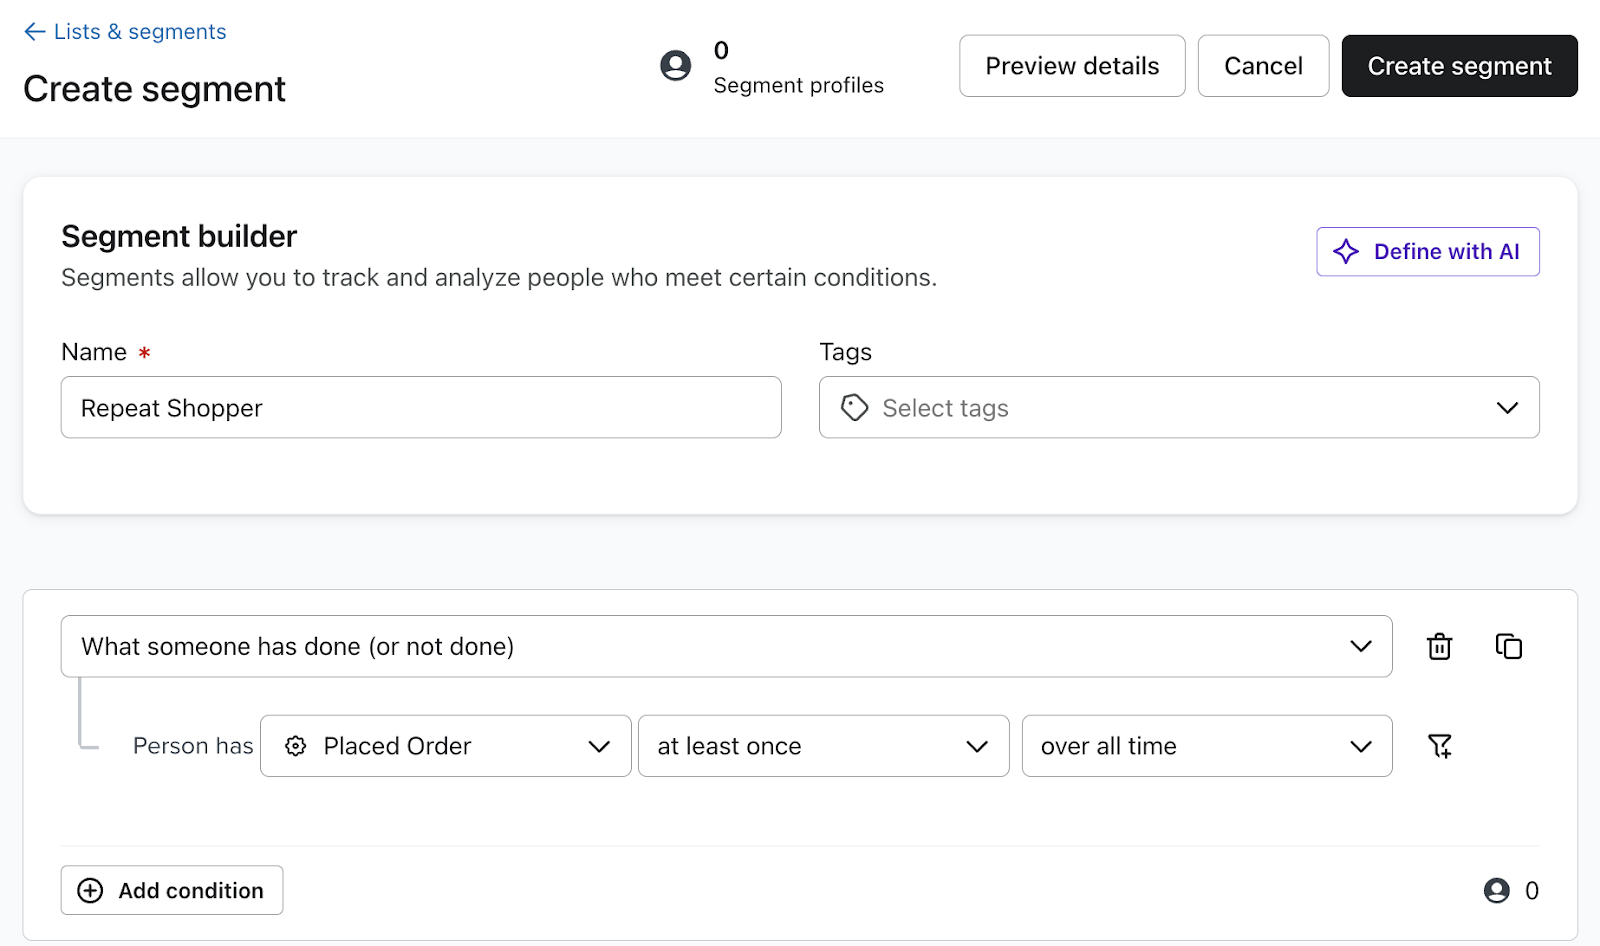
1. Create a Segment for Repeat Shoppers
- Go to Lists & Segments.
- Click Create List/Segment and select Segment.
- Set the conditions to define repeat shoppers. For example:
- Condition 1: Placed Order at least once over all time.
- Condition 2: Placed Order at least twice over all time.
- Add any other filters, such as date ranges, specific product categories, or order values.
- Name the segment (e.g., “Repeat Shoppers”) and save it.
2. Build a Flow for Repeat Shoppers
- Go to Flows.
- Click Create Flow.
- Choose to start from scratch or use a pre-built flow template. For a repeat shopper flow, starting from scratch can be best to customize for your needs.
- Name the flow (e.g., “Repeat Shopper Flow”) and click Create Flow.
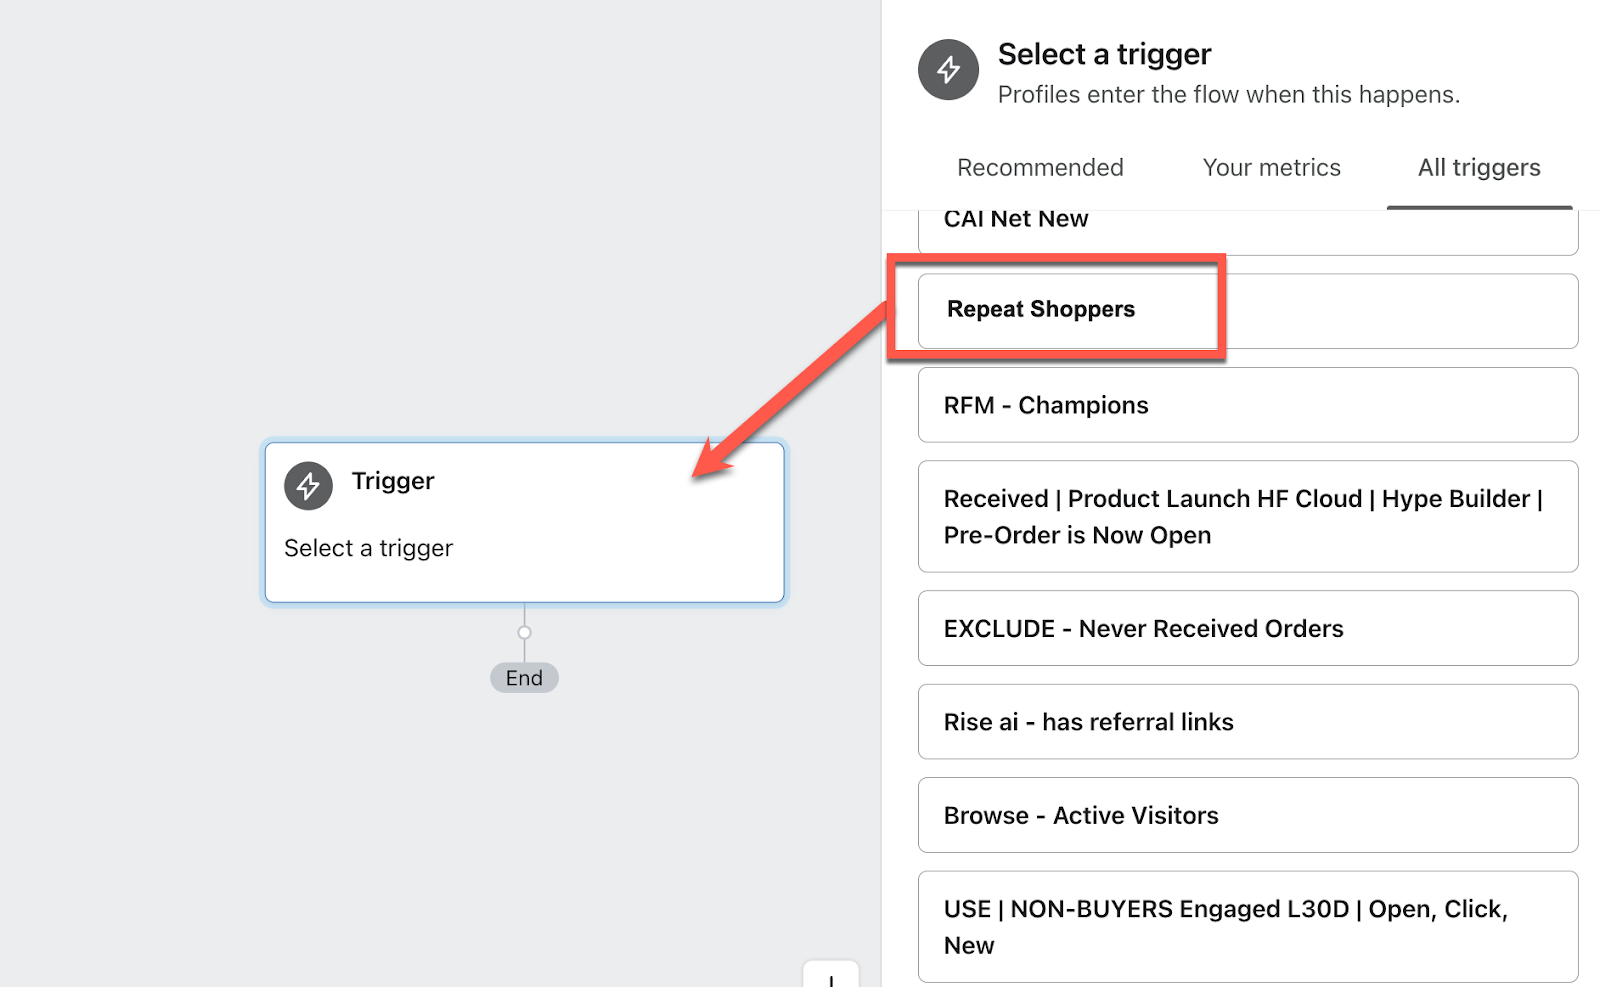
3. Set the Flow Trigger
- In the flow builder, click Trigger.
- Select Segment as the flow trigger.
- Choose the segment you just created (e.g., “Repeat Shoppers”).
- You can also refine the trigger to ensure the flow only starts when they place another order or hit a specific event related to shopping.
4. Add Emails or Other Actions to the Flow
- After the trigger, add emails or other actions (like SMS or conditional splits).
- You might start with a thank-you email, followed by product recommendations, or even offer a loyalty discount.
- Drag and drop email actions into the flow.
5. Personalize the Flow
- Use dynamic content to make the emails personal for each repeat shopper.
- Add product recommendations based on past purchases.
- Include personalized discounts or incentives for future purchases.
- Use conditional splits to show different emails based on behaviors (e.g., whether they purchased a specific product or category).
6. Set Time Delays
- Add delays between emails to space out your communications. For example, send the first email right after their second purchase, and follow-up emails after 3, 7, or 14 days depending on the goal of your flow.
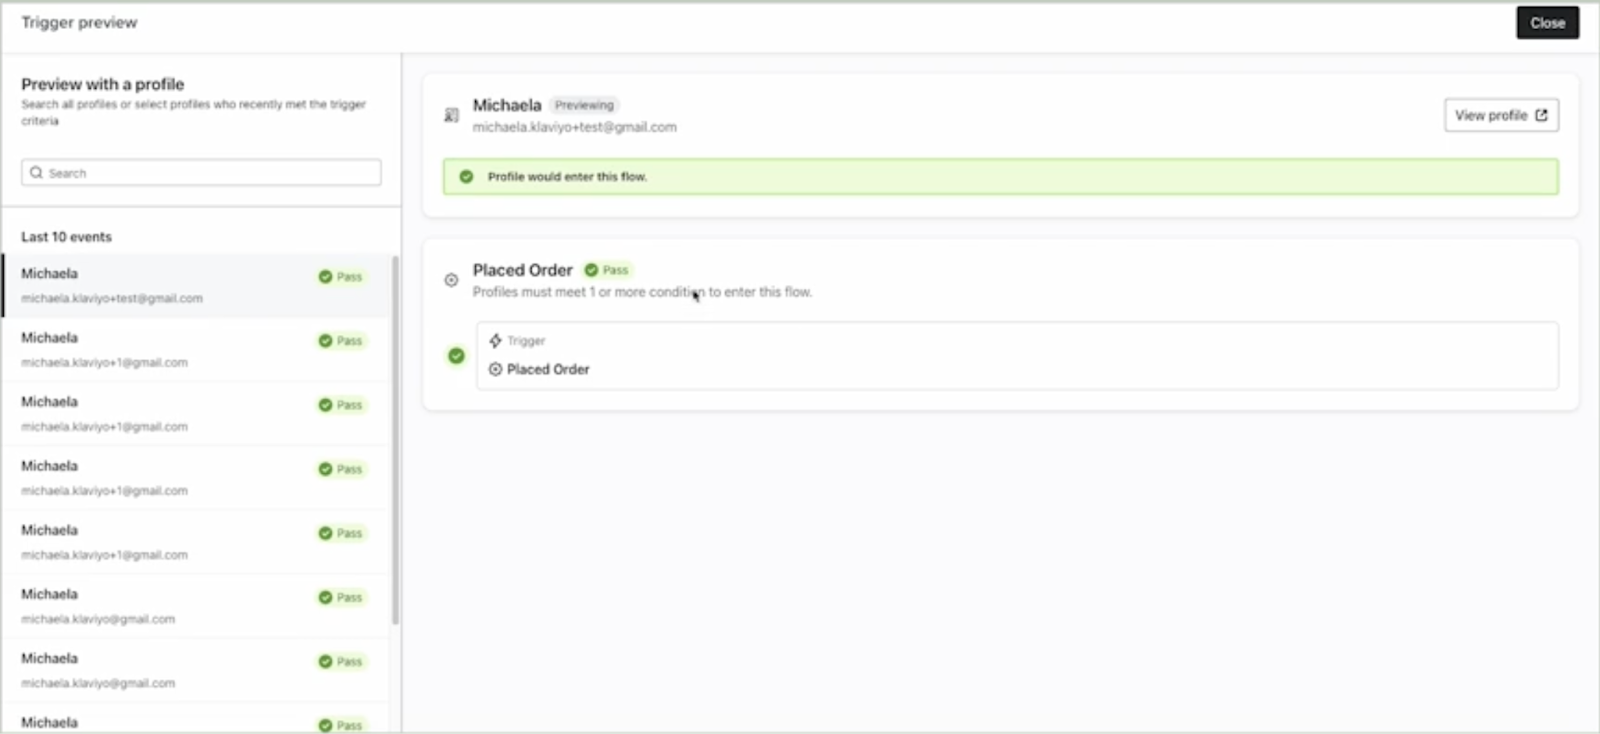
7. Preview and Test
- Preview each email to ensure the dynamic content works.
Test the flow using Klaviyo’s Manual Flow Trigger to see how the flow behaves before sending it live.
8. Turn on the Flow
- Once satisfied with the setup, toggle the flow from Draft to Live.
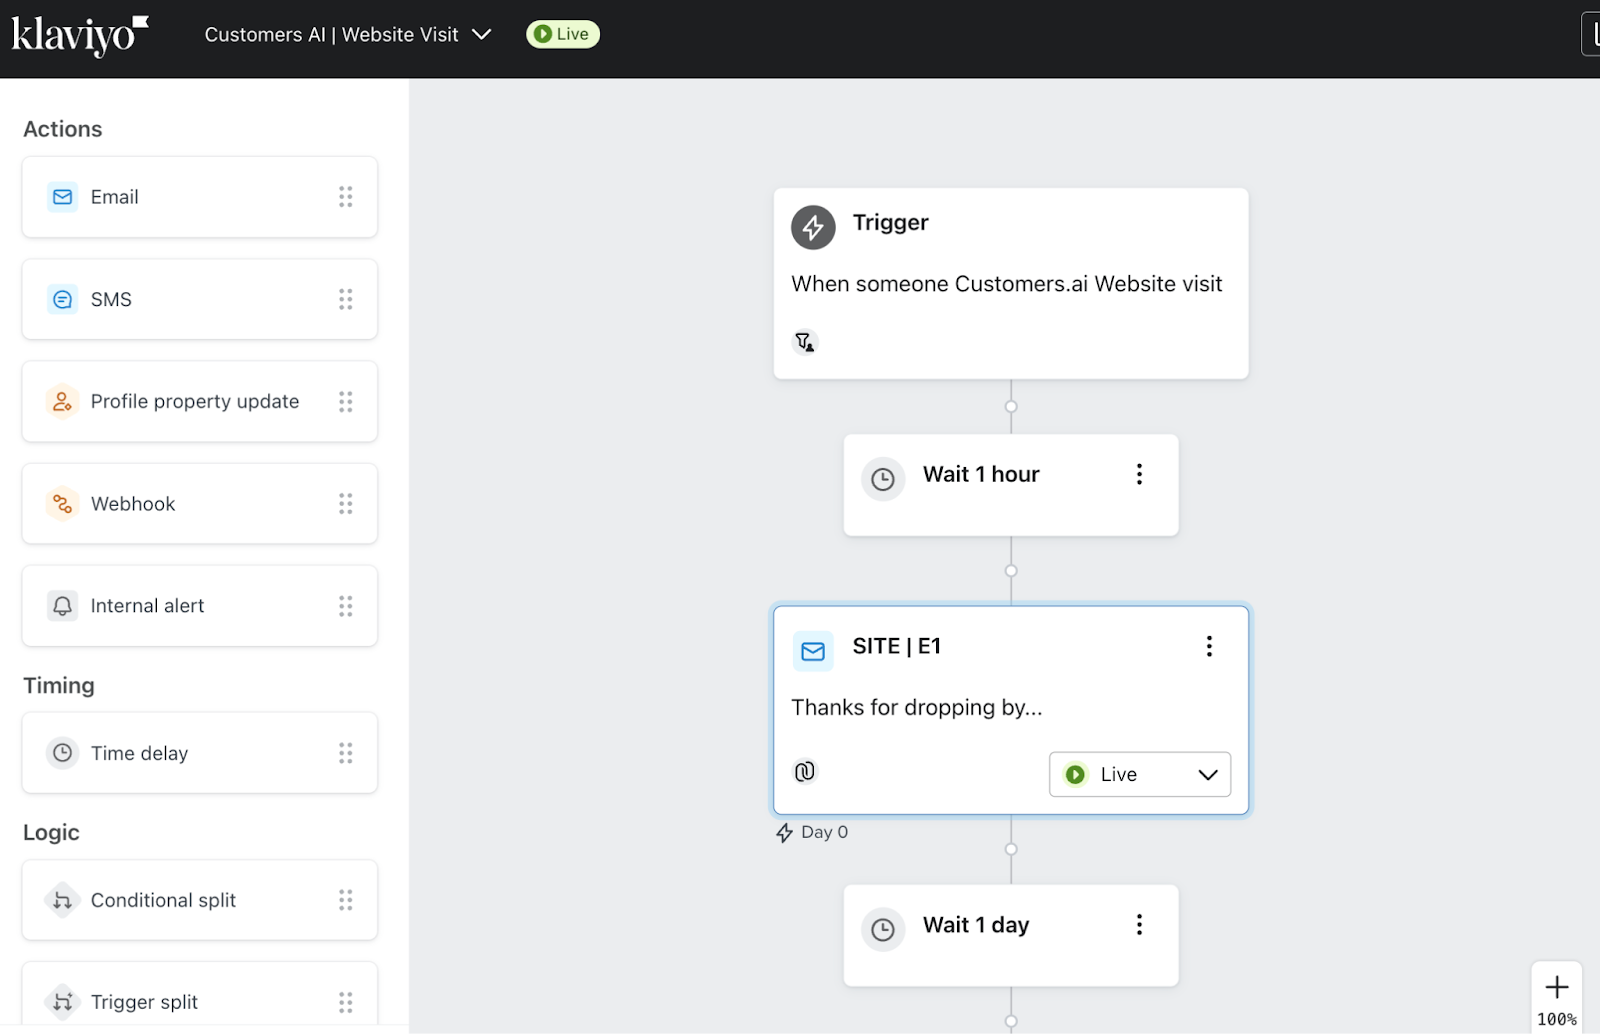
Method 2: Enhanced Setup with Customers.ai
While Klaviyo’s flow setup is effective, it has one major limitation—its cookies expire after 7 days.
This means that if a shopper returns to your site after a week or isn’t logged in, Klaviyo can no longer recognize them as a return shopper, causing missed opportunities for engagement and sales.
That’s where Customers.ai steps in.
Our Signal solution ensures you capture all of those visitors that Klaviyo misses and can put them into the right flow (or a custom one!).
Before we get into setting up Klaviyo, you need to ensure you have Customers.ai set up and are sending your audiences into Klaviyo.
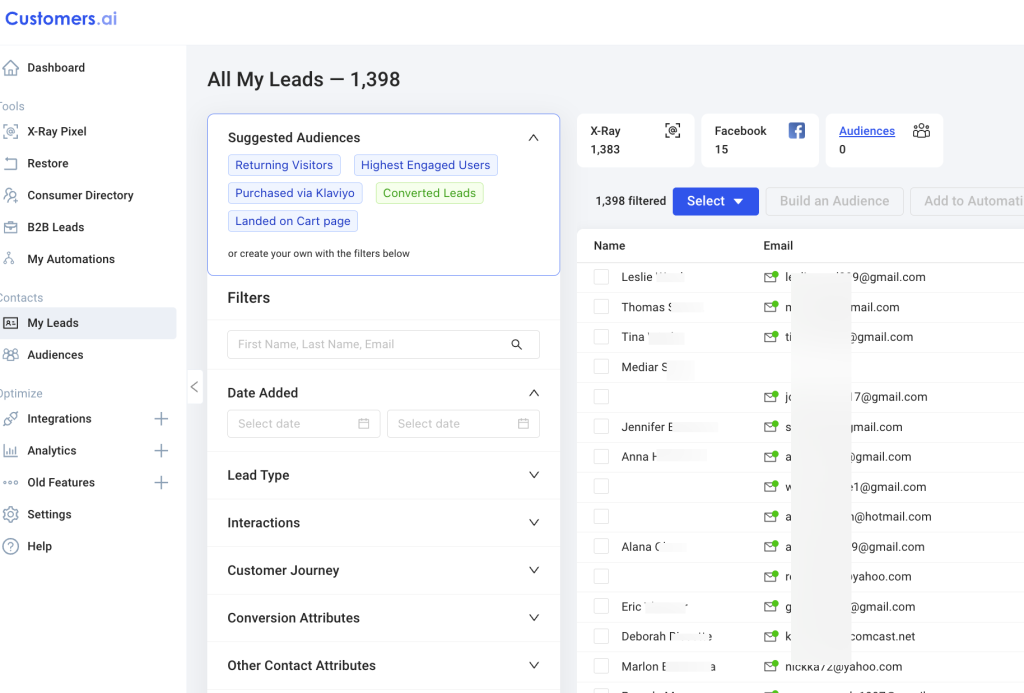
1. Sign up for a free account
If you don’t already have a Customers.ai account, you will want to start your free trial (no credit card is required) and connect your business.
2. Install the x-ray pixel on your site
Installing the website identification x-ray pixel is easy and can be done through Tag Manager, Shopify, WordPress, and more
3. Verify the x-ray pixel is firing
4. Start identifying your website visitors
Once the pixel is installed and verified, you can start identifying your website visitors.
5. Set up Signal in Customers.ai
To really get the most out of this, you need to ensure Signal is set up and syncing to Klaviyo. This can be done in the integrations tab, under Klaviyo.
Turn on Signal and add in the key events you want to trigger. The key with this is not to sync just everything, but to sync your high-intent visitors. The people who when they do return, are more likely to make a purchase.
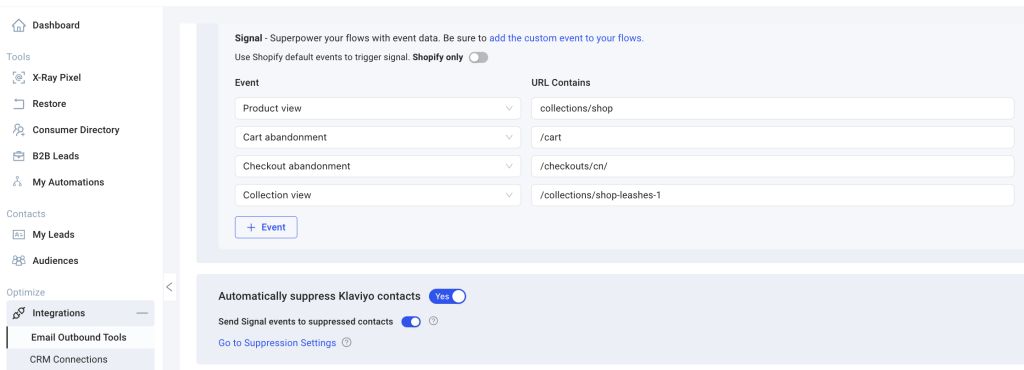
Once you have Signal on, we get to the Klaviyo set up. In Klaviyo, you will want to do the following:
1. Create a Segment for Return Visitors
- Go to Lists & Segments.
- Click Create List/Segment and select Segment.
- Set the conditions to capture Customers.ai Return Visitors.
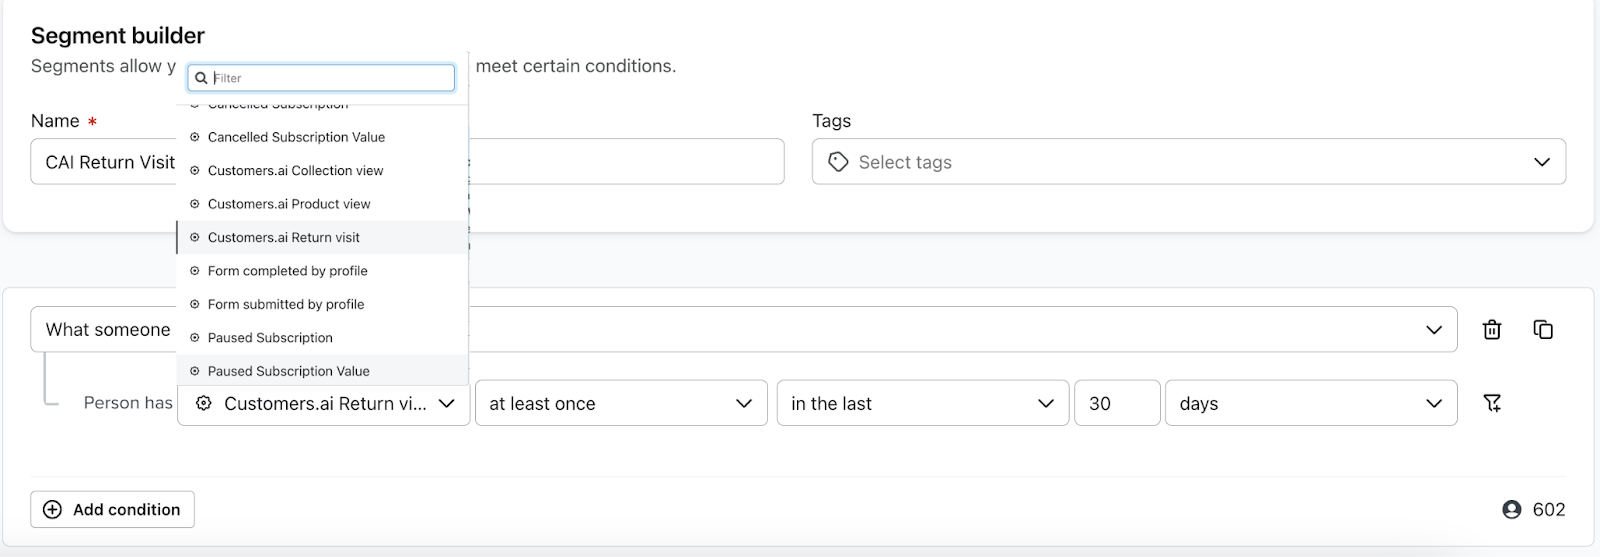
- Add any other filters, such as date ranges, specific product categories, or order values.
- Name the segment (e.g., “CAI Return Visitors”) and save it.
2. Build a Flow for Repeat Shoppers
- Go to Flows.
- Click Create Flow.
- Choose to start from scratch or use a pre-built flow template.
- Name the flow (e.g., “CAI Return Shopper Flow”) and click Create Flow.
3. Set the Flow Trigger
- In the flow builder, click Trigger.
- Select Segment as the flow trigger.
- Choose the segment you just created (e.g., “CAI Return Visitors”).
- You can also refine the trigger to ensure the flow only starts when they hit a specific event.
4. Add Emails or Other Actions to the Flow
- After the trigger, add emails or other actions.
- You might start with a welcome back email, followed by product recommendations, or even offer a loyalty discount.
- Drag and drop email actions into the flow.
As you can see, this is very similar to your traditional return shopper flow BUT you are capturing way more people!
2. How to Segment Customers in New vs Returning Purchase Klaviyo Flows
Once you have your flows set up, the possibilities for segmenting new and returning visitors are endless.
By using Klaviyo’s powerful segmentation tools (along with Customers.ai audiences), you can go beyond the basics and create personalized experiences that resonate with your audience.
Whether it’s tailoring your messaging, offering exclusive incentives, or re-engaging lapsed customers, understanding how to effectively segment new vs. returning shoppers can significantly boost your conversions and customer loyalty.
Let’s dive into three key strategies for segmenting customers in new vs. returning purchase flows.
A. Tailor Welcome Flows for New Customers and Welcome Back Flows for Returning Shoppers
New customers should be welcomed with an introduction to your brand, product highlights, and perhaps an exclusive discount to encourage a first purchase.
For returning customers, a “welcome back” flows that acknowledge their loyalty and rewards them for coming back can be a huge asset.
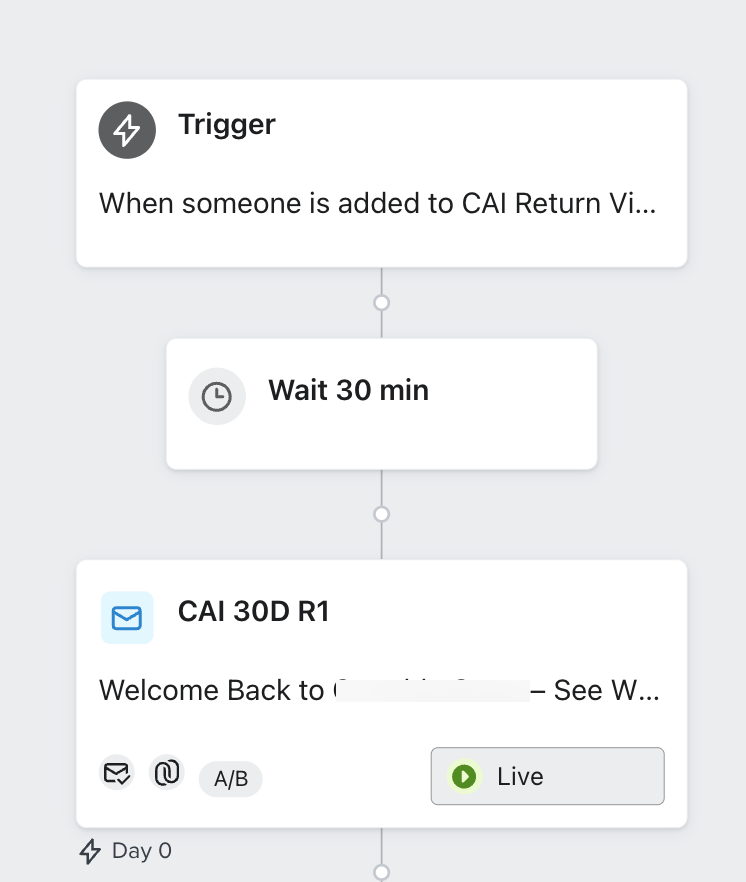
Here’s what a flow could look like for a return visitor after 30 days of inactivity:
- Trigger:
- This flow is triggered when a returning customer revisits your site or places an order after 30 days of inactivity (you can adjust the time frame based on your customer cycle).
- Use Customers.ai to help recognize returning visitors even if Klaviyo’s cookies have expired.
- Email 1: Welcome Back + Personal Thank You
- Subject: “Welcome Back! We’ve Missed You!”
- Content: Acknowledge their return with a friendly message that makes them feel appreciated. Thank them for being a loyal customer, and offer a small incentive (e.g., 10% off their next purchase). Include personalized product recommendations based on their past shopping behavior.
- Send Time: Immediately after the trigger.
- Email 2: Special Offer for Loyal Customers
- Subject: “Your Loyalty Deserves a Reward!”
- Content: Offer an exclusive deal, like early access to a new product or a loyalty program invitation. Highlight their previous purchases and suggest products they might love based on those.
- Send Time: 2-3 days after the first email if no purchase is made.
- Email 3: Gentle Reminder + Final Offer
- Subject: “Still Here for You! Don’t Miss Your Exclusive Offer”
- Content: Remind them of the offer you sent and how it’s still available. Use urgency (e.g., “Offer expires in 48 hours”) to encourage action. Reinforce their loyalty by mentioning their past support and why they’re a valued customer.
- Send Time: 5-7 days after the second email if no purchase is made.
This “welcome back” flow re-engages returning customers by acknowledging their loyalty and rewarding them with personalized offers.
B. Use Purchase History to Drive Flow Customization
Leverage customer purchase history to create targeted messaging.
For first-time buyers, your flows should focus on educating them about your brand and showcasing popular products.
For returning customers, highlight products that complement their previous purchases or introduce them to new arrivals. Personalized recommendations based on their shopping behavior will increase engagement.
Here’s a potential flow based on a purchase from a specific category and geared towards cross-sells and upsells.
- Trigger:
- This flow is triggered when a customer makes a purchase in a specific category (e.g., skincare products, home decor, electronics).
- Use the purchase history to suggest complementary products that enhance their experience or fill a gap in what they’ve bought.
- Email 1: Product Use Tips + Complementary Products
- Subject: “Maximize Your [Product] Experience!”
- Content: Provide tips on how to best use the product they purchased, enhancing their experience and showing that you care about their satisfaction. At the same time, recommend complementary products that would make their purchase even better (e.g., a protective case for electronics, a serum to go with a skincare purchase).
- Send Time: 2 days after the purchase is confirmed.
- Email 2: Cross-Sell Product Offer
- Subject: “Complete Your Collection with [Recommended Product]”
- Content: Highlight products that other customers frequently buy together with their purchase, offering a limited-time discount or bundle offer. Use their purchase history to customize this email to the specific products or category they are interested in.
- Send Time: 5 days after the first email.
- Email 3: Upsell to Premium Product
- Subject: “Upgrade Your Experience with [Premium Product]”
- Content: Encourage the customer to consider an upgrade or premium version of a related product. For example, if they bought a basic version, introduce a more advanced product that enhances their original purchase.
- Send Time: 7-10 days after the second email, if no action has been taken.
This flow leverages a customer’s purchase history to deliver personalized recommendations that align with what they’ve already bought.
Plus, by suggesting cross-sell and upsell opportunities, you can increase the average order value while keeping the content highly relevant.
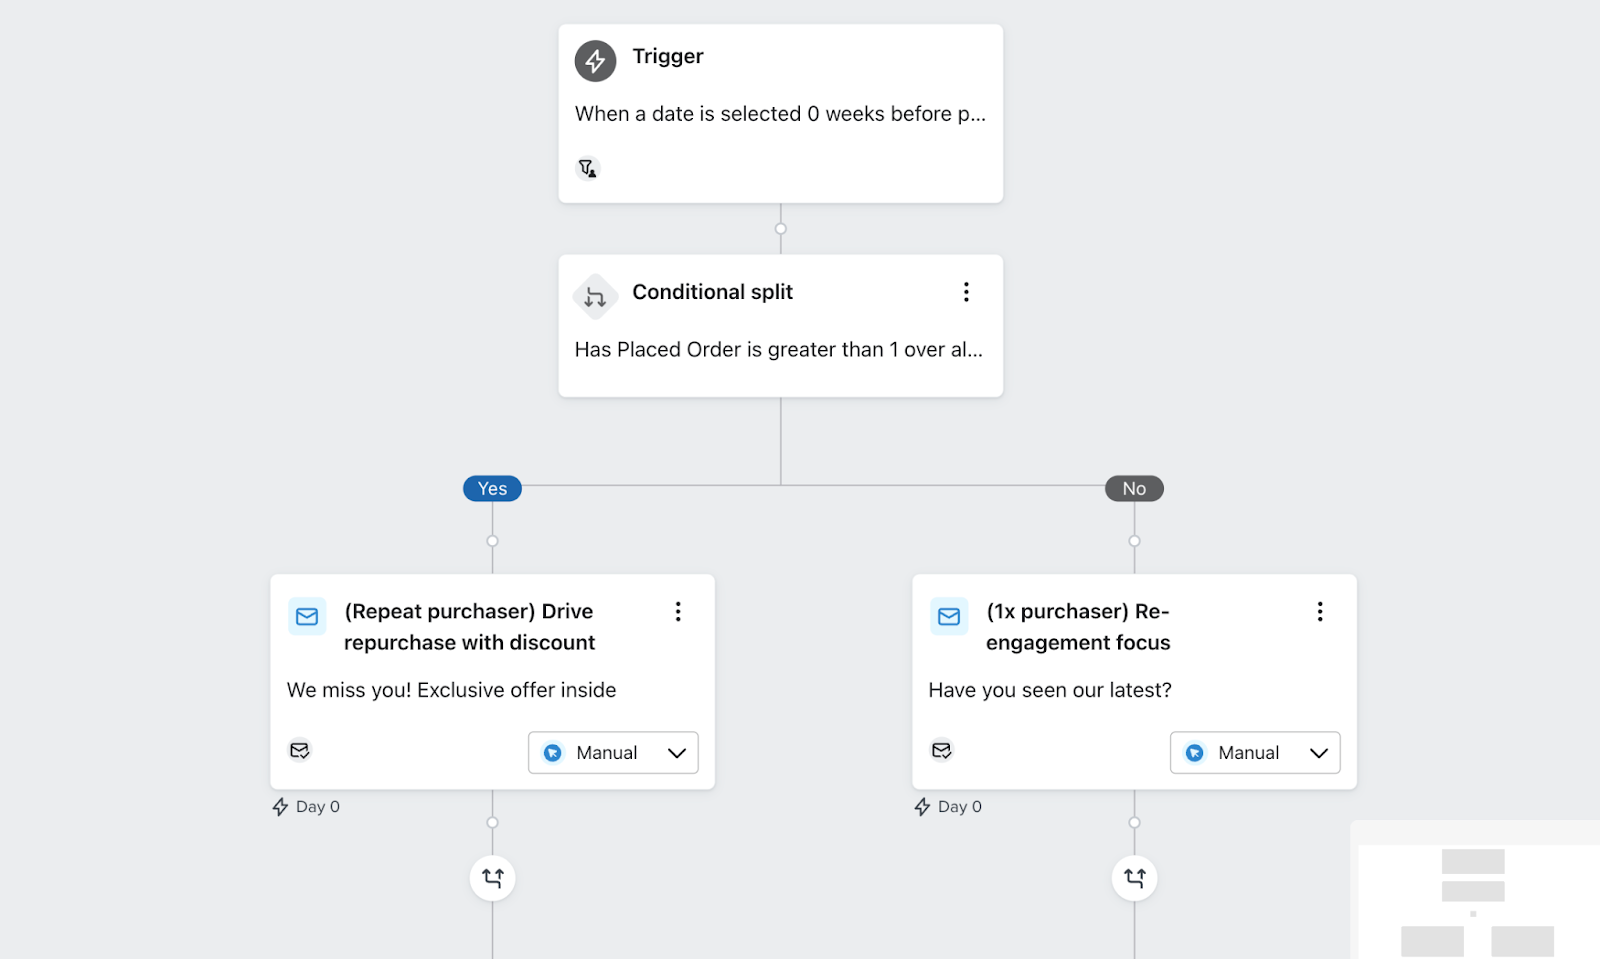
C. Incorporate Conditional Splits Based on Engagement
We all know that not all customers engage the same way. In both your new and returning customer flows, include conditional splits that adjust messaging based on user behavior.
For example, here is a conditional splits flow for a new customer:
- Trigger:
- This flow is triggered after a customer makes their first purchase. The goal is to nurture them into becoming a repeat customer, with messaging tailored based on how they engage with the flow.
- Email 1: Welcome & Thank You
- Subject: “Welcome to [Brand]! Here’s What You Can Expect”
- Content: A warm welcome email thanking them for their first purchase, introducing your brand story, and setting expectations (e.g., shipping details, customer support). Include a call to action to visit your site or explore other products.
- Send Time: Immediately after the purchase is confirmed.
- Conditional Split 1: Did They Open the First Email?
- Yes: If the customer opened the email, send a follow-up with more detailed information about your products, encouraging them to explore more on your site.
- Email 2A: Explore Our Bestsellers
- Subject: “Customers Love These – We Think You Will Too!”
- Content: Highlight popular products or new arrivals that match their first purchase. Offer a discount for a repeat order.
- Send Time: 3-4 days after the first email.
- Email 2A: Explore Our Bestsellers
- No: If the customer didn’t open the email, follow up with a more attention-grabbing subject line and a clear CTA to visit your site or check out their purchase.
- Email 2B: Quick Reminder! Here’s What You Missed”
- Subject: “Forgot Something? Here’s Your Quick Guide to [Brand]”
- Content: Briefly remind them about their purchase and reinforce your brand’s key benefits or unique selling points. Keep it simple and offer an incentive (like free shipping) to encourage engagement.
- Send Time: 3-4 days after the first email.
- Email 2B: Quick Reminder! Here’s What You Missed”
- Yes: If the customer opened the email, send a follow-up with more detailed information about your products, encouraging them to explore more on your site.
- Conditional Split 2: Did They Click a Link?
- Yes: If they clicked a link, send a targeted offer to drive the second purchase.
- Email 3A: Exclusive Offer for New Customers
- Subject: “Your Exclusive Offer Awaits!”
- Content: Offer a time-sensitive discount on their next purchase to encourage a second order. Highlight products related to their first purchase.
- Send Time: 3-5 days after the second email.
- Email 3A: Exclusive Offer for New Customers
- No: If no clicks, focus on building trust by sharing social proof, such as customer reviews or success stories.
- Email 3B: See Why [Brand] Customers Keep Coming Back
- Subject: “Don’t Just Take Our Word For It!”
- Content: Share testimonials, reviews, or success stories to build confidence. Include a call to action to check out other products or learn more about your brand.
- Send Time: 3-5 days after the second email.
- Email 3B: See Why [Brand] Customers Keep Coming Back
- Yes: If they clicked a link, send a targeted offer to drive the second purchase.
- Final Nurture Email
- Send a final email offering support, FAQs, or guidance on how to use the product they purchased.
- Email 4: Need Help or Have Questions?
- Subject: “We’re Here for You!”
- Content: Offer helpful resources like product tutorials, FAQs, or customer support contact info. Build a sense of customer care and encourage engagement through a final discount or product recommendation.
A return customer on the other hand, might look something like this:
Both flows use conditional splits based on customer engagement, ensuring that your messages are relevant and timely.
By responding to their actions (or lack thereof), you can tailor the experience and nurture new customers toward a second purchase or deeper engagement with your brand.
Each of the flows outlined above can get you started with segmenting customers into new vs. returning purchase flows in Klaviyo.
By customizing your messaging based on how customers engage, you’ll create a more personalized experience that helps turn first-time buyers into loyal, repeat customers.
3. How to Generate Reports for New vs Returning Purchases with Klaviyo
Understanding the difference between new and returning customers is really important for tracking sales and optimizing your marketing.
New customers might need more attention, while returning customers are usually closer to making another purchase.
Klaviyo lets you generate reports that break down these two groups, and when you combine it with Customers.ai, you can capture even more data, especially from visitors who might be missed.
Here are a few tips along with some example reports to help keep your sales on track.
A. Track Revenue Split Between New and Returning Customers
Understanding how much of your revenue comes from first-time buyers versus repeat customers can help you allocate your marketing spend more effectively.
If most of your sales come from new customers, you might focus more on acquisition. If returning customers drive revenue, focus on retention strategies.
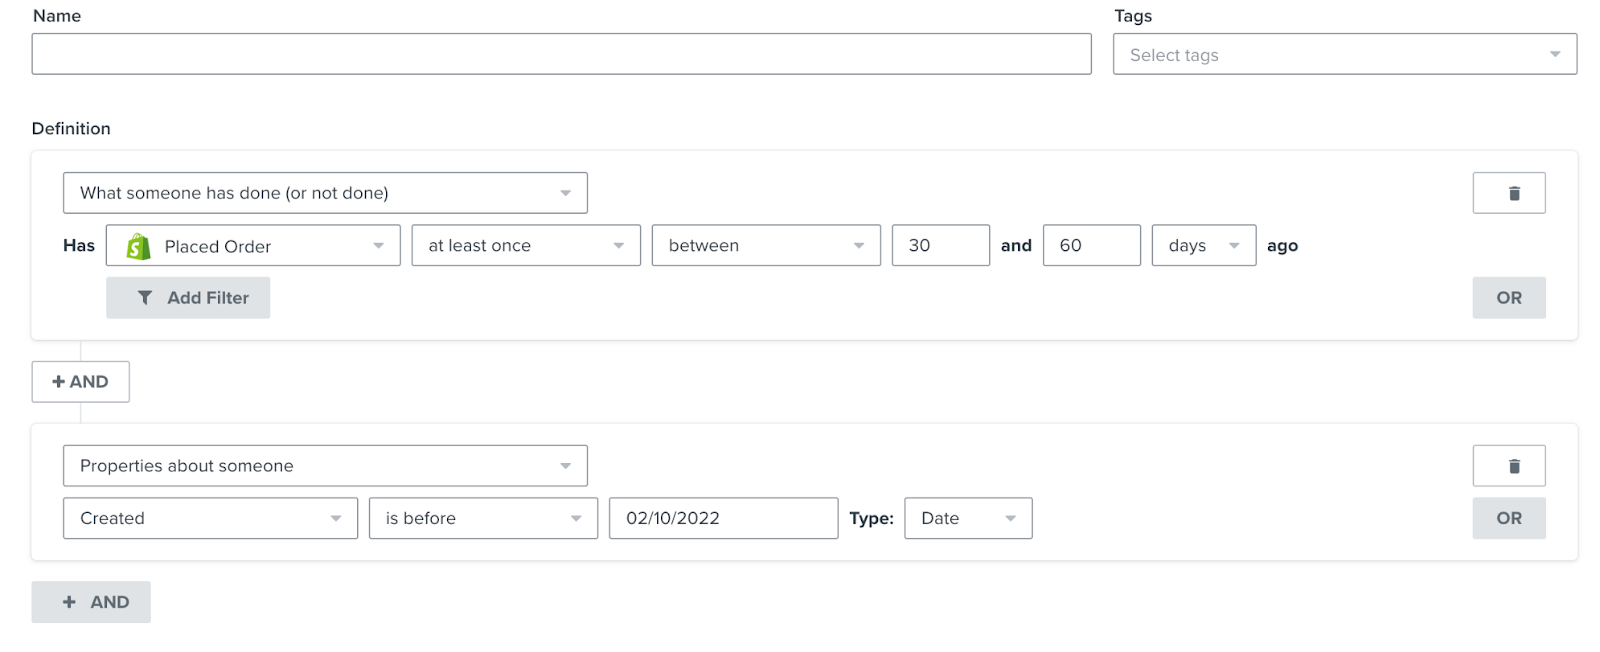
To view revenue breakdown by new vs. returning customers, you will want to set up the following report:
- Go to Analytics in Klaviyo and select Custom Reports.
- Choose Placed Order as the primary metric.
- Set up a filter for New Customers by defining a segment for people who have placed exactly 1 order.
- Create another filter for Returning Customers by defining a segment for people who have placed more than 1 order.
- Generate the report to see a side-by-side comparison of revenue from new vs. returning customers over a specific time period.
According to Klaviyo, there is another way to see this – Metrics tab in Analytics > Placed Order and utilize the ‘Advanced Filter’ Options in this tab. There is a New/Returning view you can add and then customize the time frame.
B. Measure Customer Lifetime Value (CLV) for Better Insights
CLV reports give you a clearer picture of how much value each customer brings over time, allowing you to see how repeat customers contribute to overall revenue growth.
By comparing new and returning customers, you can identify which group provides more long-term value and adjust your retention strategies accordingly.
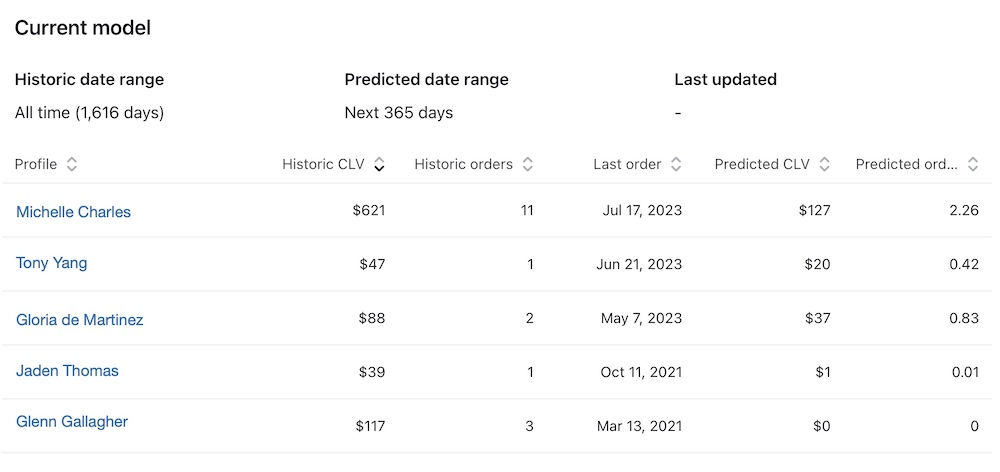
Here are 5 steps to measure customer lifetime value (CLV) in Klaviyo:
Note: You should have created your segments for new and returning customers in the previous report. Now, let’s use those segments to measure Customer Lifetime Value (CLV) and gain deeper insights into your customers’ behavior.
Step 1: Go to Analytics
- Navigate to Analytics in the sidebar.
- Select Customer Lifetime Value from the available report types.
Step 2: Choose the Date Range
- Set a relevant date range for your report, depending on how far back you want to track CLV (e.g., last 30 days, last quarter, or the last year).
Step 3: Filter by New and Returning Customer Segments
- Apply a Segment Filter for New Customers to view CLV for first-time buyers.
- Create a separate report using the Returning Customers segment to view CLV for those who have made repeat purchases.
Step 4: Review and Compare Results
- After generating both reports, compare the Customer Lifetime Value for new vs. returning customers.
- This will show you how much revenue each segment generates over time.
- Use this information to identify opportunities to increase CLV, especially for new customers, by adjusting your marketing strategies.
Step 5: Export or Save the Report
- Once the report is generated, you can export it as a CSV or PDF for deeper analysis or sharing with your team.
- If needed, save the report in Klaviyo to easily track CLV over time for new and returning customer segments.
C. Use Cohort Analysis to Understand Retention Trends
Cohort analysis helps you see how different customer segments (e.g., new customers in Q1 vs. Q2) behave over time.
Comparing the behavior of new customers against returning customers can help you spot retention trends and figure out when customers are most likely to drop off or come back.
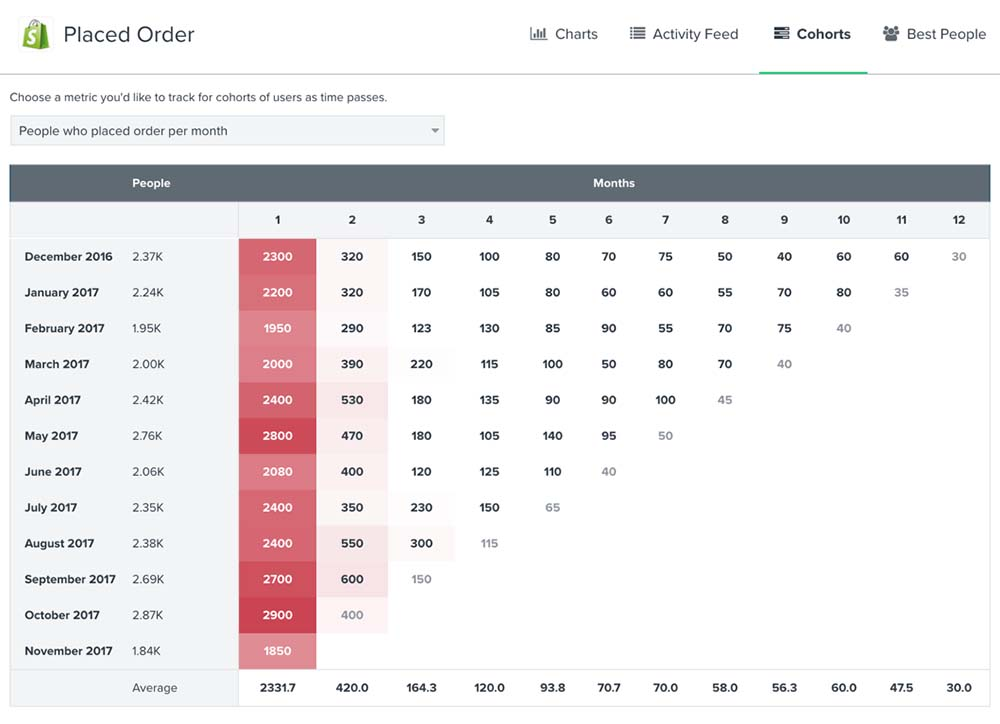
Here are the steps to set up cohort analytics in Klaviyo:
Step 1: Navigate to Analytics
- In Klaviyo, go to the Analytics tab on the left-hand sidebar.
- Select Cohort Analysis from the list of available report types.
Step 2: Choose Your Metric
- Under the Metric dropdown, select Customer Retention.
- This will track how well you’re retaining customers over time based on their first purchase and follow-up purchases.
Step 3: Define Your Time Frame
- Choose a time frame for your cohort analysis (e.g., Last 30 days, Last 90 days, or a custom date range).
- You can set your cohorts to be grouped by week or month, depending on how detailed you want the data to be.
- Example: Group customers based on their first purchase month and track how many made repeat purchases in subsequent months.
Step 4: Apply Segment Filters
- If you have already created segments for New Customers and Returning Customers, you can apply these filters to your cohorts.
- Filter by New Customers to track how well you retain first-time buyers.
- Filter by Returning Customers to track their repeat behavior.
Step 5: Review the Cohort Report
- After generating the report, you’ll see a table or graph showing how each cohort (grouped by the time they made their first purchase) behaves over time.
- This will show how many customers in each cohort return for a second, third, or subsequent purchase.
- For example, you might see that 30% of new customers from January made another purchase in February, but only 15% made one by March.
Step 6: Use Insights to Improve Retention
- Based on the trends you see in your cohort analysis, adjust your retention strategies:
- If you notice a drop-off after a certain period, consider re-engagement campaigns or loyalty incentives.
- Compare different time periods to see if any changes in your marketing or product offerings correlate with improved retention.
By setting up cohort analysis, you can track how well you’re retaining customers over time and pinpoint when customer drop-off occurs, allowing you to take action to improve retention rates.
Wrap Up: Unlocking the Power of New vs Returning Purchase in Klaviyo
Segmenting new and returning customers in Klaviyo is key if you want to boost engagement and make the most out of every sale.
Whether it’s setting up personalized flows or digging into reports, these strategies help you really understand your customers and improve your marketing.
And by adding Customers.ai into the mix, you can capture even more returning visitors that Klaviyo might miss.
It’s an easy way to take your campaigns to the next level and keep your customers coming back again and again. Interested in learning more about how to maximize Klaviyo with Customers.ai?
Get a free Klaviyo audit and we’ll show you just how easy it is to capitalize on new and return customers.
See Who Is On Your Site Right Now!
Get names, emails, phone numbers & more.
Try it Free, No Credit Card Required
Important Next Steps
- See what targeted outbound marketing is all about. Capture and engage your first 500 website visitor leads with Customers.ai X-Ray website visitor identification for free.
- Talk and learn about sales outreach automation with other growth enthusiasts. Join Customers.ai Island, our Facebook group of 40K marketers and entrepreneurs who are ready to support you.
- Advance your marketing performance with Sales Outreach School, a free tutorial and training area for sales pros and marketers.