Facebook Messenger marketers have a new way to automatically stay in touch with customers on the messaging platform and it’s called “One-Time Notifications” (OTNs).
Forgive me while I gush, but OTNs have my bananas in a bunch because they are a totally FREE way to stay in touch with customers on the #1 messaging platform in the US, with 1.3 billion users around the world!
This is the complete guide to understanding Facebook Messenger One-Time Notifications:
- What are One-Time Notifications?
- How to set up One-Time Notifications in 3 quick steps
- Facebook Messenger One-Time Notification rules
Everything here is free to do using Customers.ai’s Free Forever special edition — designed to help your business stay connected with customers in the messaging apps they already use.
What are One-Time Notifications?
So what are Facebook one-time notifications? One-time notifications are one of several ways brands have to automatically message contacts in Messenger.
With one-time notifications, you can invite users to get an update from your Facebook Page when the update is available. Think price-drop alerts, back-in-stock alerts, tickets available for purchase and product launches.
You can invite people to sign up for a one-time update a bunch of ways like a checkbox or button on your website, a comment guard on your Facebook post or Send Message button on your Facebook page.
Here’s a button that will sign up you for a one-time time notification demo so you can see what it’s like:
And just in case you were curious, Facebook’s approved use cases for automated messaging include:
- One-time time notifications
- Replies within 24-hours
- Confirmed event notifications
- Account updates
- Purchase updates
- Subscription updates by news organizations
- Sponsored message ads
Now let’s jump in to the simple 3-step process for using one-time notifications for your Facebook Page.
How to set up One-Time Notifications in 3 quick steps
Here is how to use Facebook Messenger one-time notifications:
- Step 1: Apply for Facebook One-Time Notifications permissions.
- Step 2: Invite users to get a One-Time Notification in Messenger.
- Step 3: Send a One-Time Notification Messenger blast when you have an update to announce.
Use this video along with the step-by-step guide below to set up Facebook One-Time Notifications for your Page!
Ready for the play-by-play?
Step 1: Apply for Facebook One-Time Notifications permissions
Facebook requires a quickie application by a Facebook Page admin before giving permission to send One-Time Notifications. (Yes, Facebook can revoke this permission if you aren’t using OTNs right.)
Here’s how to apply for Facebook Messenger One-Time Notification permissions:
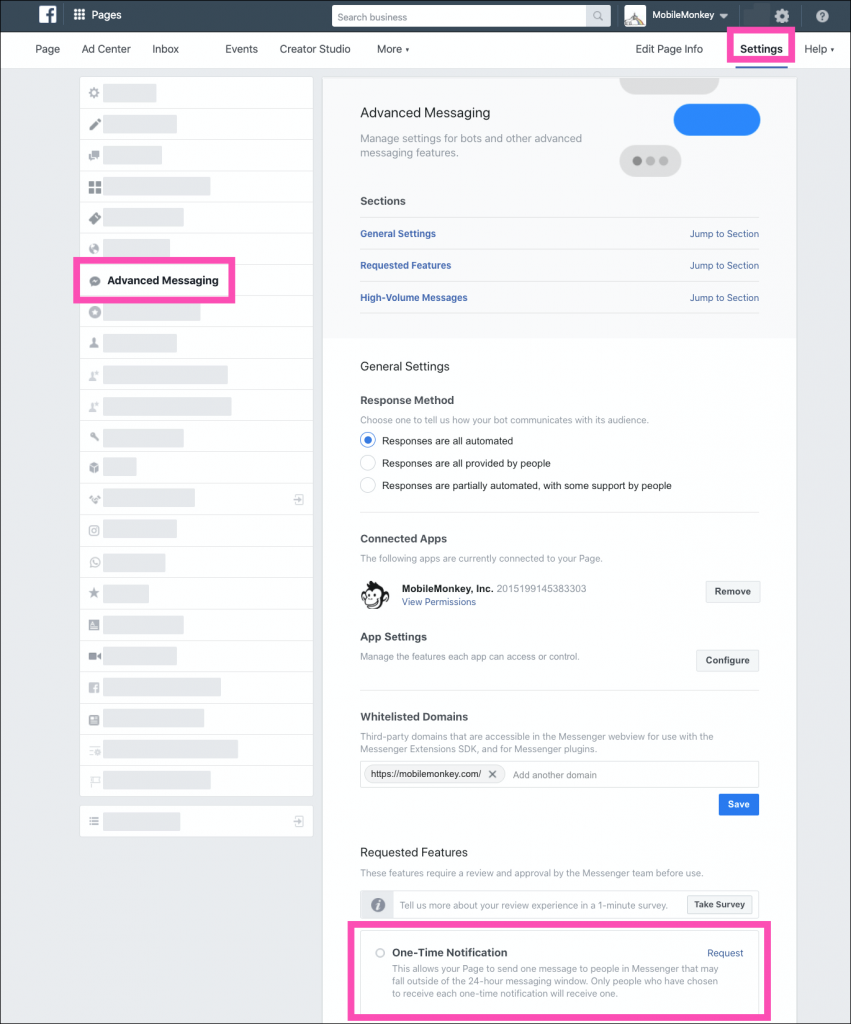
- Go to your Facebook Page Settings > Advanced Messaging. Find “Requested Features” and click the “Request” link next to One-Time Notification.
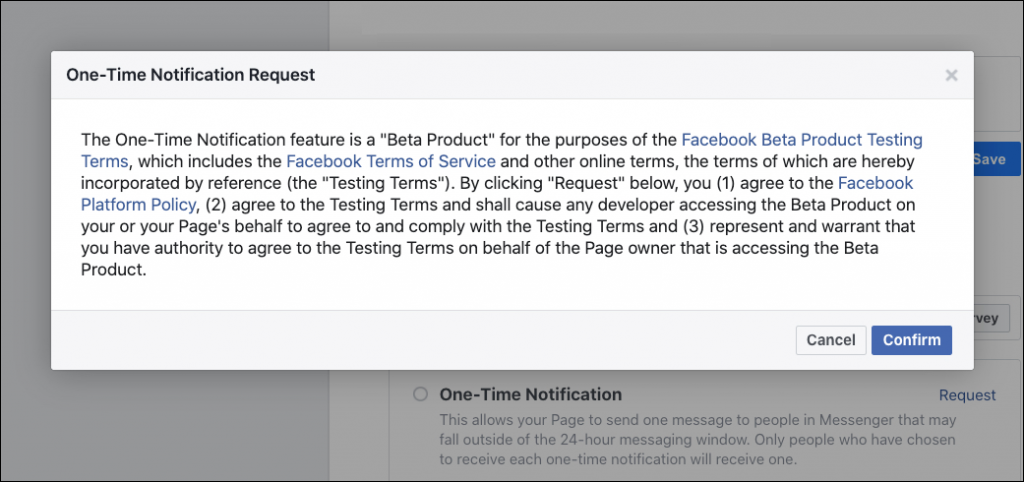
- Agree to the terms described by Facebook.
- Voila! You’re approved for One-Time Notifications.

Step 2: Invite users to get a One-Time Notification in Messenger
Say you’re planning a big launch and you want to do a bit of advanced promotion and excitement building.
You can connect an invitation for a One-Time Notification of the launch to any of a dozen Messenger bot connections — everything from:
- Buttons on landing pages
- Links in emails and social
- Facebook post comment guards
- “Send Message” button on your Facebook Page
- Facebook click-to-Messenger ads
So for our demo, let’s create a link to the One-Time Notification opt-in that we can link anywhere, like this button here:
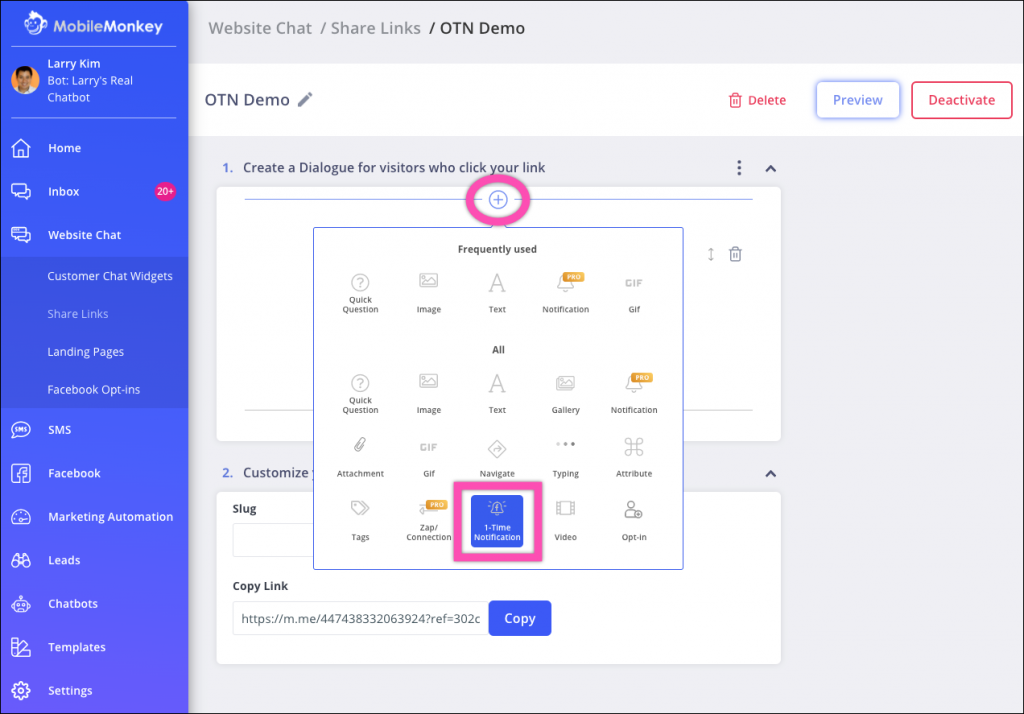
In Customers.ai, go to Website Chat > Share Links and create a new share link.
Add the 1-Time Notification widget to the Messenger dialogue your audience will see when they click on the link:
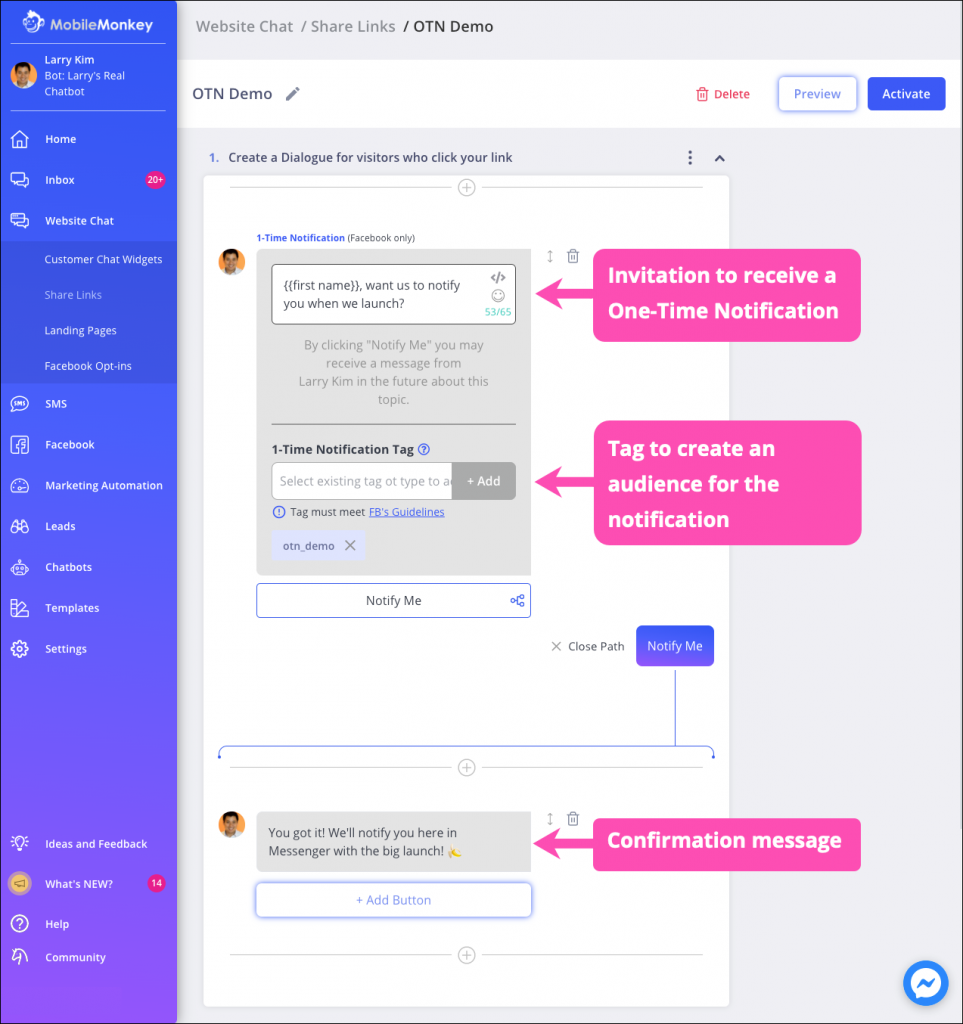
Fill out the three parts to the notification widget: the invitation text, the tag that you’ll use to create an audience to receive the notification, and the thank you confirmation message.
Copy and paste this link anywhere you want!
Step 3: Send a One-Time Notification Messenger blast
When you have an announcement or update, use the chat blaster to send a free message to everyone who signed up for the notification.
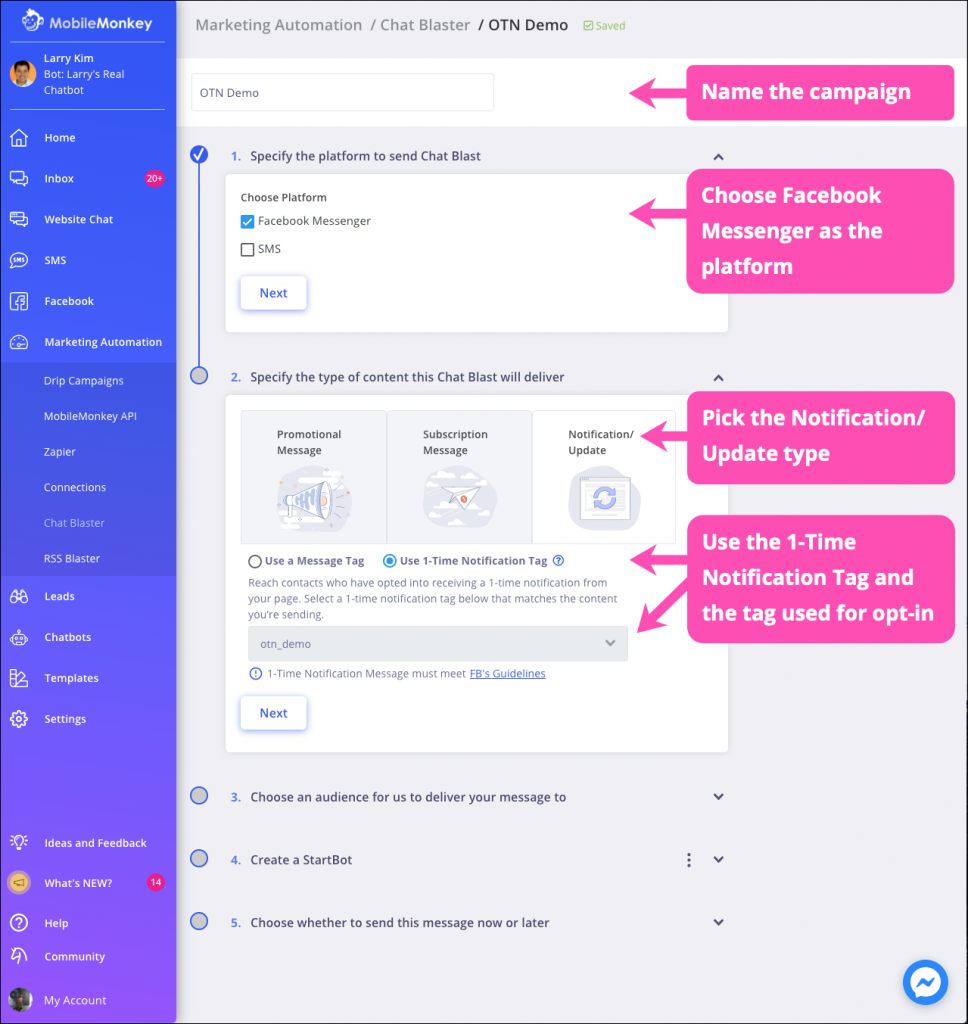
Go to Marketing Automation > Chat Blaster and create a New Chat Blast.
Name the campaign and build the one-time notification for Facebook Messenger.
Choose “Notification/Update” for the type of content and pick “Use 1-Time Notification Tag” from the tag options. Pick the tag you made for the OTN.
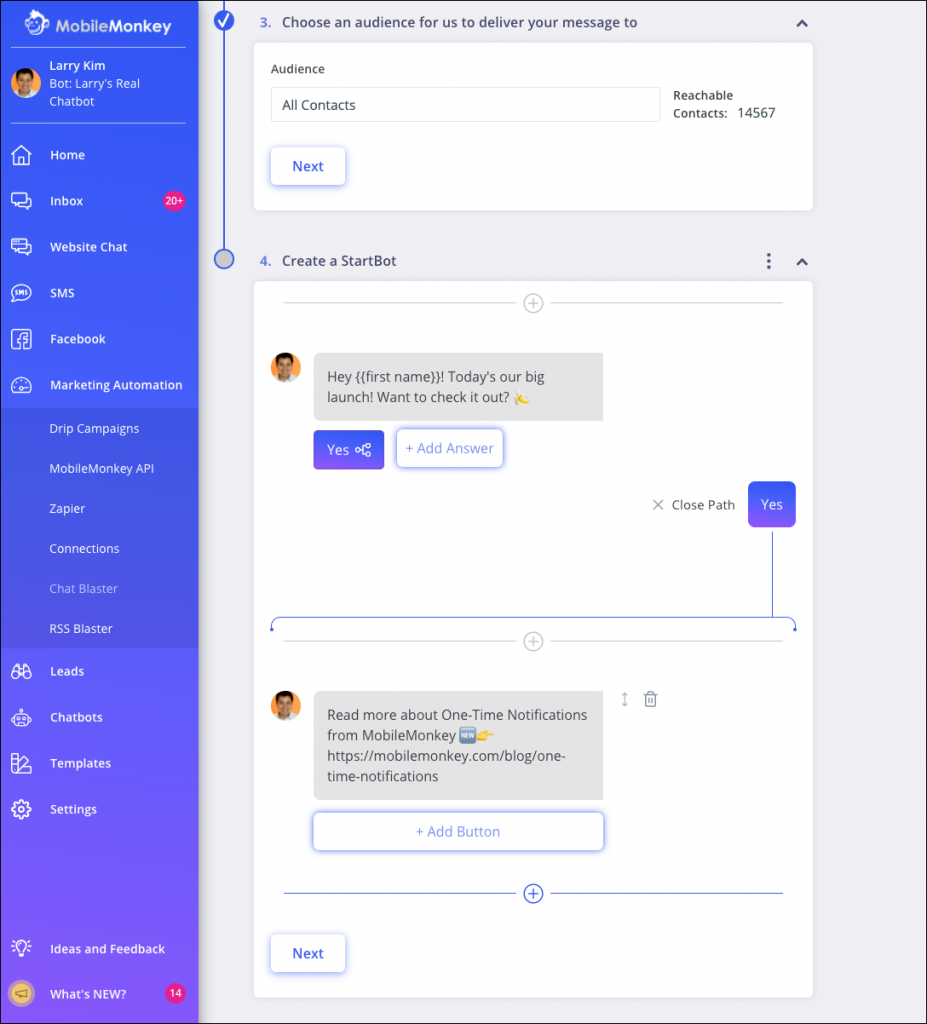
Pick the audience you want to receive the campaign. Customers.ai will automatically filter the audience for folks with the OTN tag on it.
For example, send the blast to your All Contacts audience and Customers.ai will send it to All Contacts with the OTN tag AND anyone who is available to message within the Facebook 24-hour reply window.
Now write your conversation blast, starting with a quick question widget to fire up an engagement from your reader — and open up that Facebook 24-hour window!
Last step: Send the blast or schedule it for the future!

Facebook Messenger One-Time Notification rules
As you get ready to use this exciting new way to reach folks for free on Facebook Messenger, here’s what you need to know about One-Time Notifications.
Customers.ai’s searchable Help Docs have an easy reference of Facebook’s policy for OTNs:
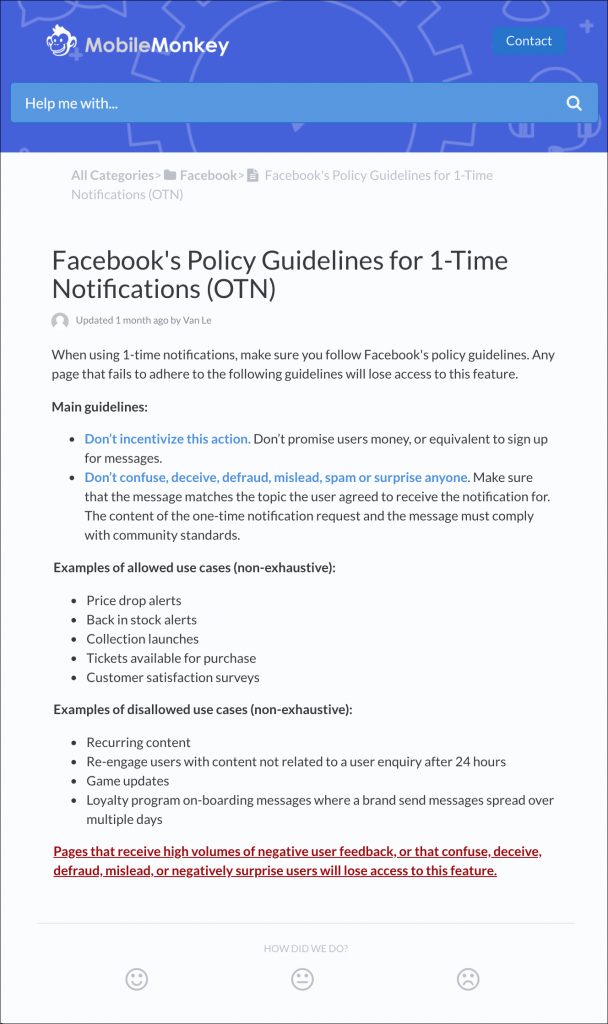
Ready to get your Page approved for One-Time Notifications in Facebook Messenger?!
Request permissions from your Facebook Page settings and get Customers.ai’s free Messenger bot builder to get started with OTNs today!
Important Next Steps
- Build a Facebook Messenger bot and send One-Time Notifications for free with the Free Forever Customers.ai Stay Connected special edition.
- Talk and learn about chatbots with other enthusiasts. Join Customers.ai Island, a Facebook group of over 35k marketers and entrepreneurs that are ready to support you.
- Advance your marketing performance with Chatbot University, a free chatbot tutorial and training area for chat marketers.
