
Need to learn how to schedule a post on Facebook for your business page? No worries, it’s pretty simple and should take less than 5 minutes.
Having a steady stream of content on your Facebook Page helps to keep your readers engaged. And to avoid having to constantly release new posts, you can easily schedule posts ahead of time.
Additionally, there are many tools where you can manage and schedule posts on Facebook like a pro. When you’re done scheduling your Facebook post, be sure to take a look at these social media marketing tools to take your business to the next level.
Although Facebook no longer lets you schedule posts on personal accounts, you can still do so on a Facebook Page.
In this “how-to” article, we’ll show you how to schedule a post on Facebook, as well as how to manage a scheduled Post on Facebook.
So let’s get straight to it!
Join Today’s Webinar with Larry Kim!
Or Register for the Free Replay
Learn all about NEW 100% Meta-Approved Automation Tools from Customers.ai with a spotlight on features to 10X Instagram & Facebook Engagement and turn social media into a revenue driver for your business.

How To Schedule a Post on Facebook
Here’s the short version of how to schedule a post on Facebook:
- Step #1: From the Facebook News Feed, click Pages in the left menu.
- Step #2: Select the Facebook Page you wish to post from.
- Step #3: Click Publishing Tools in the left-hand column.
- Step #4: Click the Create Post button in the top right of the page.
- Step #5: Create your post.
- Step #6: Click the Share Now dropdown and select Schedule.
- Step #7: Below Publication, set the date and time when you want the post to publish and click Schedule.
And now onto the more detailed version of how to schedule a Facebook post from your Business Page with step-by-step screenshots.
Step #1: From the Facebook News Feed, click Pages in the left menu
Log into Facebook if you have not already. Once logged in, you’ll be on your Facebook News Feed page.
On the Facebook News Feed page, find the menu bar on the left. Then, click on the Pages tab from the menu on the left-hand side of the screen.
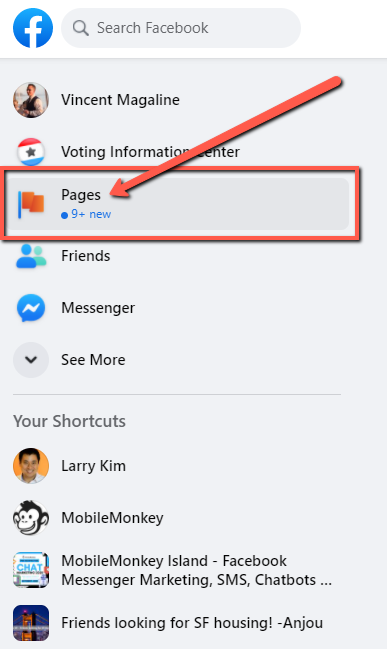
Clicking on Pages will bring you to a new page with all of the Facebook Pages you have control over.
Step #2: Select the Facebook Page you wish to post from
From the Pages menu, find the Facebook Page you wish to schedule a post on Facebook for on the left-hand side of the screen.
Click on the Facebook Page you want to schedule a post for.
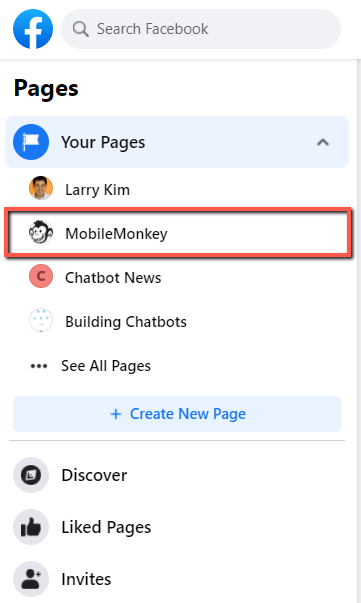
In the above example, I’ve chosen the Customers.ai Facebook Page.
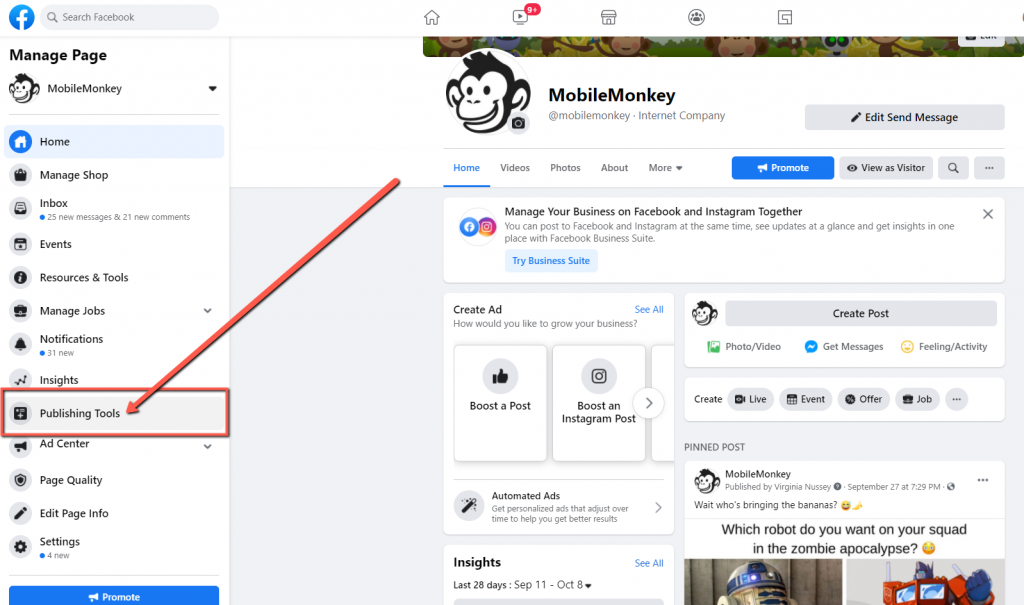
Step #3: Click Publishing Tools in the left-hand column
Once you’ve landed on your desired Facebook Page, again locate the menu bar on the left-hand side of your screen.
Find the option titled Publishing Tools from the menu.
Click on Publishing Tools.
Step #4: Click the Create Post button in the top right of the page
Now that you’ve opened the Publishing Tools menu on your Facebook Page, it’s time to schedule your post!
Find the blue Create Post button at the top-right of the Publishing Tools menu.

Click on the Create Post button and a pop-up window should appear.
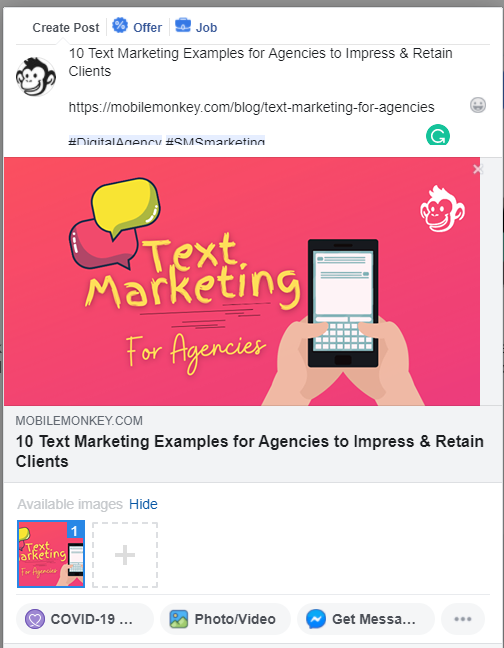
Step #5: Create your post
It’s time to create and schedule your post on Facebook.
Add some text, an image, GIF, video, or whatever you want to your Facebook post.
For some great Facebook marketing tips, check out these 10 tactics guaranteed to increase engagement on Facebook.
Step #6: Click the Share Now dropdown and select Schedule
Okay, so you’ve created your post. That was the hard part.
Now all we have to do is schedule the post for when you want it to appear on Facebook.
Towards the bottom of the pop-up window, find the Share Now dropdown menu.
Click on the Share Now dropdown menu.
And now, start scheduling your post by choosing the Schedule option from the dropdown menu.
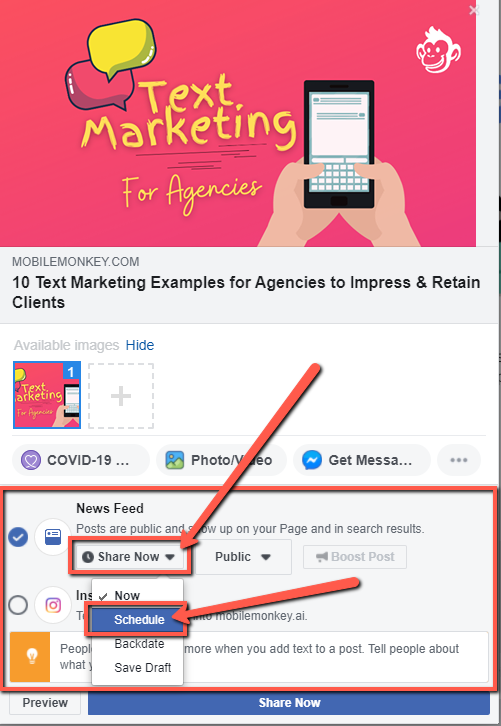
After choosing the Schedule option from the dropdown menu, you should see another pop-up window appear on your screen.
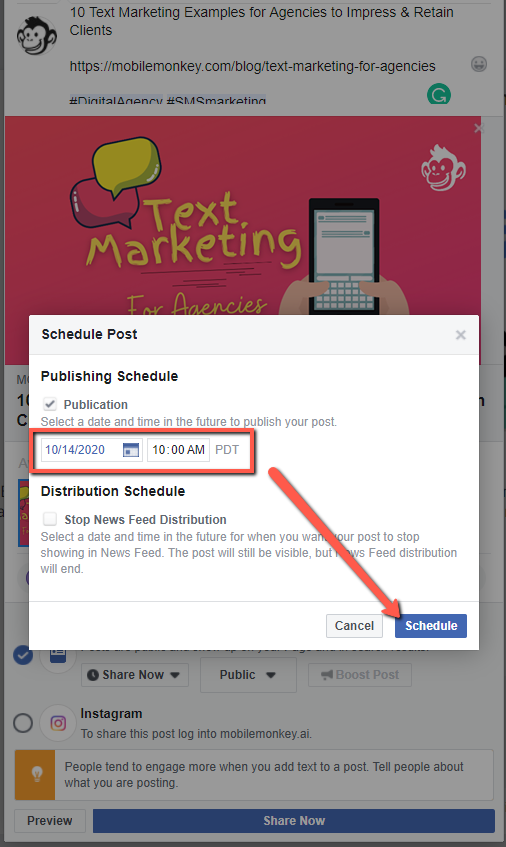
Step #7: Set the date & time and schedule the post
A new pop-up window titled “Schedule Post” should now be on your screen.
From the Schedule Post pop-up window, find the date and time boxes.
Use the date and time boxes to choose when you want your Facebook post to appear on your Facebook Page.
Once you’ve selected your desired date and time, click on the Schedule button to schedule your post on Facebook.
Congratulations! You’ve successfully scheduled a post on Facebook!
How To Manage Scheduled Posts on Facebook
Once you’ve scheduled your post on Facebook, you may need to reschedule, edit or delete that scheduled post. If that should happen, here’s what to do:From the Facebook News Feed, click the Pages tab in the left menu.
- Go to your Facebook Page that you wish to manage.
- Click the Publishing Tools option from the left column.
- Below Posts, click on Scheduled Posts.
- Select the post you want to edit by clicking on it.
- Click Edit to edit the post, or click the dropdown arrow to choose to reschedule, delete, or publish the post immediately.
Are You Marketing on Facebook?
If you’re a digital marketer, chances are that one of your main channels is Facebook.
Did you know that you can use Facebook Messenger for business? Whether you answered “Yes” or “No” doesn’t matter. What matters is that more than 1.5 billion people actively use Facebook Messenger chat.
However, less than 1% of businesses are engaging with their audience on this proven channel.
Therefore, Messenger presents a rare opportunity to engage with consumers on an untapped and highly engaging marketing channel.
Join Today’s Webinar with Larry Kim!
Or Register for the Free Replay
Learn all about NEW 100% Meta-Approved Automation Tools from Customers.ai with a spotlight on features to 10X Instagram & Facebook Engagement and turn social media into a revenue driver for your business.
Here’s what to do next:
- Check out the Customers.ai Growth Marketing Blog for all things Facebook marketing and multi-channel chatbots.
- Talk and learn about chatbots with other enthusiasts. Join Customers.ai Island, a Facebook group of over 35k marketers and entrepreneurs that are ready to support you.
- Advance your marketing performance with an omnichannel strategy and learn why OmniChatⓇ technology by Customers.ai has the tools to differentiate your marketing from the competition.