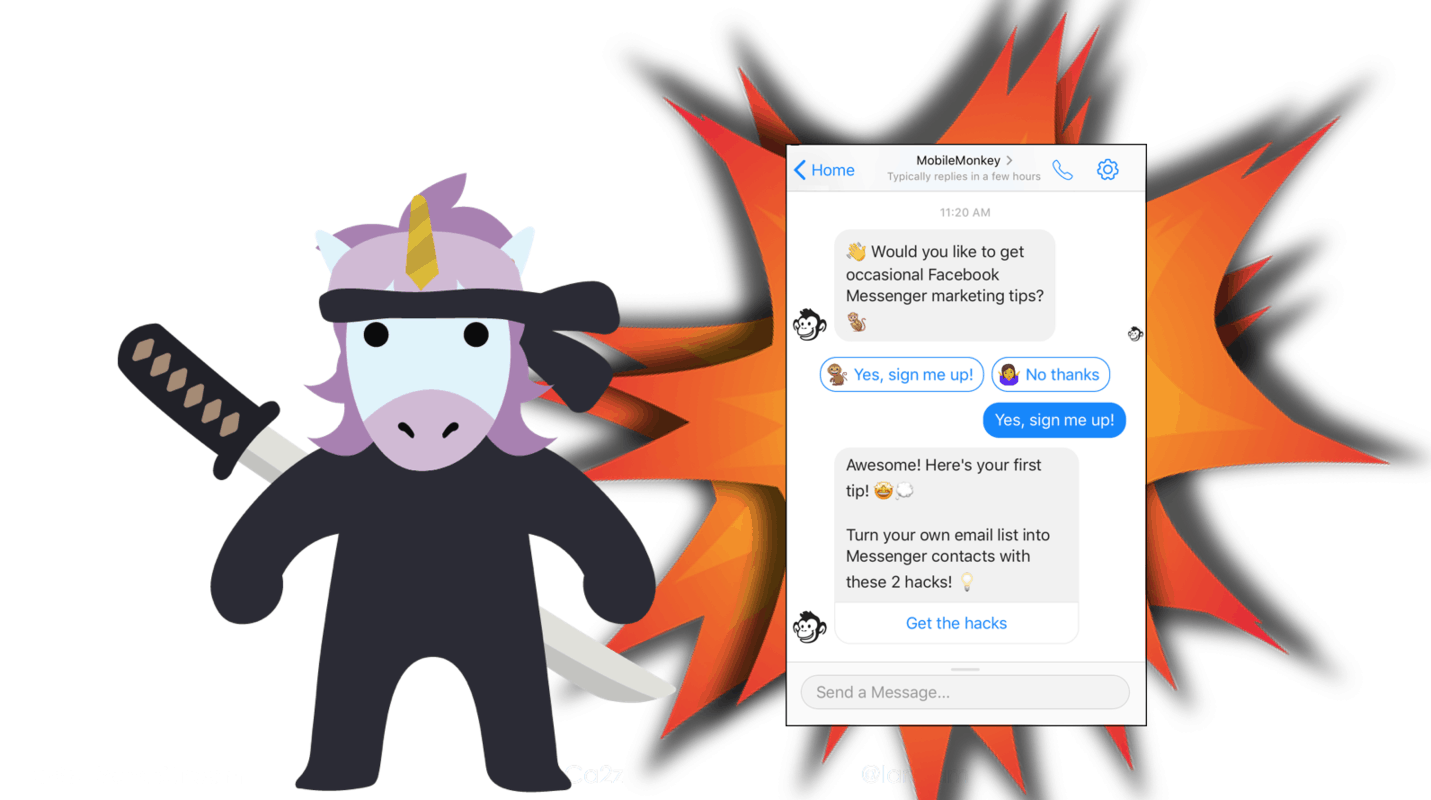
Mastering the Facebook Messenger subscription opt-in page is the first step in becoming a Messenger marketing ninja.
You use Messenger opt-in pages to sign up your subscribers so you can execute Facebook Messenger marketing tactics like:
- Facebook post autoresponders
- Chat blasting new blog posts in Messenger
- Facebook Messenger drip campaigns
- RSS blasting in Facebook Messenger
- Facebook subscription messaging
- Facebook Messenger hacks
Today I’m going to zoom in on creating your Facebook Messenger opt-in pages in Customers.ai.
Join Today’s Webinar with Larry Kim!
Or Register for the Free Replay
Learn all about NEW 100% Meta-Approved Automation Tools from Customers.ai with a spotlight on features to 10X Instagram & Facebook Engagement and turn social media into a revenue driver for your business.

We’ve used Facebook Messenger subscription opt-ins to grow our Messenger contacts. Here’s a peek of our own chatbot analytics where you can see contact growth over the last 60 days:
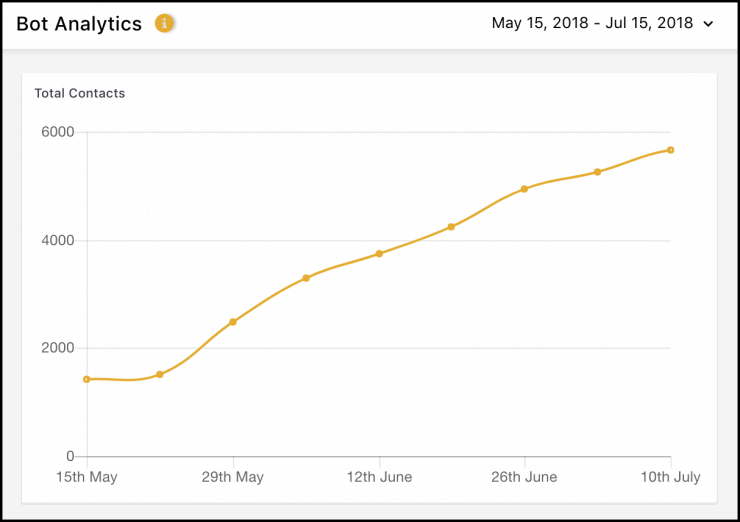
See a Facebook Messenger opt-in page in action by signing up for Customers.ai Facebook Messenger updates, tutorials and news tips.
How to Create a Facebook Messenger Opt-In Page and Audience in 3 Steps
Here’s the three-step drill for building effective opt-in pages for Messenger subscriptions that get more sign-ups, let you segment your audience and send follow-up messaging.
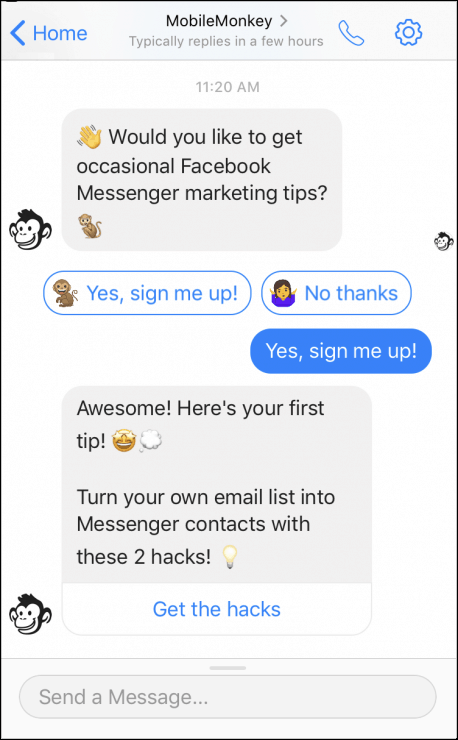
The final Facebook Messenger subscription opt-in page we’ll create looks like this in chat:
Step 1: Create the Messenger subscription opt-in page with the chatbot builder
Use the visual chatbot builder to create chatbots without coding.
Just click on the widgets to add content to your chat pages. And drag elements around to reorder them on your pages.
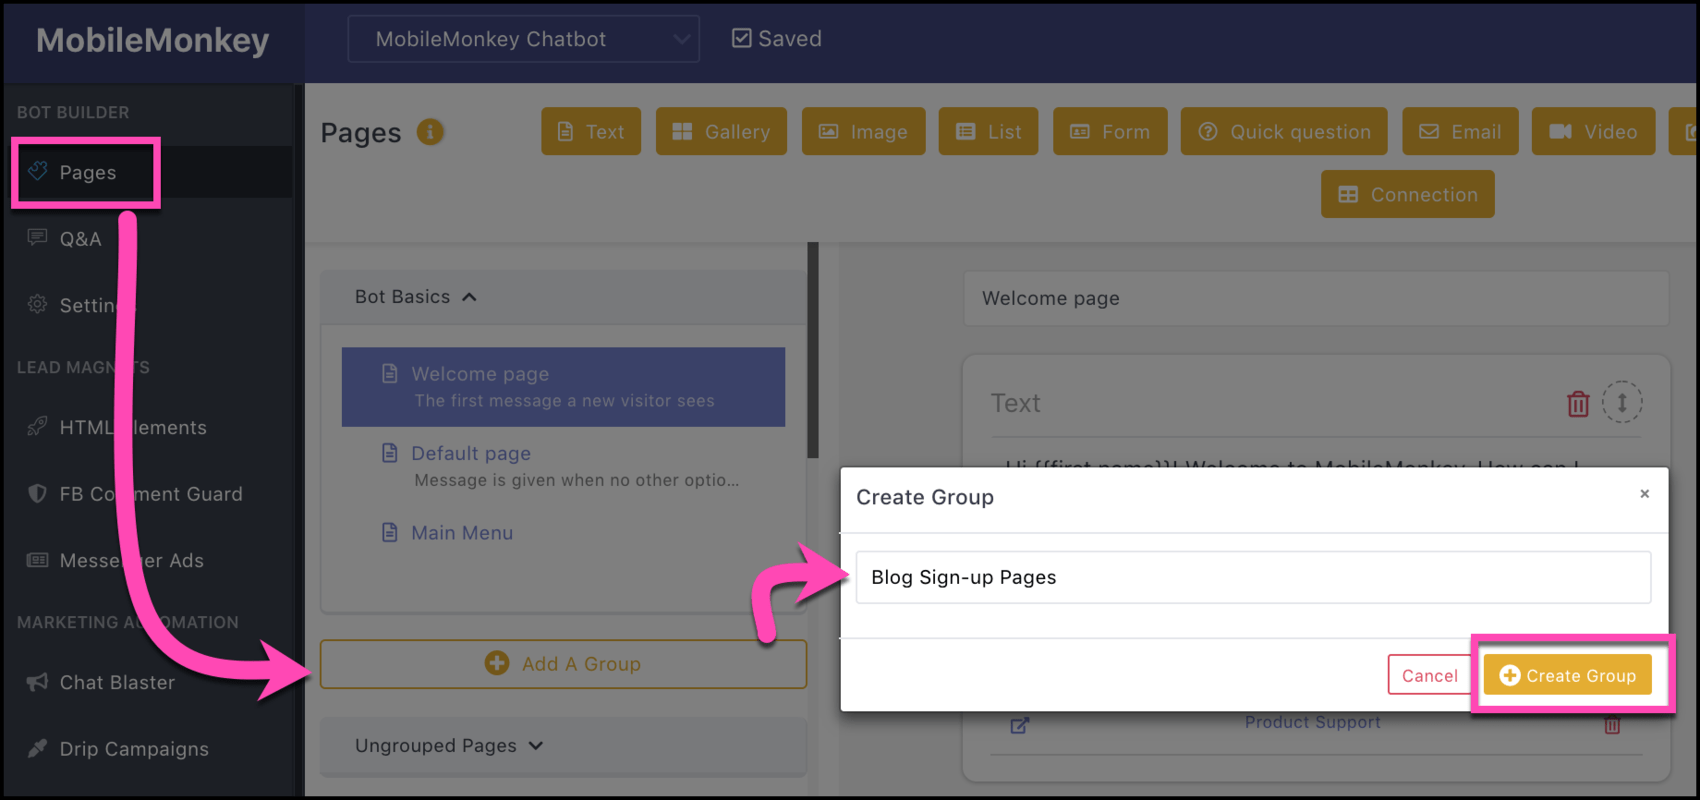
Like folders on a website, groups help you keep your chat pages organized around their purpose.
Some logical groups might hold all the chatbot pages around a single purpose, like sign-up pages. And you might create a group to hold all your blog update blasts.
So to get started, go to the chatbot builder to create a Facebook Messenger opt-in page so people can sign up for updates from the Customers.ai blog.
Create a new group for sign-up pages (webinar sign-ups, RSS subscription sign-ups, daily tip campaign sign-ups, etc.). If you’re adding the new opt-in page to an existing group, go straight to creating a new page.
Create a new page in this group that will be your opt-in page. Use a description when creating pages to help you remember a page’s purpose at a glance later on:
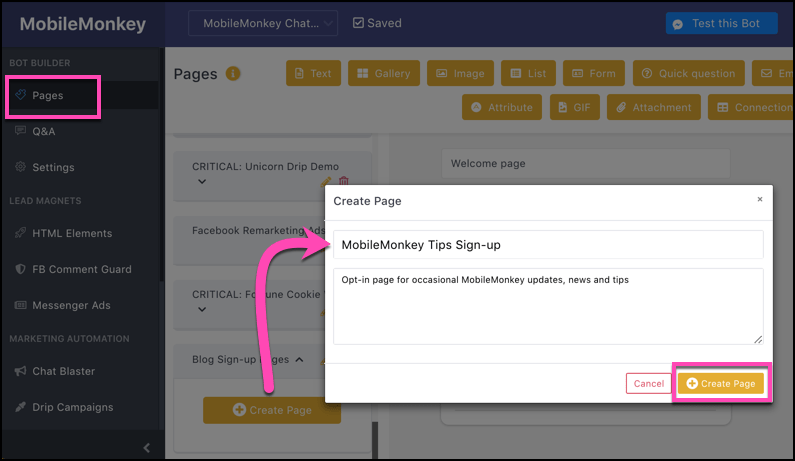
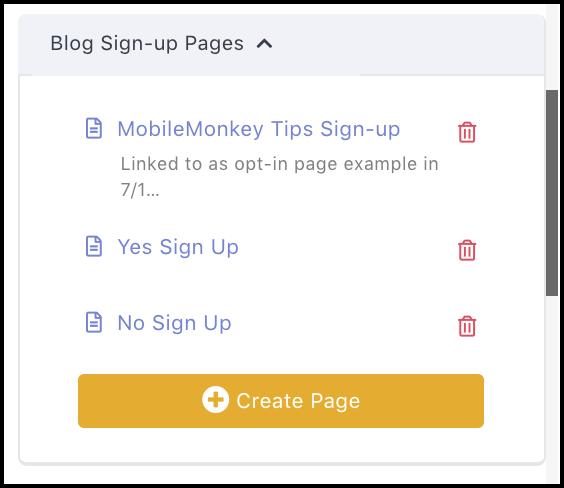
Create all the pages you need for this chatbot sequence. We’ll have a page to say “thanks” If someone answers “yes” and “no problem, you can always change your mind” if someone answers “no.”
All the pages in this chatbot sequence look like this in the group:
With your pages created, although blank, go back to the sign-up page to add content to the page.
Click the quick question widget to add a question to the page. Ask the question “do you want to sign up?” in the voice and tone of your brand:
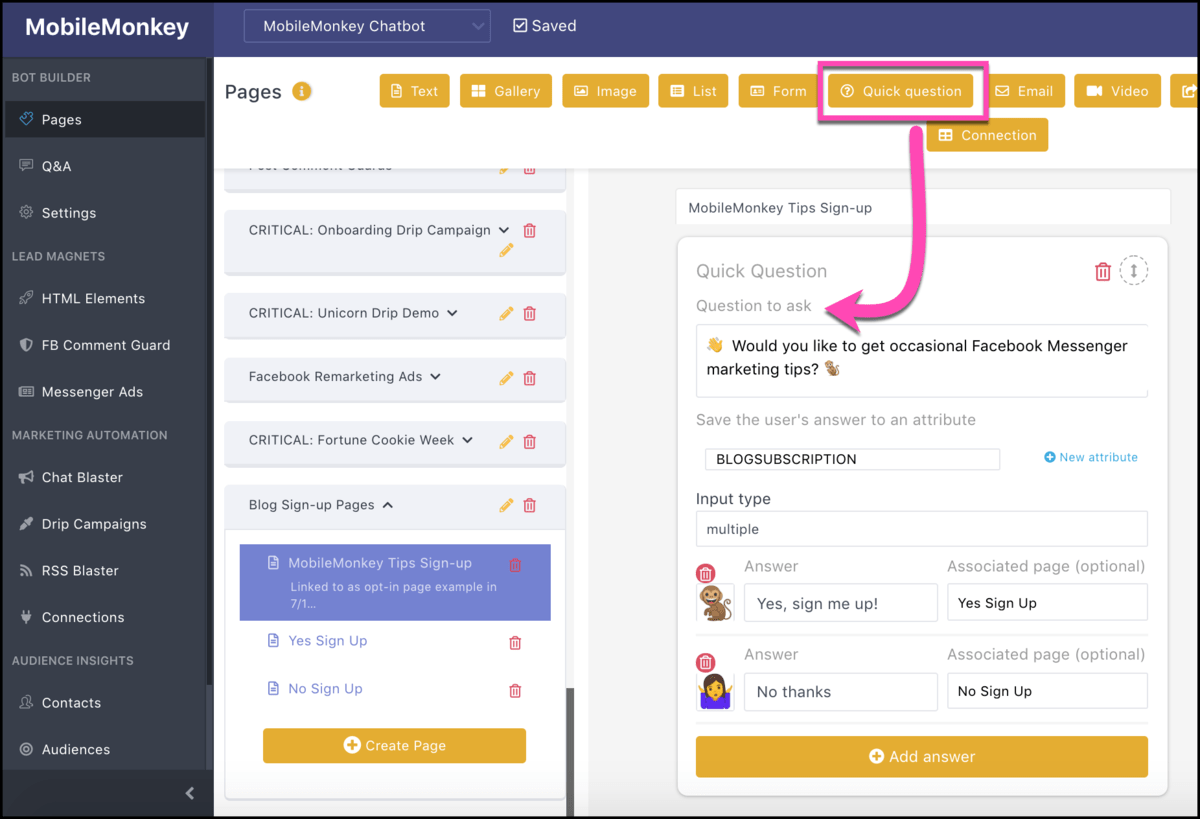
Click “New attribute” to create a custom attribute that saves the user’s answer to their contact profile. This key step is how we’ll filter this audience segment among all our contacts:
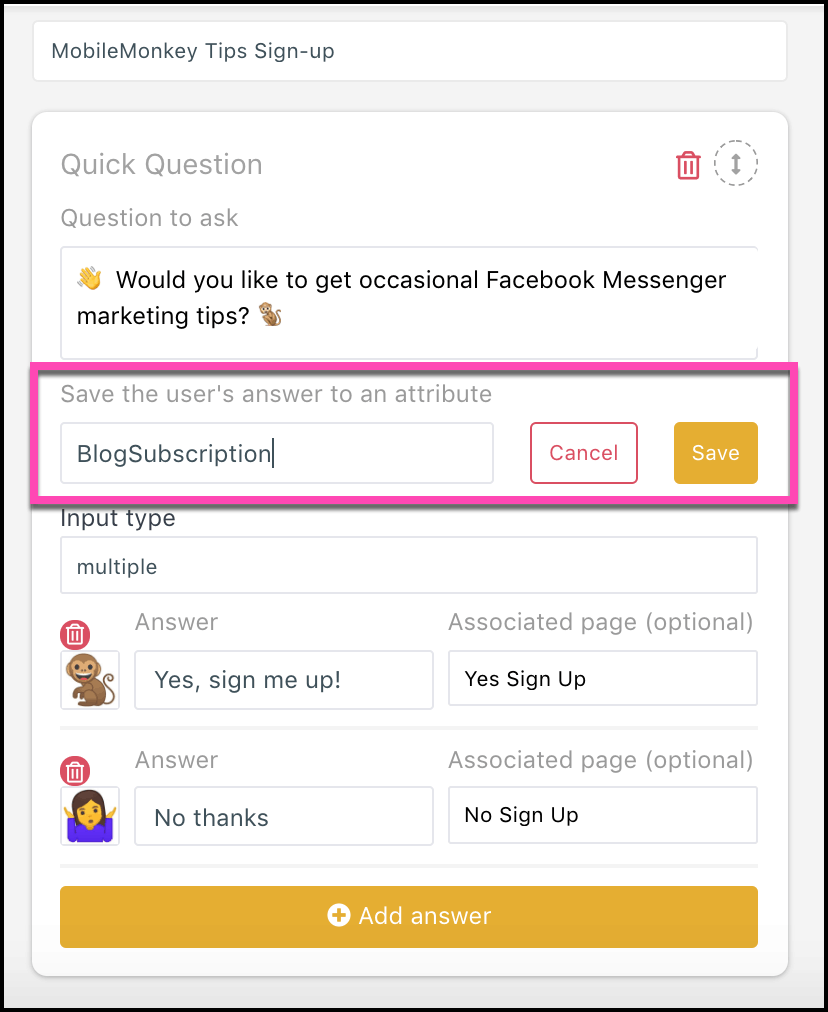
From “Input type” choose the option for “multiple” choice answers. User see multiple choices as buttons they can click to select. Answers are limited to 20 characters so they can fit in the button. Emojis are supported here!
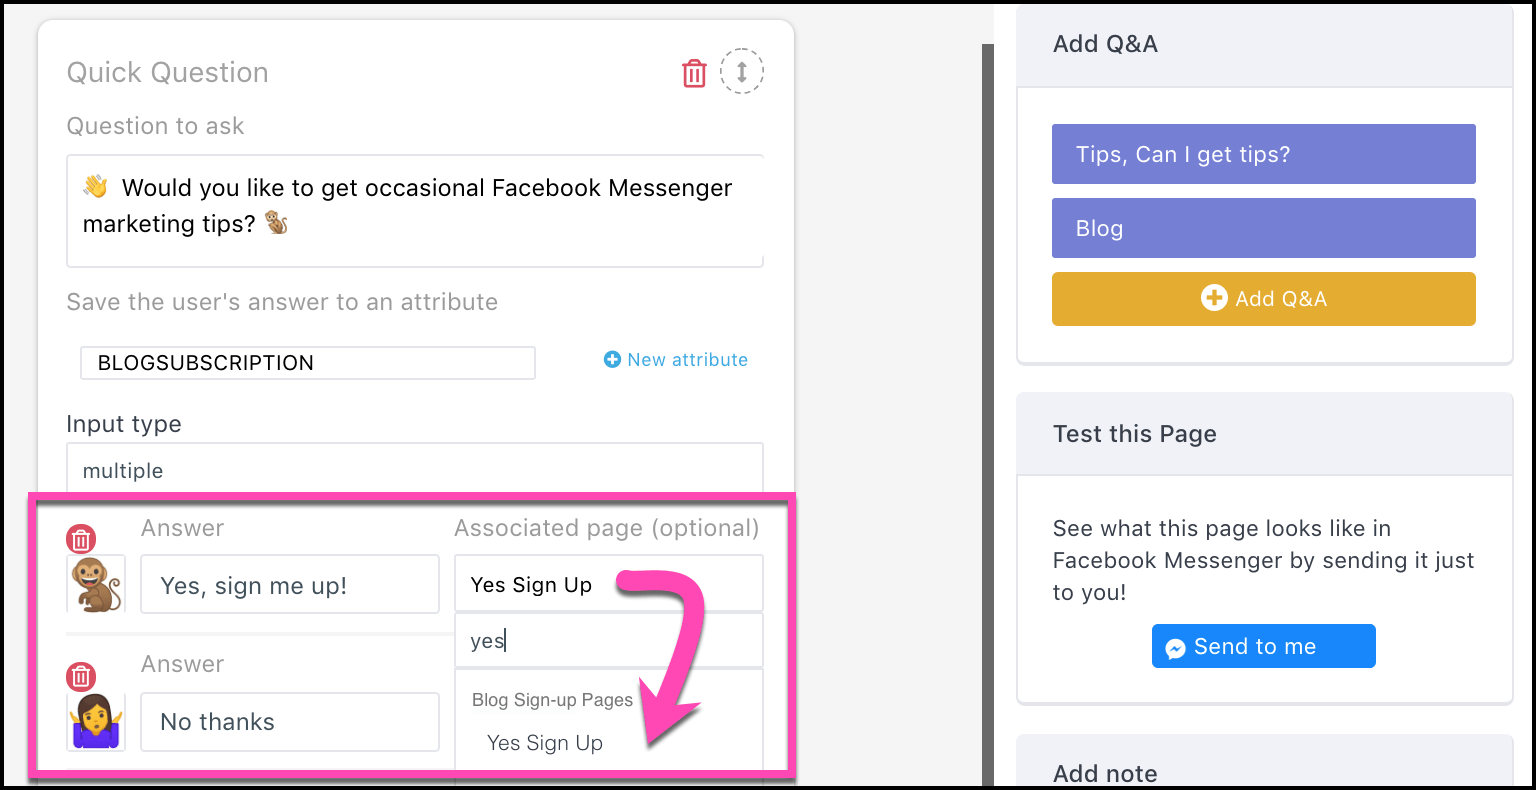
You can hook up this button to another “Associated page”, which will display when the user clicks the button. Use the drop-down selections to pick the “yes” and “no” pages we created earlier:
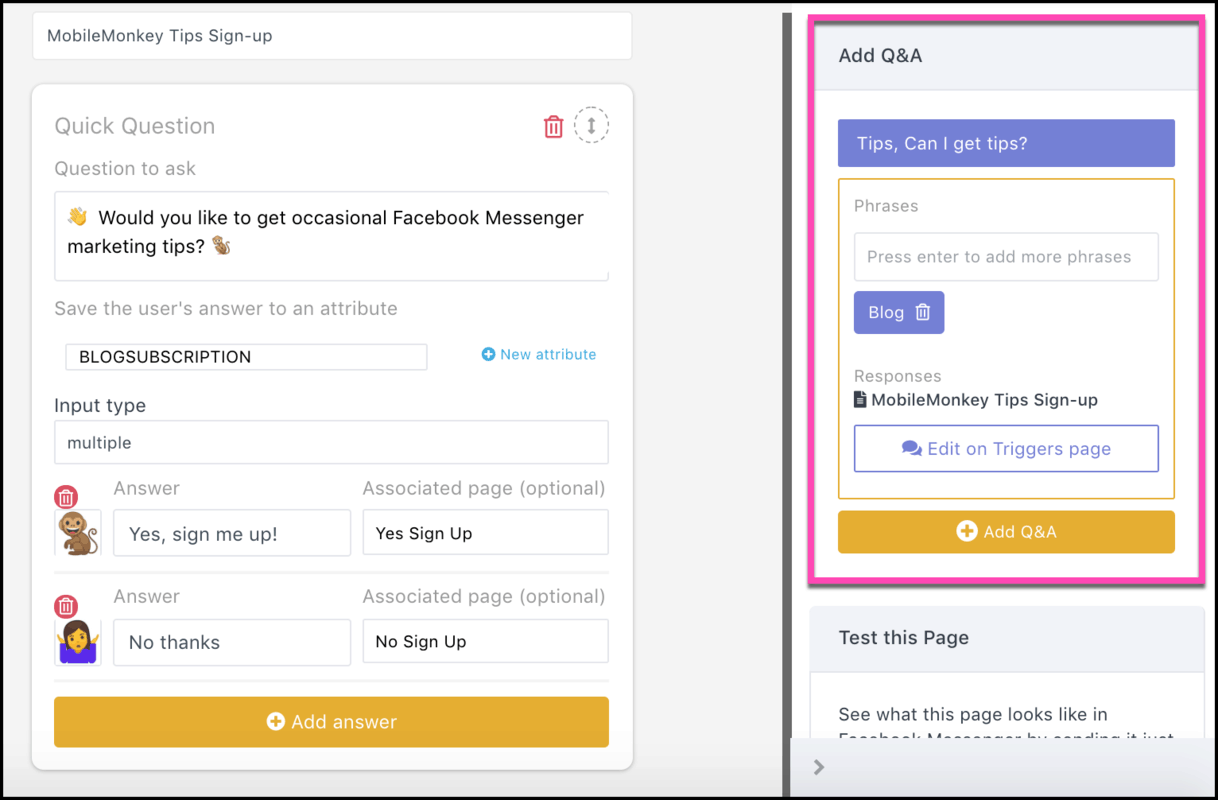
From “Add Q&A” add keywords that will trigger this sign-up page for a user who’s looking for it:
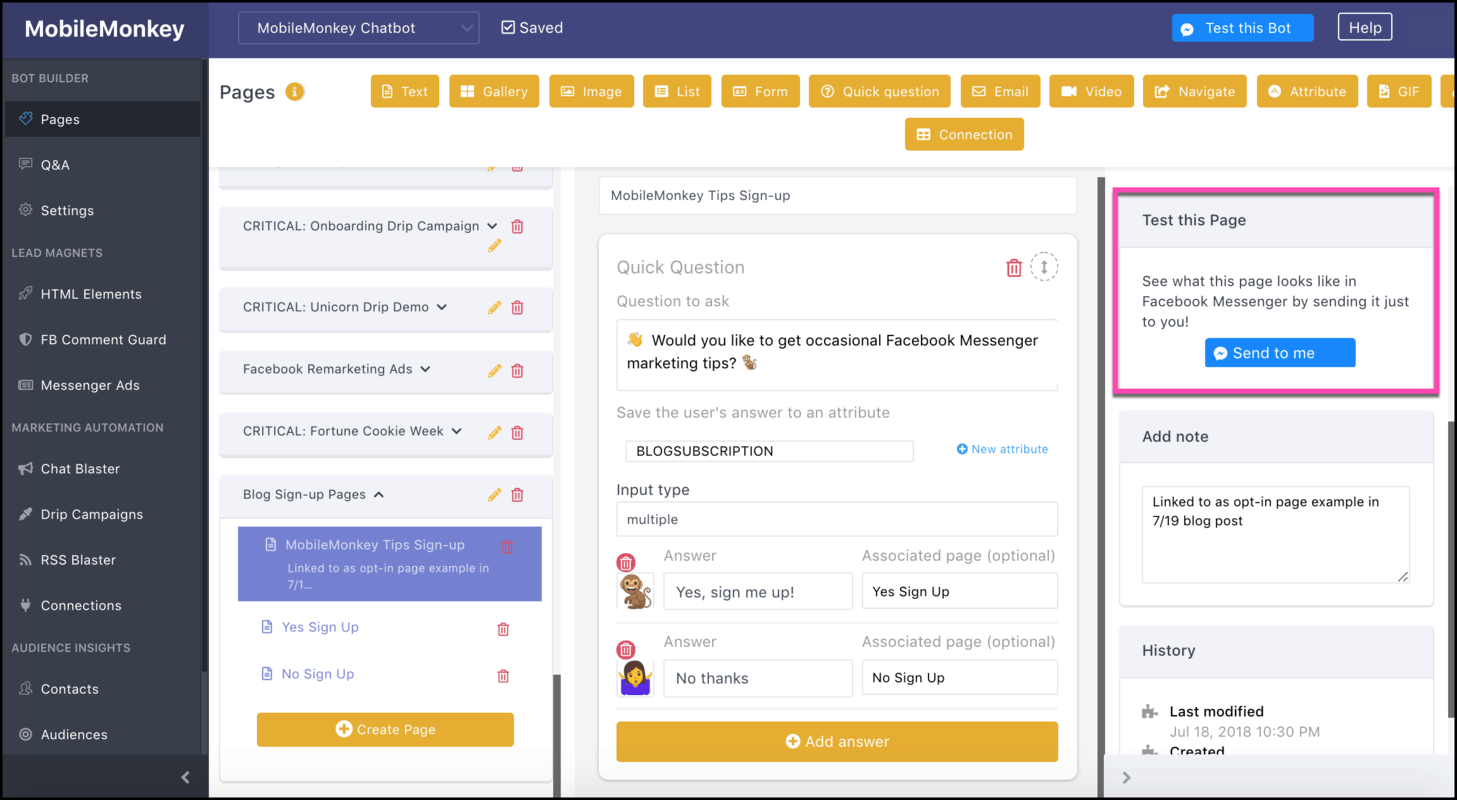
Use the “Send to me button” to test out your chatbot pages so you can see what they look like in Messenger:
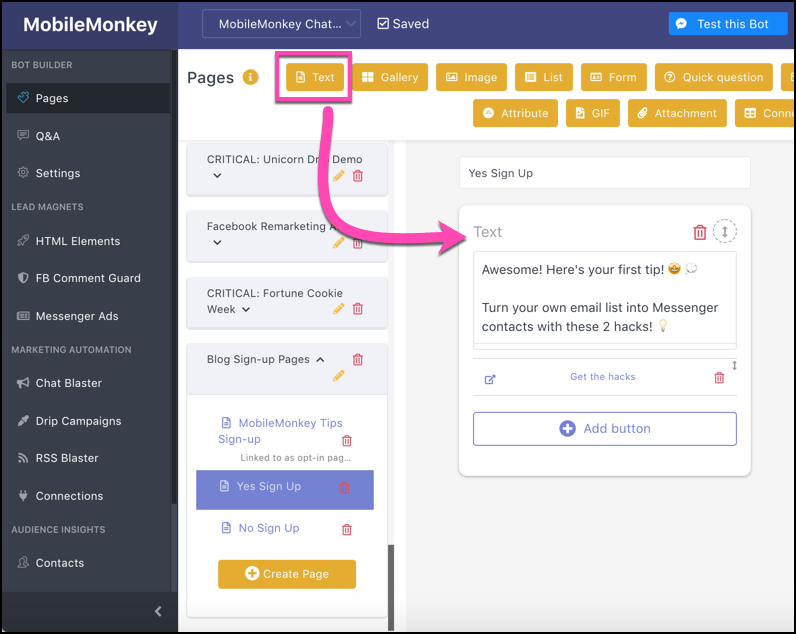
Repeat the process in the content editor to create the associated pages. These are the pages that result when a user clicks the “yes” and “no” buttons. You won’t need to add triggers to these pages since users will only see them through interactions with other pages.
Here’s what our Facebook Messenger opt-in confirmation pages look like.
“Yes Sign Up” Page
When someone clicks the button “Yes, sign me up!” on the opt-in page, they get this message:
“Awesome! Here’s your first tip! ??
Turn your own email list into Messenger contacts with these 2 hacks! ?”
We used the text widget to add this content to the page:
We also offer a link to an evergreen blog post guide on the basics of how to build a chatbot. Click “Add button” and then choose your button text and where the button links to:
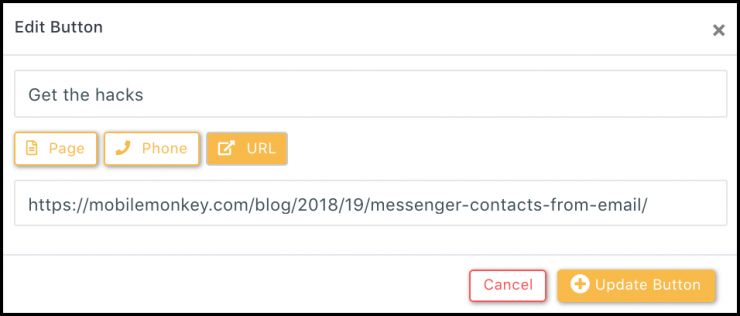
I like to give people a helpful resource for signing up right off the bat.
“No Sign Up” Page
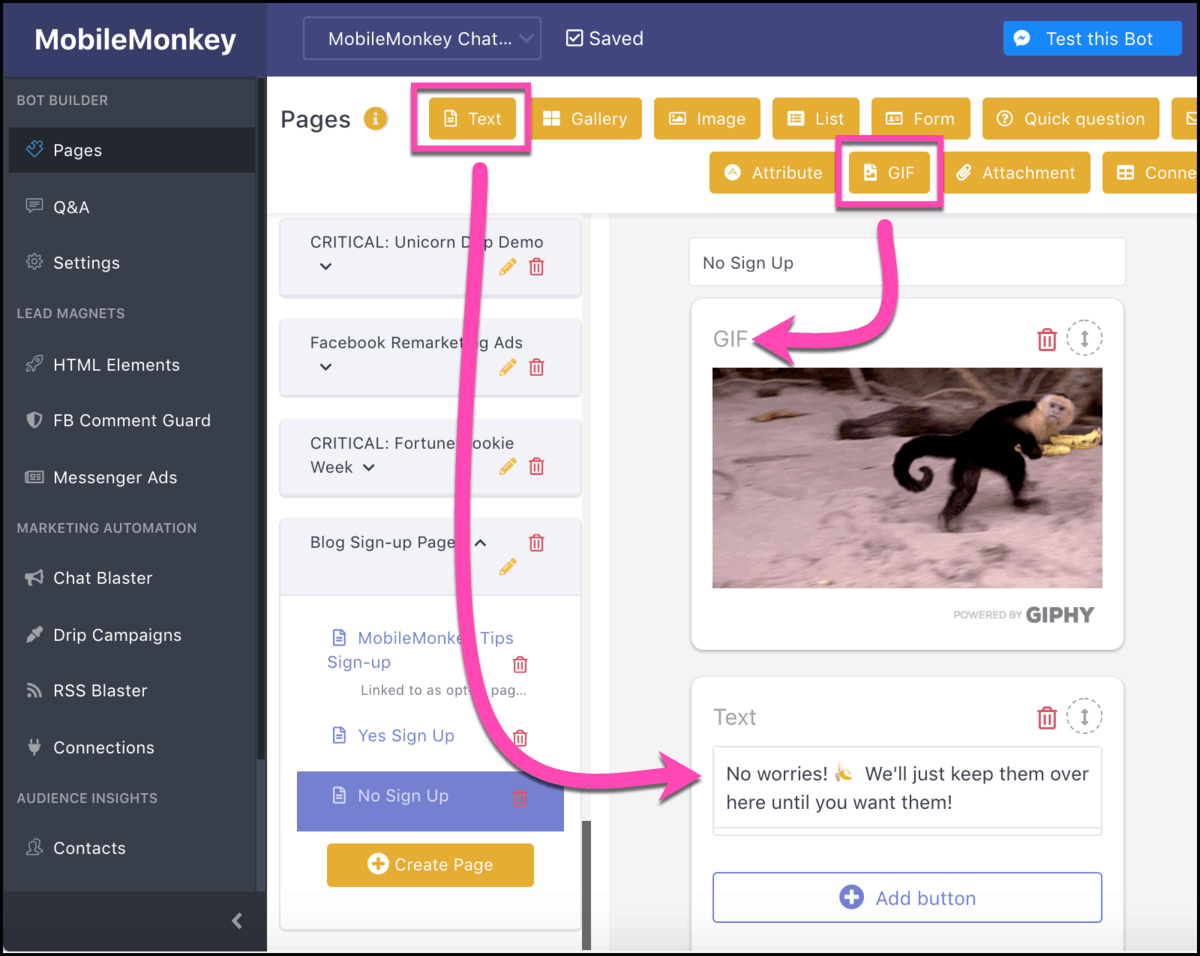
You don’t actually need an associated page for any button, and you don’t need more than one button either. You can just use one “yes” button.
But with this page that shows up when someone clicks “no thanks” we’ll showcase the brand with a fun GIF and a reminder they can sign up any time if they want:
More tactics for your Facebook Messenger subscription opt-in pages and chat messages below.
Step 2: Create a link to the Facebook Messenger opt-in page you can share
With your subscription opt-in page on-line, create a link so you can share it in all the usual spots.
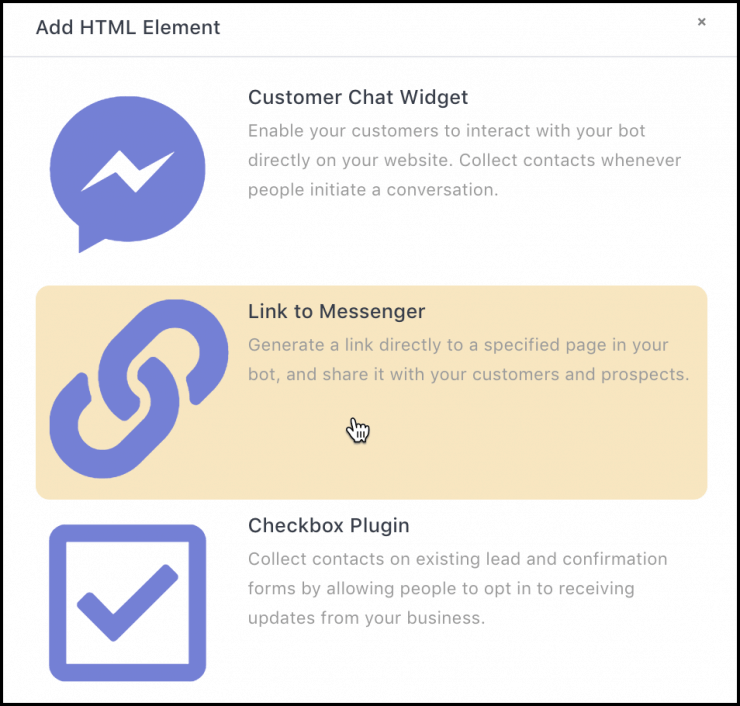
From HTML Elements, click “Add HTML Element”:

And create a new link:
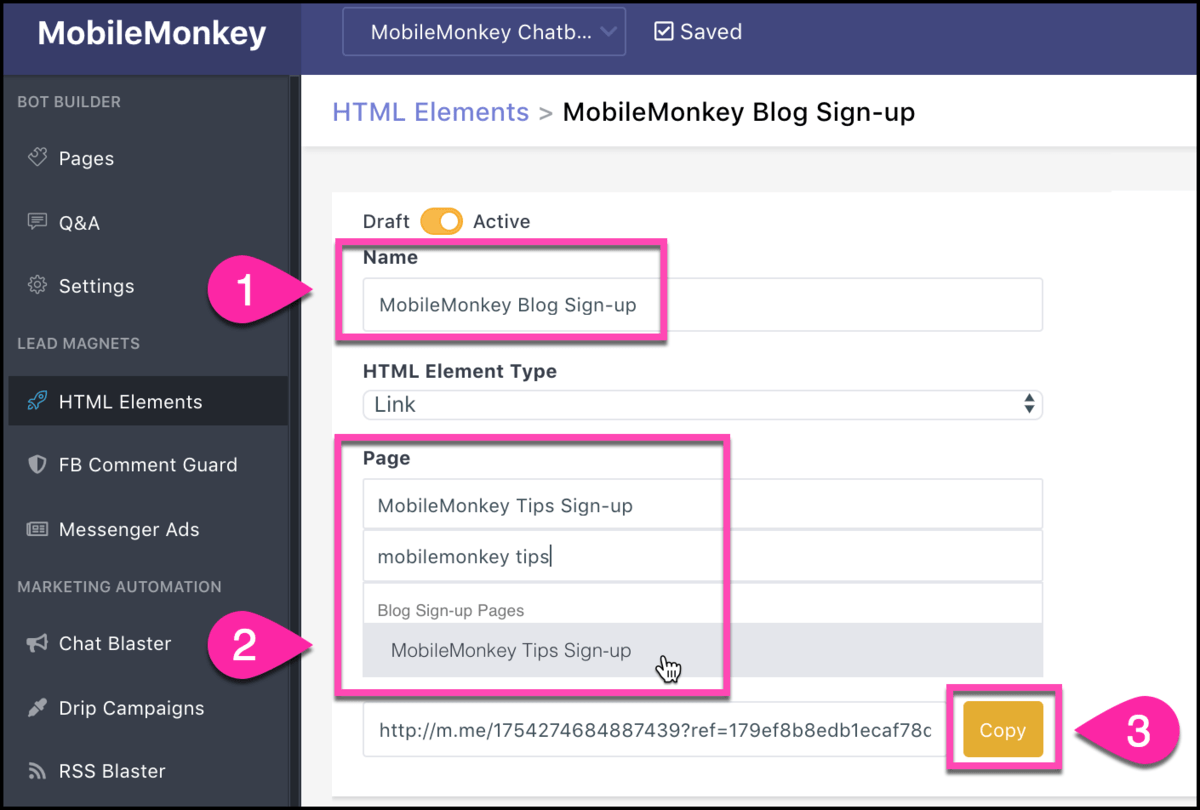
Now name the link something descriptive, choose the page to link to from the drop-down selector, and click the “copy” button to copy the URL to your clipboard:
Share this link anywhere, everywhere! Blog posts, blasts in chat and email, social posts, signatures, you name it!
Step 3: Create a new audience of people who sign up
Like creating a list for your email marketing or an audience for your Facebook ad targeting, we create audiences for Messenger marketing.
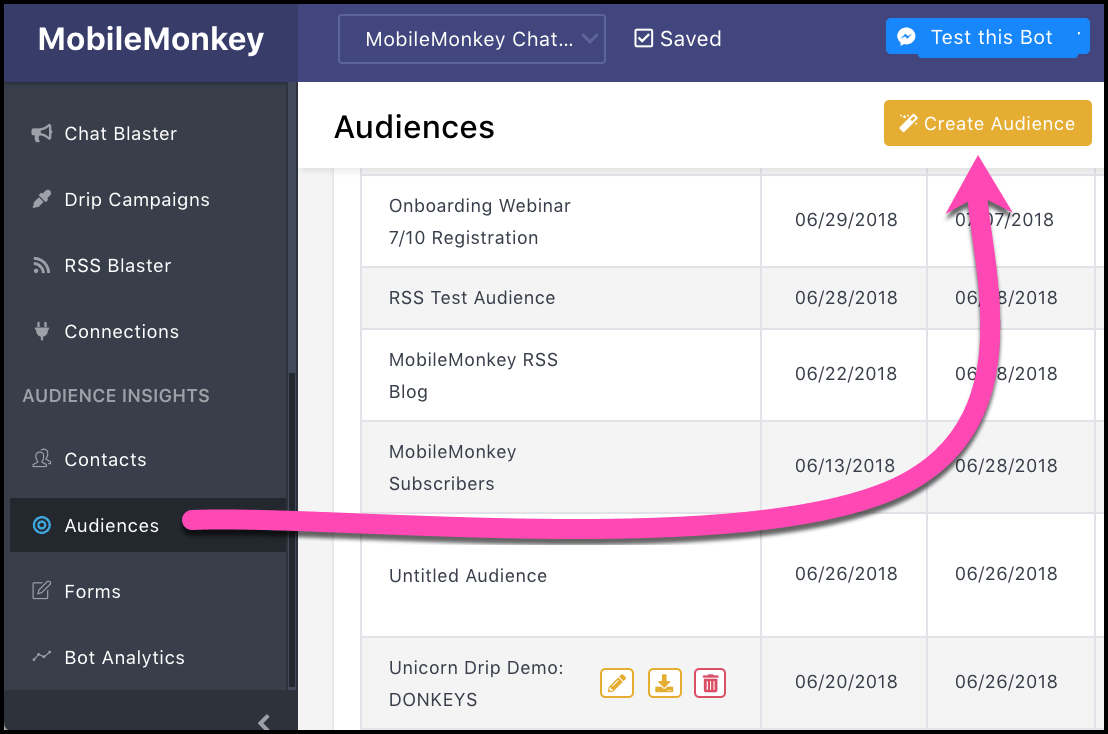
From Audiences, click “Create Audience”:
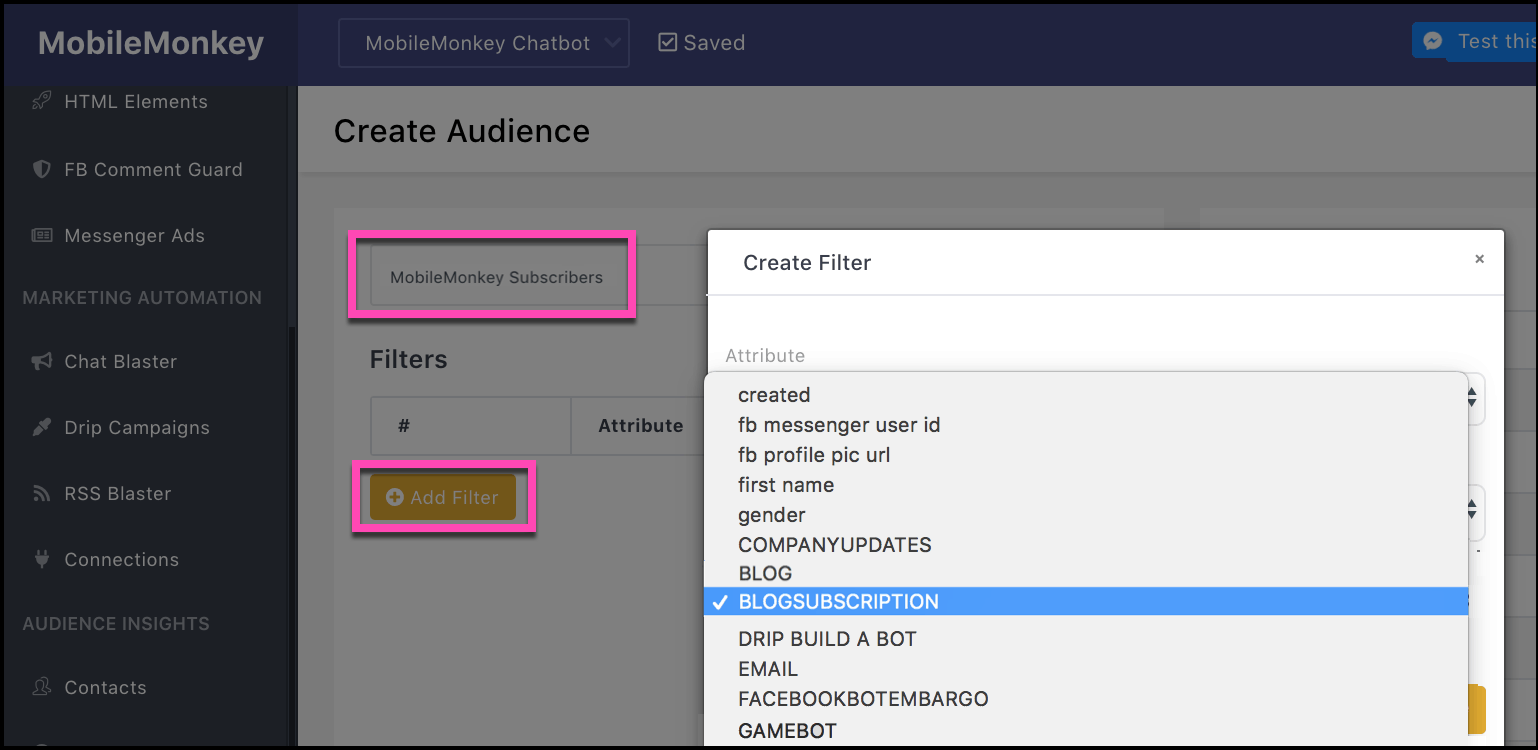
Use a descriptive name for this audience of opt-in subscribers and add a filter. Filter the audience segment using the attribute tagged on subscribers during step 1:
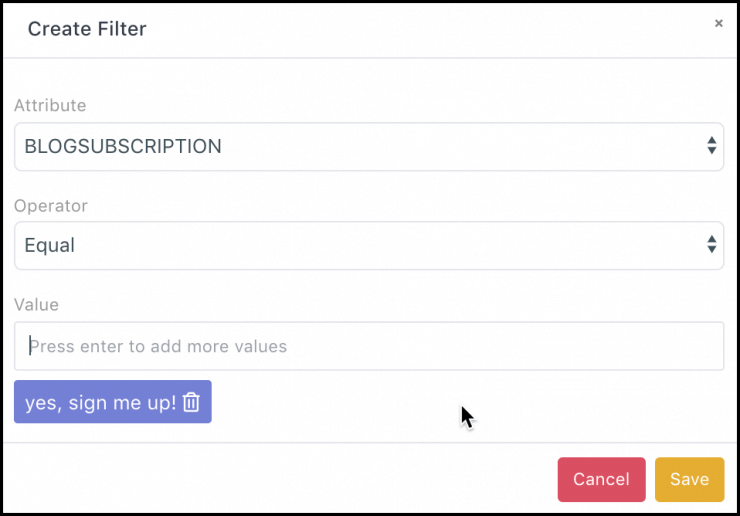
Here’s what the filter for this audience segment looks like:
When you save this audience segment, you can create all the magical marketing automations — everything from Facebook Messenger chat blasts, to drip campaigns, to Facebook Messenger ads.
Best Practices for Facebook Messenger Subscription Opt-In Pages
You’re probably going to be making a lot of Facebook Messenger subscription opt-in pages, so here’s your 5-point checklist for making them awesome.
- Quick question: Make your Facebook Messenger opt-in pages with the quick question widget.
- Attributes: Save an attribute to everyone who answers this question so you can create an audience segment for future messaging.
- Emojis: Since Messenger is a chat application, make your messages fit the normal chat etiquette. Emojis are the visual language of chat and text.
- Images: Use the images widget to add an image in the chat window, and don’t forget about the option to add an image next to buttons.
- Thank you page: The confirmation that they’ve opted in is your first chance to show they made the right choice in signing up. You can even provide valuable content right away in your thank you message.
Check out our guide to Facebook Messenger marketing best practices for an up-to-date list on the rules for Facebook Messenger marketing straight from Facebook and our own experiences.
Get more Facebook Messenger tutorials and tips by signing up for Customers.ai Facebook Messenger updates and see the unicorn ninja power of a Messenger opt-in page for yourself.
Join Today’s Webinar with Larry Kim!
Or Register for the Free Replay
Learn all about NEW 100% Meta-Approved Automation Tools from Customers.ai with a spotlight on features to 10X Instagram & Facebook Engagement and turn social media into a revenue driver for your business.

Be a Unicorn in a Sea of Donkeys
Important next steps:
- Get Customers.ai for FREE (non-expiring, UNLIMITED contacts).
- Sign up for occasional Facebook Messenger Marketing tips via Facebook Messenger.
- Join the Customers.ai group on Facebook and share your ideas and questions.
