The decision to implement automated appointment reminder text messages is a no-brainer for professionals across a range of industries.
Not only do scheduling assistant chatbots save you time and money, but just as important, an appointment reminder SMS bot is super convenient for your clients to use.
Today it’s very common to see one of the following industry-specific appointment scheduling bots:
- Doctor appointment chatbot
- Chatbot for travel industry
- Real estate chatbot
And this makes a ton of sense, considering sending business appointment reminders to customers through chat reduced missed appointments by 26%.
Additionally, this isn’t limited to live chat on your website. You can build a chatbot for appointment reminders for Facebook Messenger and SMS text scheduling assistant chatbots as well.
In this article, you’re going to learn how to build an SMS chatbot for appointment reminders and scheduling for your own business.
What is an Appointment Reminder Text?
An appointment reminder text is exactly like it sounds. It’s an automated text messaging chatbot that you can implement using a chatbot builder like Customers.ai, where you can easily send appointment reminders to your clients to confirm or cancel their appointments.
Customers.ai has dozens of SMS marketing tools for you to choose from and test out.
You can experience the bot by using an SMS keyword. To do so, text REMINDER to (802) 294-4135.
Additionally, you can experience the appointment reminder text bot via Facebook and Instagram Messenger by clicking here ????
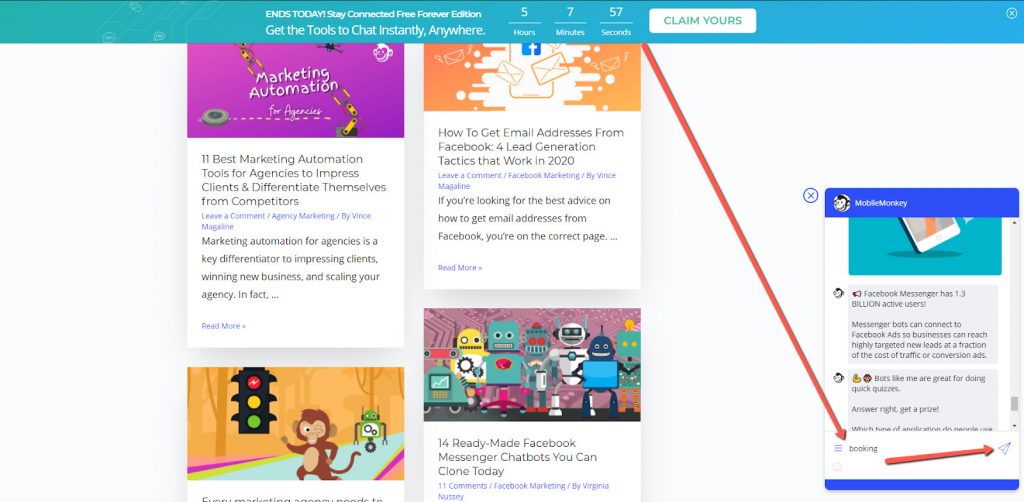
Or, you can experience the appointment reminder text bot on live chat by clicking the “Let’s chat!” button in the chat widget at the bottom right of your screen.
Here’s how to build an appointment reminder text message chatbot in 7 easy steps using Customers.ai:
- Create a new folder and your first Dialogue
- Build your conversational workflow using chatbot widgets
- Add answers and create a new Dialogue
- Create a Dialogue for a “NO” answer
- Create a Dialogue for a “YES” answer
- Build out your remaining Dialogue paths
- Test your appointment reminder text chatbot
How To Send Automated Appointment Reminder Text Messages
In order to pull data from your CRM, such as customer appointment dates and appointment times, see the following pages:
It’s super easy to get set up with Customers.ai’s Zapier integrations, and if you need help pulling your customer data from your systems, you can get in touch with our Customer Success team, who will be more than happy to get your appointment reminder texts up and running smoothly!
Step #1: Create a new folder and your first dialogue
You’ll want to create a separate folder for this use case because you’ll be creating multiple dialogues.
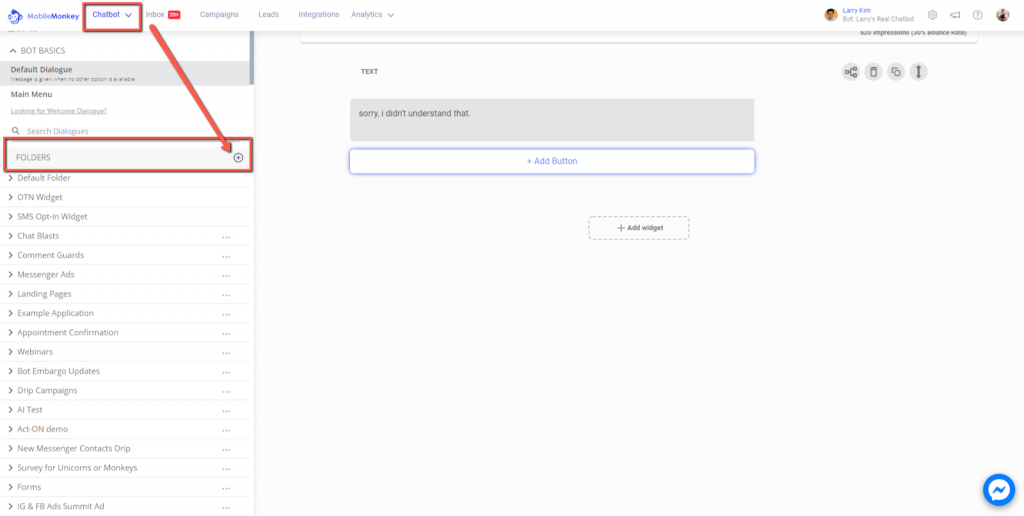
Go to Chatbots > Dialogues from the tabs at the top of your Customers.ai dashboard.
Then, create a new Folder and give it a name that makes sense for your use case. I’ve named my example folder “Appointment Confirmation.”
Now that you’ve created a Folder, it’s time to build the first Dialogue of your appointment reminder text.
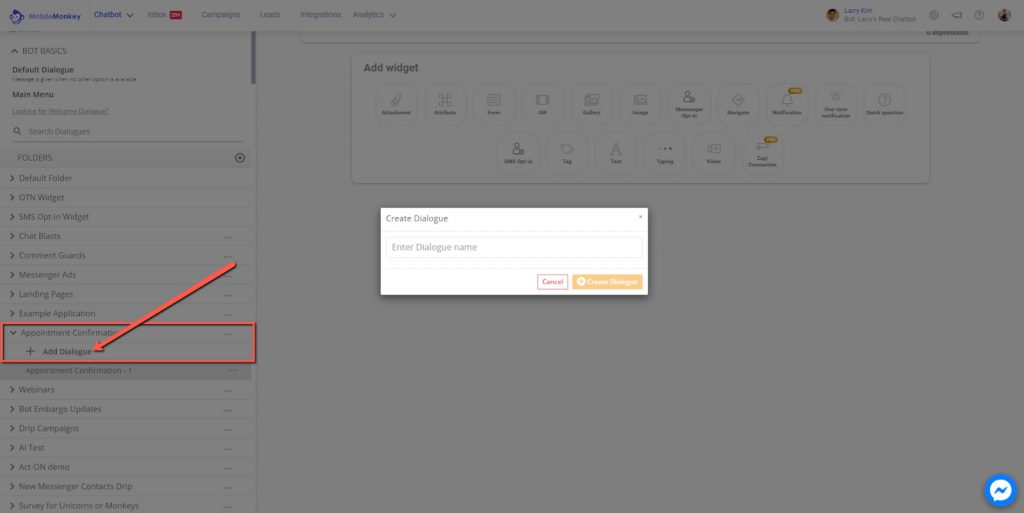
To create a Dialogue, click where it says + Add Dialogue inside the Folder you created. Then, name your Dialogue.
Step #2: Build your conversational workflow using chatbot widgets
In order to start building your conversational workflow, you need to choose from one of dozen plus chat widgets.
Choose from the many rich-media content widgets, such as text, buttons, quick questions, images, attachments, videos, GIFs and more.
For this SMS workflow example, I’ve chosen to start with the Quick Question widget.

The Quick Question widget will allow us to add some text and then provide multiple choice answers that work for SMS text messages, live chat, and Messenger.
However, since this is an appointment reminder text message, we just need to keep in mind that the person will be experiencing this bot via SMS.
Below you can see the first Dialogue our chatbot will use. At the end, we’ll ask a question and then move onto Step #3 to create the possible answers responses the end user can give.
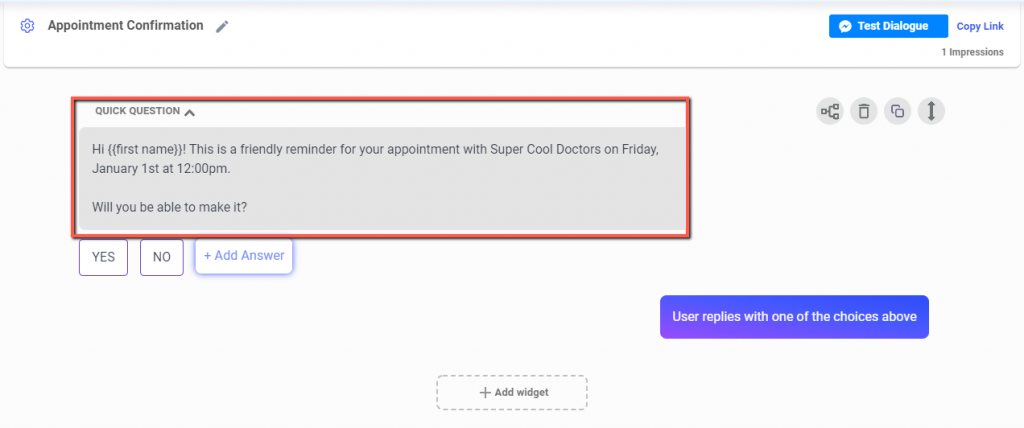
Before adding the answers, you’ll want to take note of the ability to add custom fields in your text, like where I added {{first name}} in the beginning of the dialogue.
Since this is an appointment reminder, you’ll want to add the day and time of the appointment. Access your custom fields
In order to connect Customers.ai to your CRM and other systems that hold your customer data, see the Customers.ai Integrations page, as well as the Customers.ai API documentation.
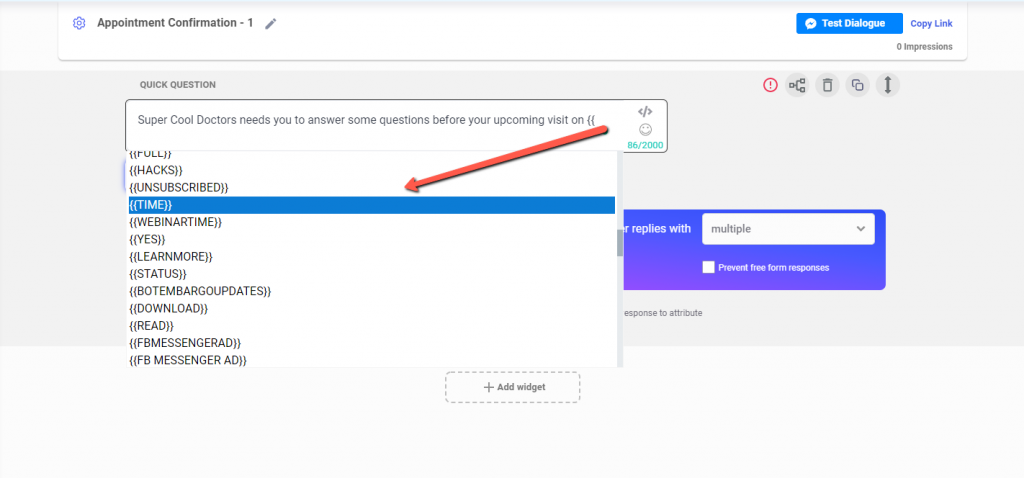
Step #3: Add answers and create a new Dialogue
Now it’s time add answers to your question. Note that for SMS, you don’t need to type out “Reply Y for Yes, or N for No.”
Customers.ai’s SMS marketing tools will automatically assign numbers to each of your multiple choice answers, such as: “Press 1 for Yes. Press 2 for No.”
To add answers to your Quick Question widget, click on the + Add Answer button. You can add as many answers as you want, but it’s best to keep it simple.
In this example, we’ve added two possible answers: YES and NO
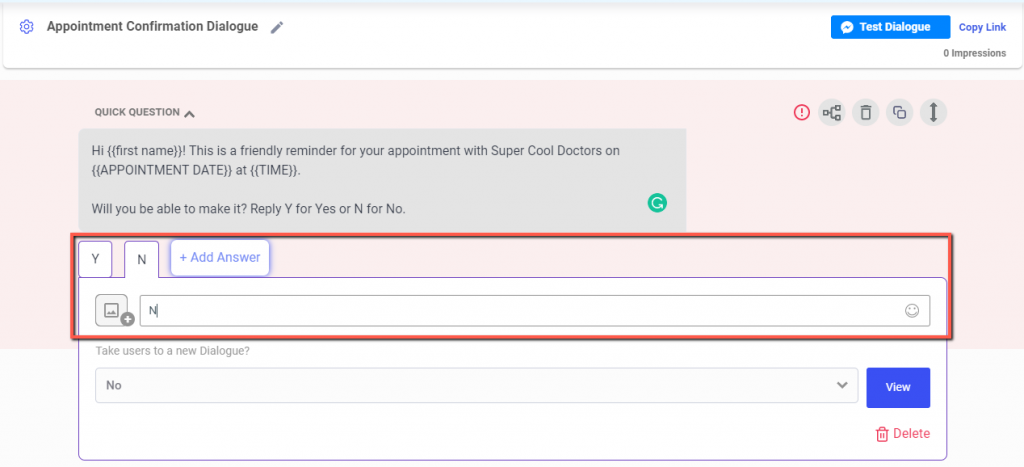
This next bit may seem confusing at first, but trust me, it’s very simple.
Depending upon whether the person answers “Yes” or “No”, there will be different paths that user will take.
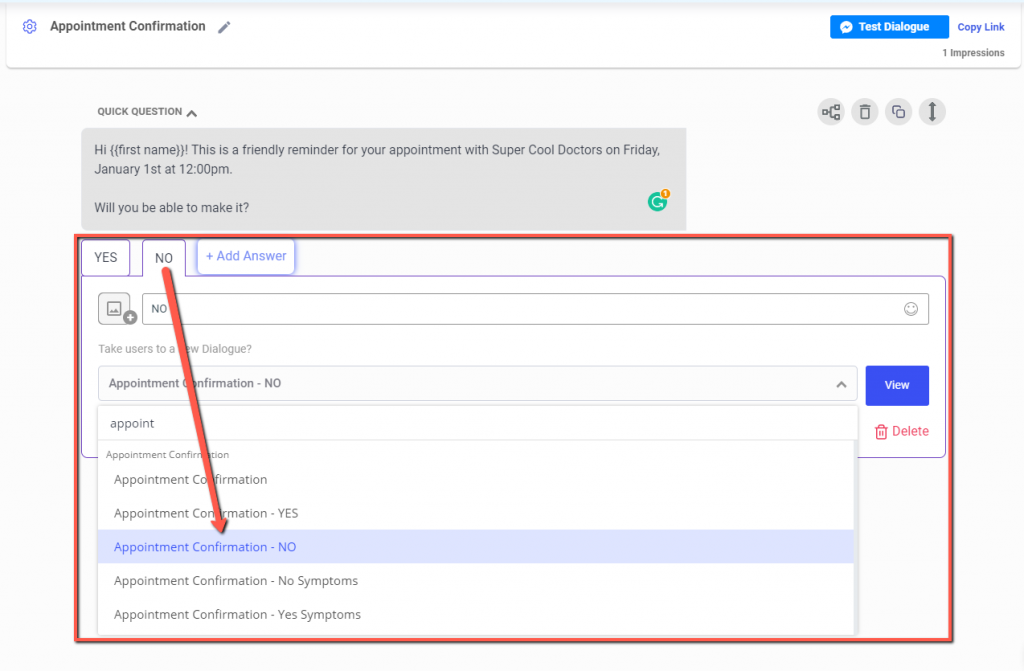
In this example, we’ve already created a new Dialogue and named it, “Appointment Confirmation – YES” in the case the person answers “No.” This path will cause the user to receive a message that most likely will end the conversation.
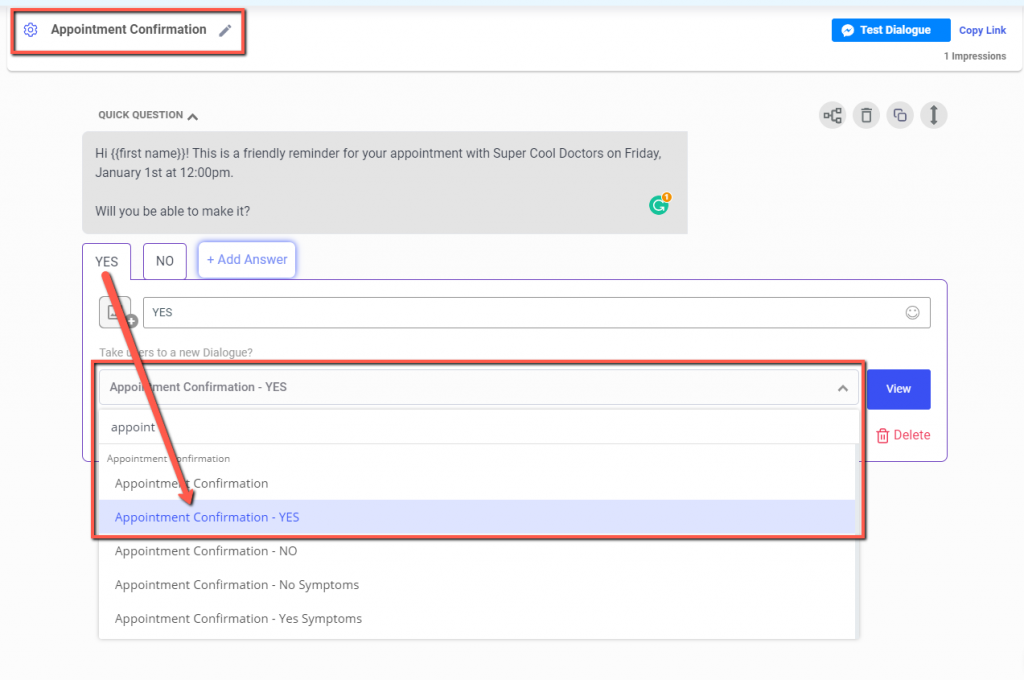
Now that we’ve created our next Dialogue (Appointment Confirmation – YES), we need to build out the user flow. In the image above, you’ll see that if the person selects “YES” from the “Appointment Confirmation” Dialogue, they’ll be sent to the “Appointment Confirmation – YES” Dialogue.
Similarly, if the person selects “NO” from the “Appointment Confirmation” Dialogue, they’ll be sent to a different Dialogue, which I named “Appointment Confirmation – NO.”
Step #4: Create Dialogue for a “NO” answer
We’ll get the Dialogue for an answer of “NO” out of the way first, because it’s very simple.
Here’s a screenshot of the example I created for what you could use if the person can not make it to their appointment:
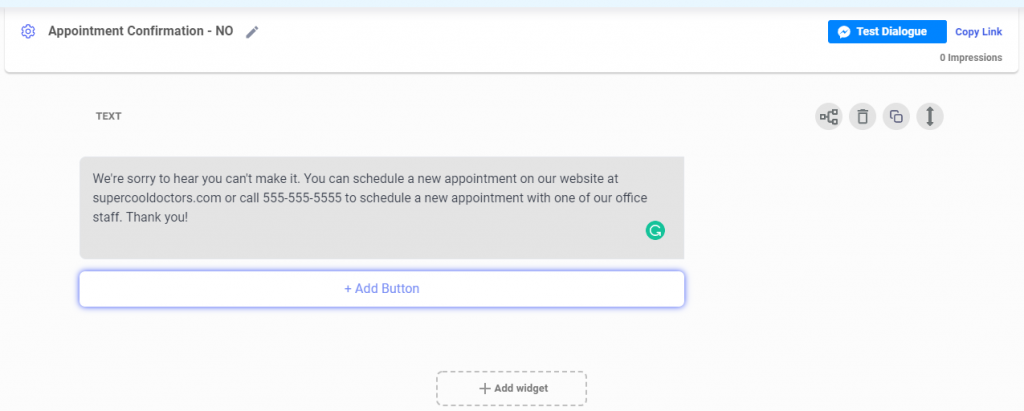
If you want to get real fancy, you can even use the Customers.ai Integrations to connect your favorite calendar application to Customers.ai. That way the person will be able to schedule a new appointment right there in the chat!
Explore Customers.ai’s +100 integrations here.
Step #5: Create a Dialogue for a “YES” answer
Next, we need to create the conversation for the Dialogue if the person selects “YES” to confirm their appointment.
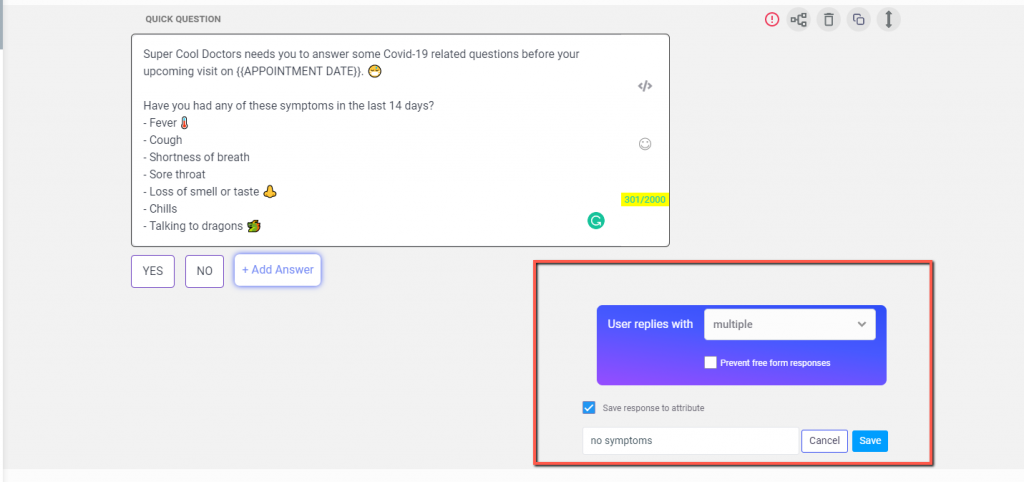
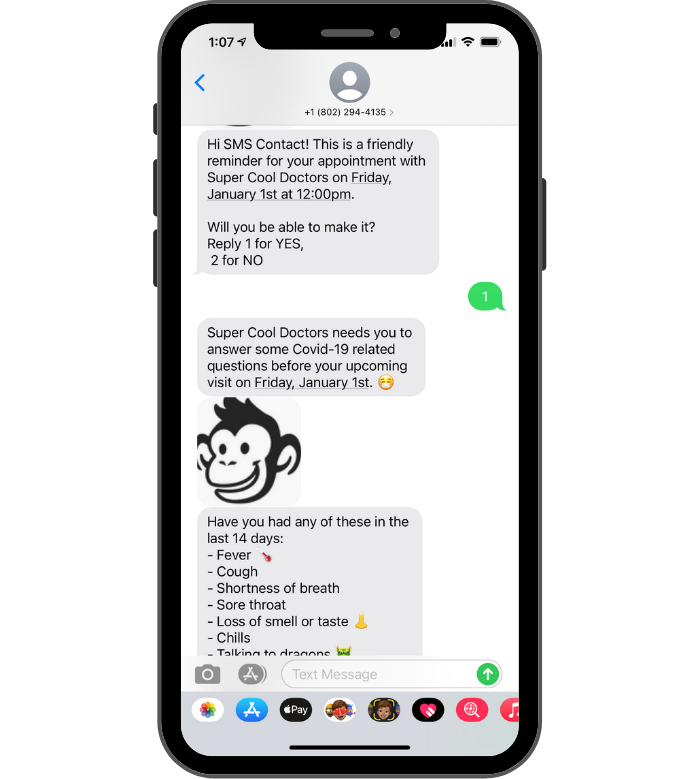
In this example, I’ve added another quick question widget with a question that I’m sure we’re all unfortunately used to being asked in 2020 – the COVID-19 questionnaire.
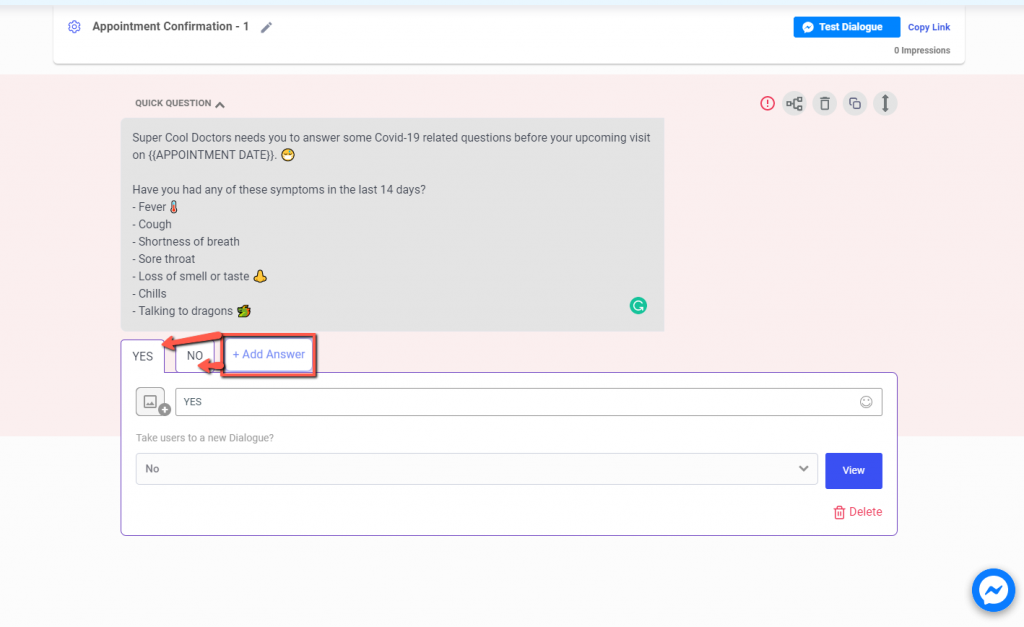
Now, all we need to do is add some answers to the COVID-19 questionnaire, as well as a new Dialogue for an answer of “YES” and a new Dialogue for an answer of “NO.”
However, let’s say you want to save the answers to the COVID-19 questionnaire if the person answers YES. Maybe you want to be able to know to ask in the future if the person has been cleared with a negative test since the last time you spoke.
In order to do this, you can add an attribute to the Dialogue, which will be attached to each person’s contact profile info. To add an attribute to the Dialogue, place a checkmark in the “Save response to attribute” box and either select an existing attribute or create a new attribute.
We’re done with the “Appointment Confirmation – YES” Dialogue. Now it’s time to create new Dialogues depending on how the person answers the question in this Dialogue – YES or NO.
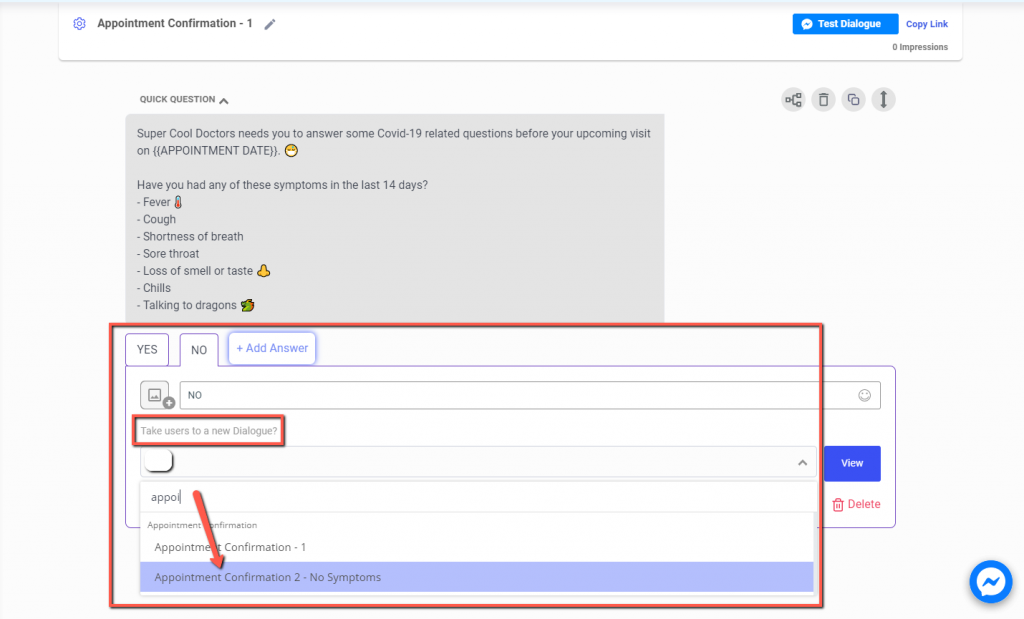
In the screenshot below, you’ll see that I’ve created a new Dialogue called “Appointment Confirmation – No Symptoms” for those who say they are experiencing no COVID-19 symptoms.
Similarly, I’ve also created a path for those that answer “NO.”
Step #6: Build out your remaining Dialogue paths
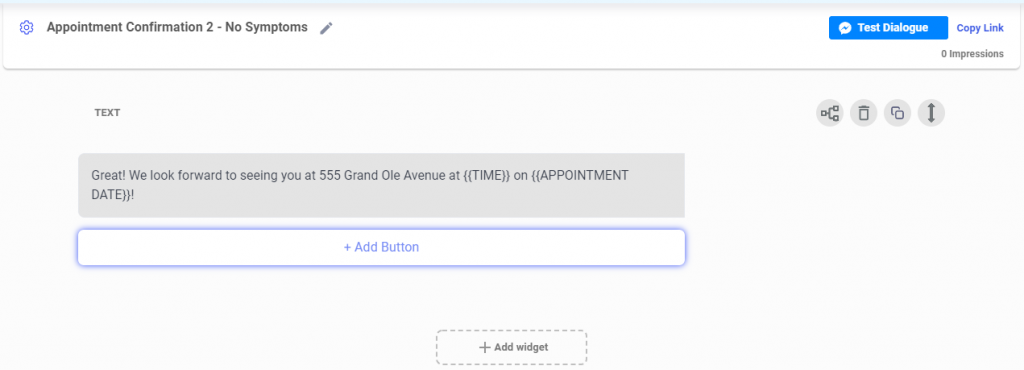
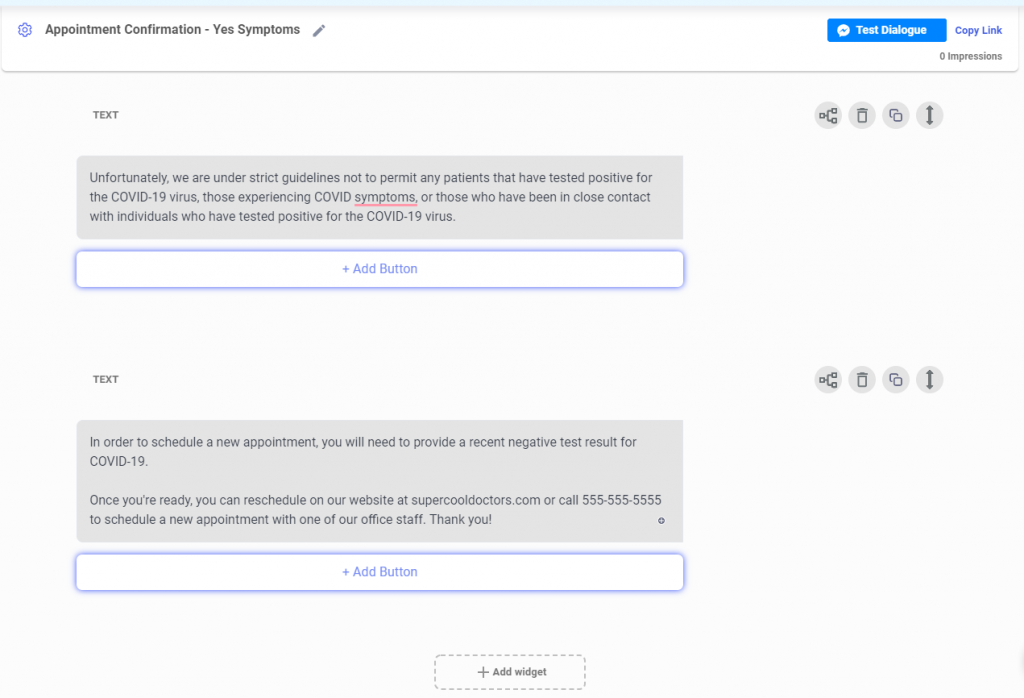
Below you’ll see two screenshots. The first is an example Dialogue you could use for those who answer that they have no COVID-19 symptoms, and the second is for those who answered that they were indeed experiencing COVID-19 symptoms.
- Appointment Confirmation – No Symptoms:
- Appoint Confirmation – Yes Symptoms
Step #7: Test out your appointment reminder text chatbot
To test this bot for yourself, text REMINDER to +1-802-294-4135, click here to chat in Messenger, or test out the bot right here in the bottom right corner of the page by clicking the “Let’s chat!” button.
Here’s what you will see when you use the SMS keyword opt-in.
For more on SMS marketing, check out these super hand SMS marketing tips!
