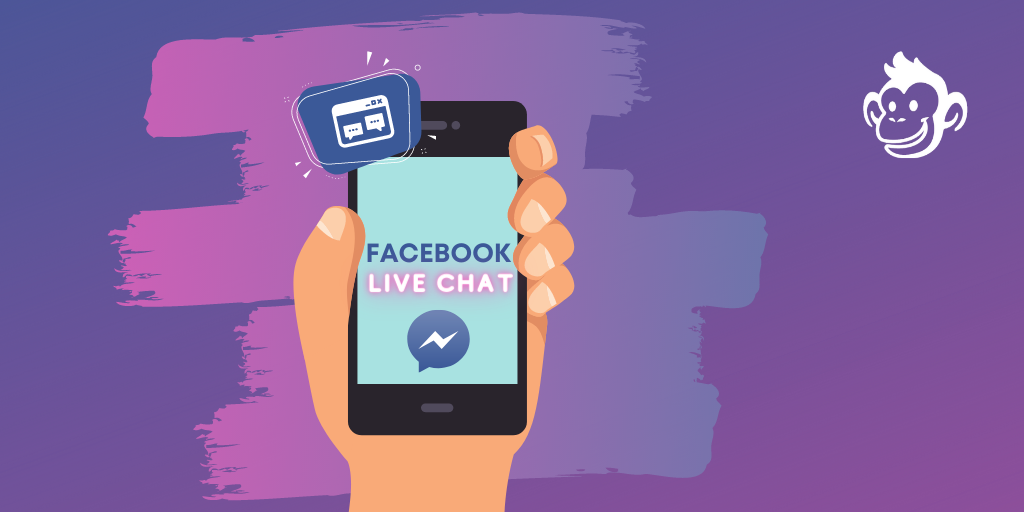
The best way to add Facebook live chat to your website is to install what is referred to as a “chat widget.”
Adding live chat to a website can improve conversion rates by 45%.
Technically speaking, a chat widget is a line of code that you can easily install on your website.
This code will position a chat icon at the bottom right-hand corner of your site. When customers click on it, they can chat with a bot or a live agent from your business.
There are many benefits to adding a Facebook Messenger live chat to your website, such as increased consumer engagement, lead generation, and better customer support.
However, not all live chat software tools are built the same.
Here are the top 10 benefits to adding Customers.ai Facebook live chat to your website:
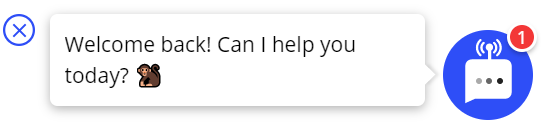
- Website Chat Widget: The chat window in the bottom right of this webpage.
- Responsive OmniChat: Facebook live chat is cross-device functional and mobile-friendly, meaning the conversation is available on your site, the Messenger app, and Facebook desktop.
- Chatbot to Direct Issues: 24/7 chatbot first responder, answers customer FAQs and routes conversations that need live agents.
- Inbox to View & Manage Convos: See and respond to conversations across website visitors in real-time. Both businesses and consumers can reach out to one another at any time via Messenger.
- Live Chat Agent Assignments: Assign follow-up to individuals on a support team, sales or marketing team and more.
- Mobile App to Respond Anywhere: Free mobile app in case you want to do live chat support on the go.
- Lead Capture & Opt-in Tools: Invite site visitors that start a chat conversation to connect in email, SMS or Messenger.
- Remarketing opportunities: Your business is able to re-engage Messenger contacts from Facebook or your website with Facebook Sponsored Message ads.
- Rich Customer Profiles: Your business creates customer profiles that are further enriched with each interaction.
- Notifications for Live Takeover: This live chat tool is included in any Customers.ai upgrade subscription. Live takeover notifications let businesses set up email, web and mobile app alerts for chatbot-to-live agent transfer.
All of these tools are included in Customers.ai’s free chat software.
What is the best Live Chat Software with Facebook Messenger Integration?
Traditionally, businesses can choose to use a Facebook chat widget on their website or use a general native web chat. And when deciding which is the best app for live chat, there are pros and cons to consider for both.
With a Facebook chat widget, customer support conversations happen in the Facebook chat app known as Messenger.
Benefits to both businesses and customers who choose to use the Facebook live chat option:
- Conversations are persistent: Both customers and businesses can continue a conversation in Messenger at any time.
- Facebook Messenger default customer data: Facebook Messenger provides businesses with contact info like name, location, language and more.
- Allows for remarketing: Businesses can create an ad remarketing audience from Facebook Messenger contacts.
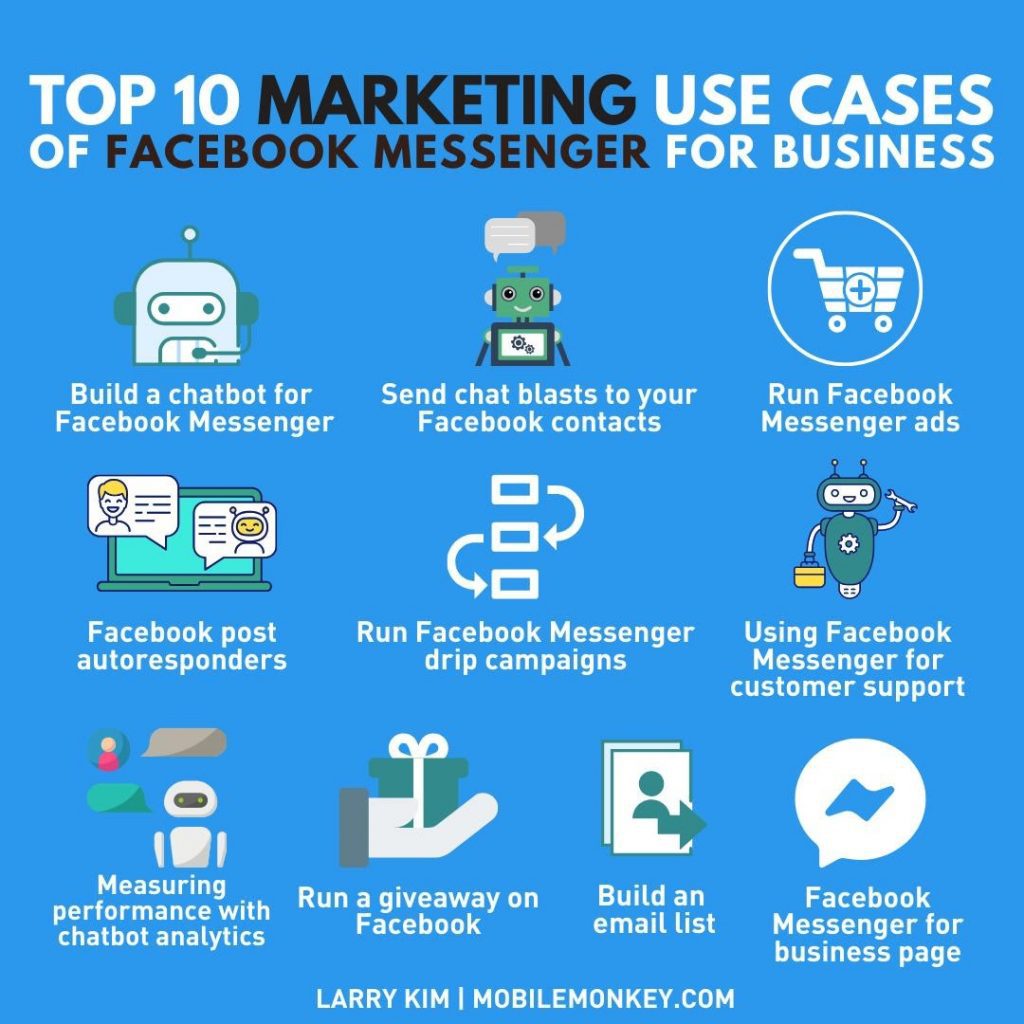
There are plenty of marketing use cases for how to use Facebook Messenger for business.
However, in most cases, for live chat to take place on Facebook Messenger, the customer needs to be logged in to Facebook.
The challenge for a business that wants to communicate via Messenger is that not all of their customers are logged-in to Facebook.
An alternative is to use native web chat, which will allow anyone to talk to the page without having to sign into a Facebook account.
Native web chat is a great solution because it’s flexible, it’s available to every customer, with no login required.
But there’s a better solution that allows you to do both.
With Customers.ai OmniChat, you get a multi-channel website chat widget that brings the best of both solutions together. This way, a business can offer website chat in the messaging app their customer wants to use.
So, how do you add Facebook live chat to your website and simultaneously offer native web chat?
Here are 10 simple steps to add both Facebook and native web messaging apps for live chat on your website.
How to Add Facebook Live Chat to Your Website in 10min
Step 1: Create a free Customers.ai account
First things first, claim your Free Forever Edition Customers.ai account!
You can use the following video from our friends at Chatimize to see how easy it is to connect Customers.ai to your Facebook Page:
After you’ve created your free account, follow these steps and you’ll have a fully functional Facebook live chat widget on your website in 10 to 20 minutes.
Step 2: Go to Chat Starters > Website Chat Widgets in Customers.ai
Following the screenshot below, go to “Chat Starters” and then select “Website Chat Widgets” inside of Customers.ai in order to set up a live chat widget.
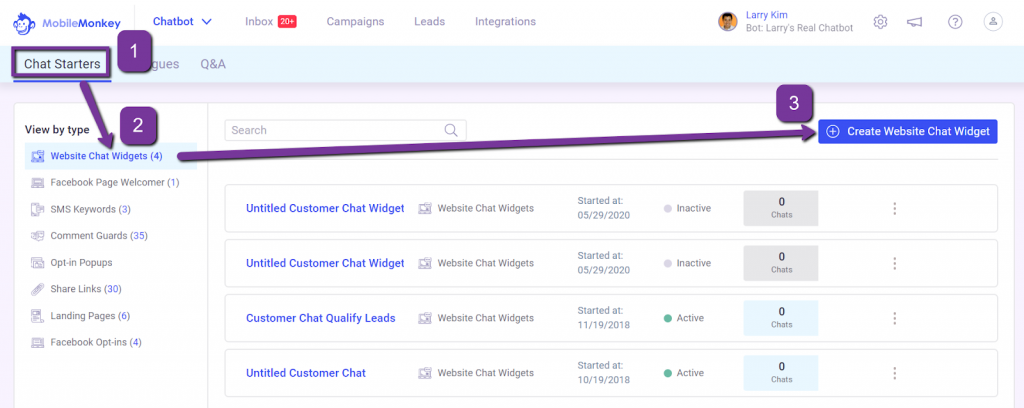
Under “Website Chat Widgets”, go to “Create Website Chat Widget”.
Here you can create one or more chat widgets to function on your website.
You may want to start with just one chat widget on all of your pages, but here’s why you would want to create multiple chat widgets in the future.
You can have a different welcome message as well as a different autoresponder based on the page of your website. For example, it’s highly recommended to have a unique and engaging welcome message on the Pricing page of your website.
A welcome message is the text in the chat window inviting the visitor to click or respond. And an autoresponder refers to the initial chatbot that helps route the conversation.
Step 3: Give the chat widget a descriptive name
Now it’s time to start customizing the chat widget by giving it a descriptive name that’s easily recognizable in a line-up of customer chat widgets.
As mentioned above, you may want a live chat widget that has a different greeting on the Pricing page vs. the Contact Us or Homepage of your website.
Here you can create different website customer chat widgets for each page and name them to describe which page the widget is displayed.
In this example we’ve simply used the default customer chat widget name, however, you may want to name your chat widget “Homepage Customer Chat Widget” or “Pricing Page Customer Chat Widget.”
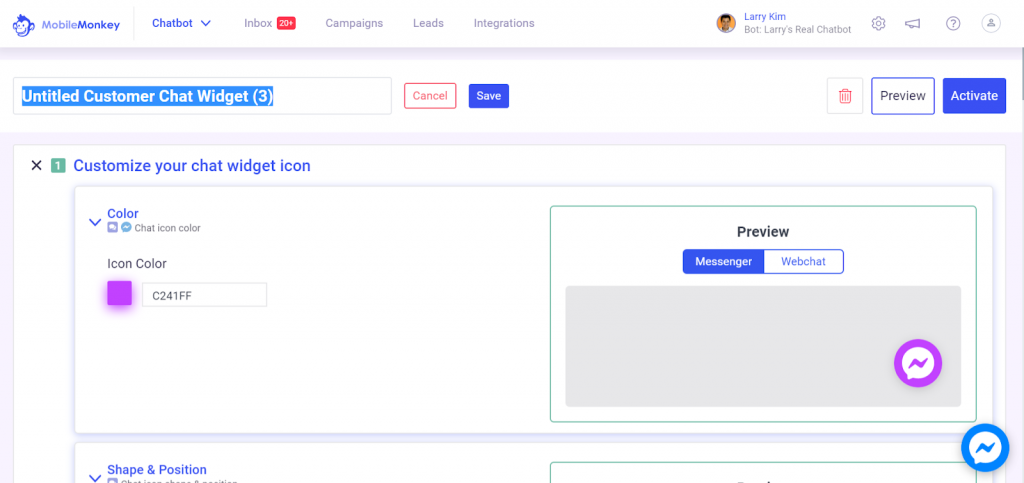
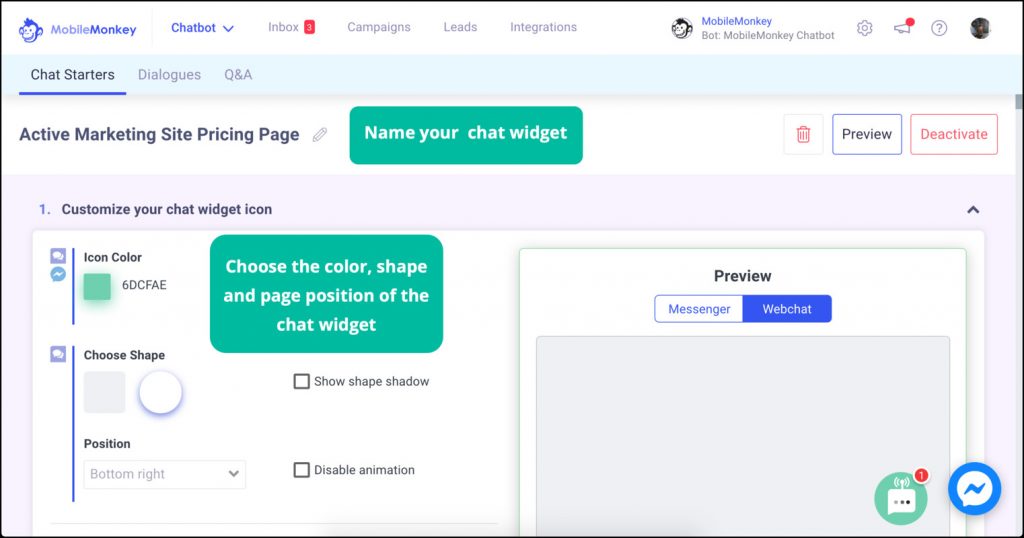
Step 4: Customize the color and look of your chat widget
You can change the chat widget color. It’s a standard business blue by default, but here we’ve changed the color to the Customers.ai brand color purple.
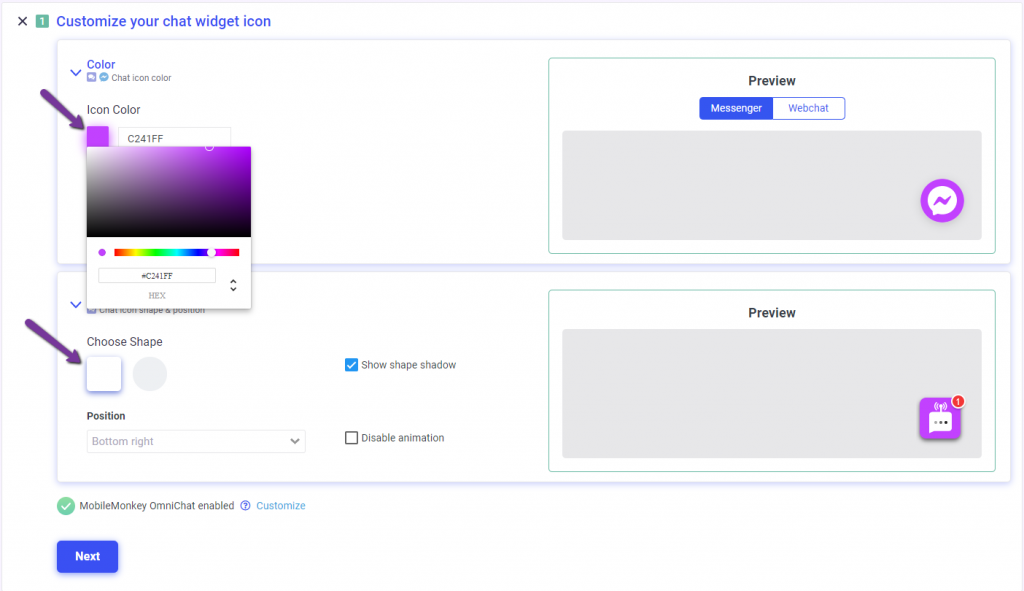
Change the widget to any color you want in order to compliment your website and brand.
You can also change the shape of the widget, choose whether or not to show the shape’s shadow, and position the live chat widget wherever you want on your page.
Step 5: Set up your welcome message
Next, set up a greeting message. In this example you can see a basic greeting: “Hi, how can we help you?”
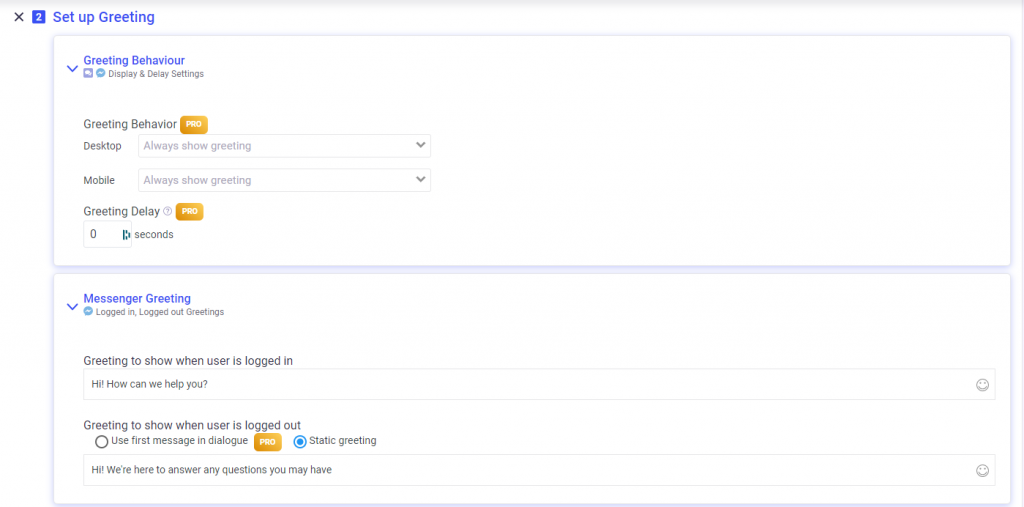
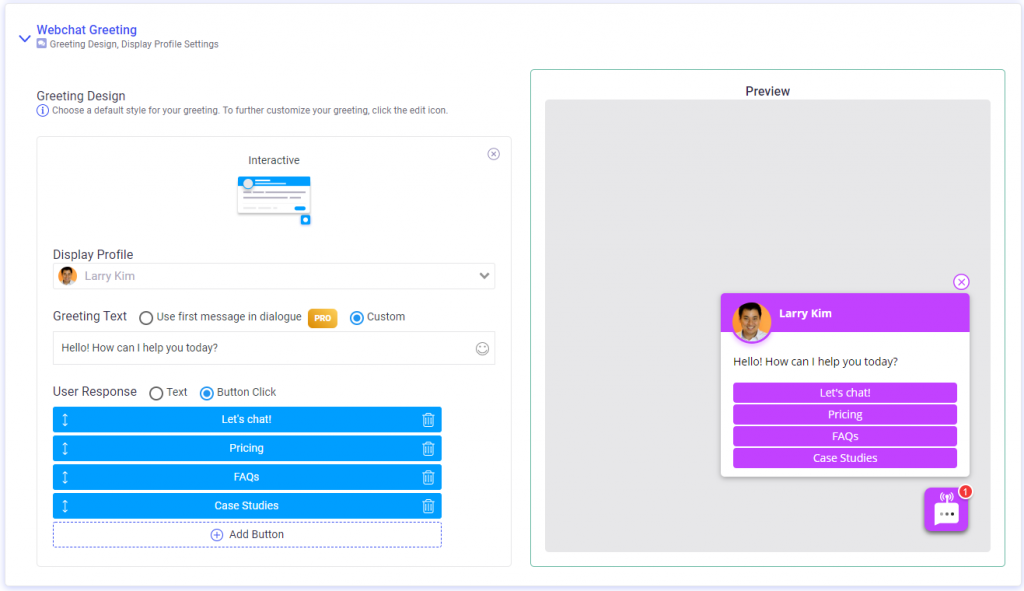
Alternatively, you can get fancy by using what’s called an interactive greeting that greets website visitors with the first message in the chatbot autoresponder.
We’re going to use the first message in our web chat bot as the example greeting. “Hello! How can I help you today?”
Additionally, we’ve added multiple choice answers for the visitor to choose from. Typically, this is the type of greeting we would use for someone visiting the Customers.ai website for the first time.
This allows them to easily navigate the site’s most popular pages and lets them know that they can use the chat widget for assistance whenever they need it.
If you want to proactively engage customers to get them to start talking to you on a page, use an initial message that’s catchy and appealing.
For example, you can showcase a promotion, a contest that you’re running, or whatever events are happening on your website at that point in time.
In other words, anything you want that would get the customer excited and interested in chatting with your business.
Step 6: Set up actions to the responses you receive from your initial question
The next step is setting up the chatbot autoresponder that will route conversations to a live chat support team.
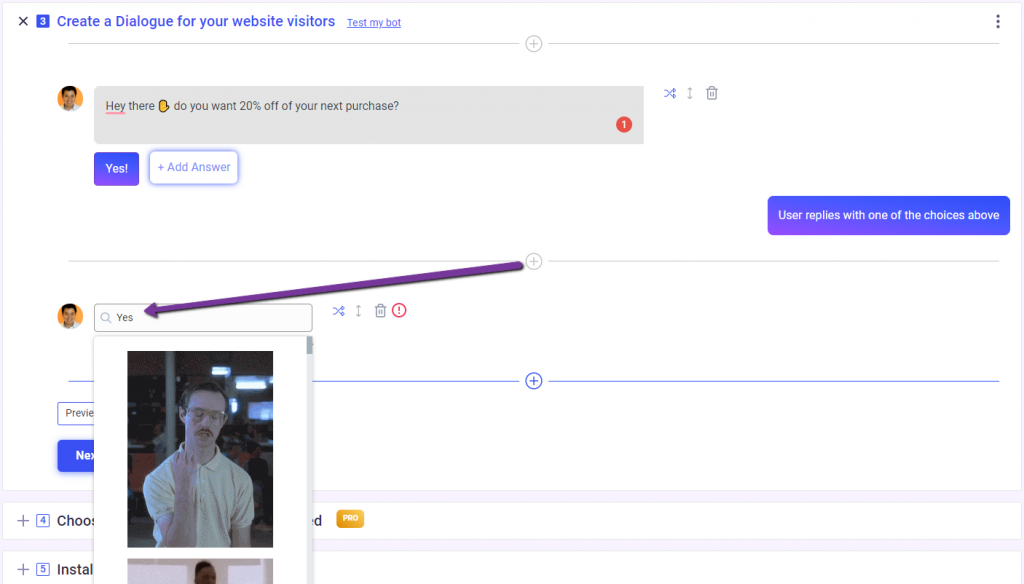
In this example, we are using a chatbot autoresponder offering an incentive for a 20% discount.
Then we’ve added a “Yes!” as one of the possible answers that the customer can select.
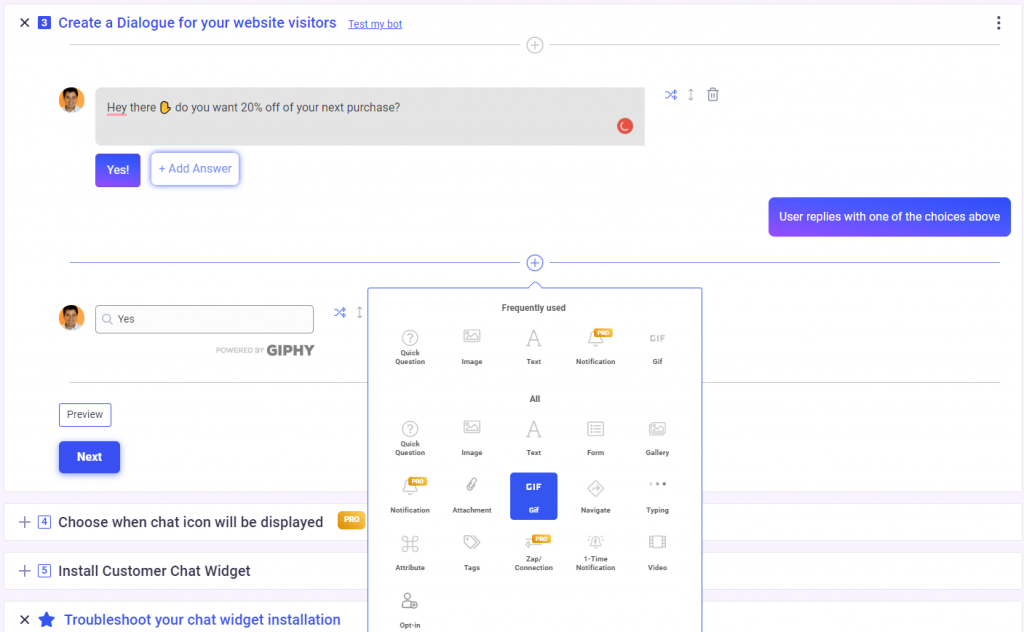
Additionally, we’ll be adding a fun GIF to further increase the likelihood of the visitor engaging with the chat widget.
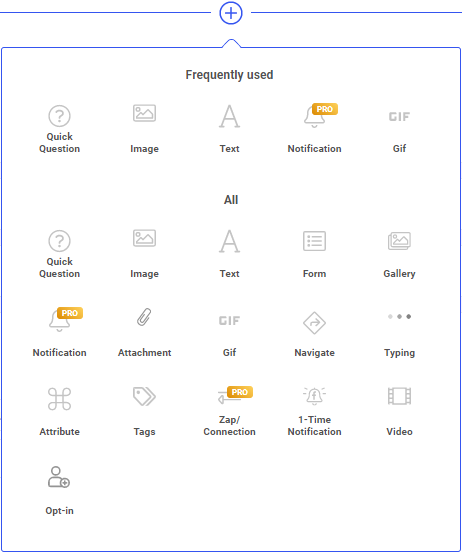
Other than GIFs, by clicking the plus sign, you’ll see over a dozen different chat widget tools to choose from, such as videos, images, forms, opt-ins, and more.
Next, once your customer responds positively, it’s a good idea to say something like “That’s great! What’s your name?”
Note that if the visitor is logged into Facebook Messenger you’ll capture their Messenger contact data automatically. And if they are a returning visitor whose information you’ve already captured, your bot will know not to ask this question.
In both cases, your smart bot will be able to automatically skip this question.
However, in the case of a first time visitor that’s not logged into Messenger, requesting a name ensures that you can add the customer’s name and contact information to your database.
When setting this up, another option could have been for us to use a “quick question widget” which would have meant that we just offered the user fixed response buttons.
However, in this example, we’re expecting a text response, so we save the response as a text attribute, which we can use as an audience segmentation tool for additional marketing campaigns in the future.
Step 7: Facebook live chat lead generation and opt-in invitations
A customer or prospect chatting on your website is actively engaged with your business.
There’s no better time to invite them to provide contact information or to opt-in to further communications.
To do this, you can use a website chat autoresponder that’s configured to collect an email address, SMS opt-in, phone number, Messenger opt-in, and more.
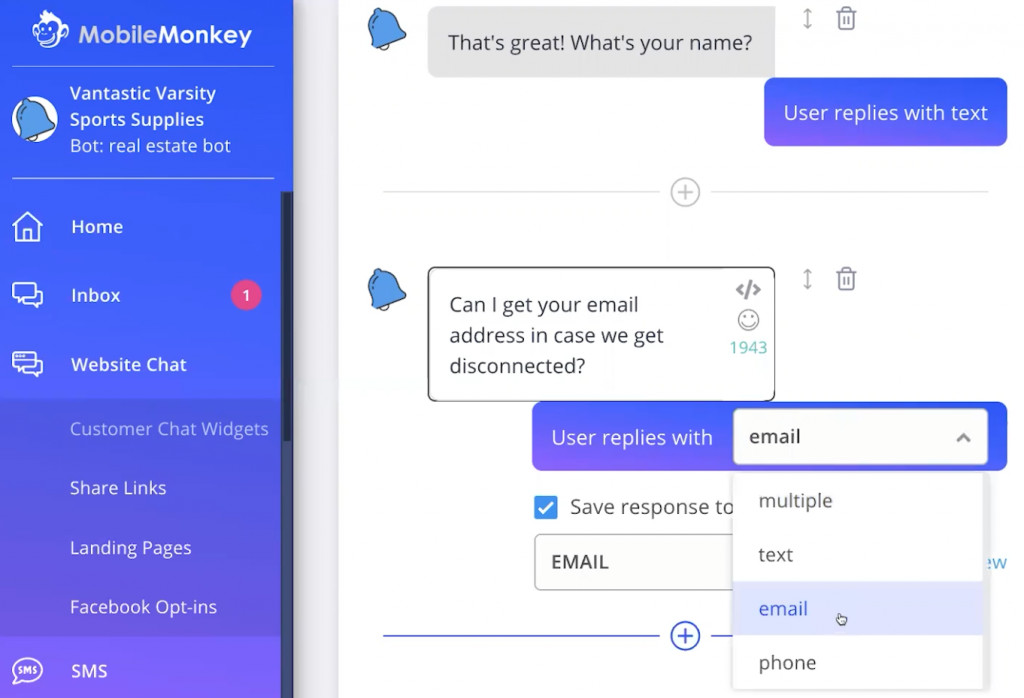
In this example we’ll create an email capture chatbot by asking the customer for their email address.
When you receive the response, make sure that you set up Customers.ai to save this as an email attribute.
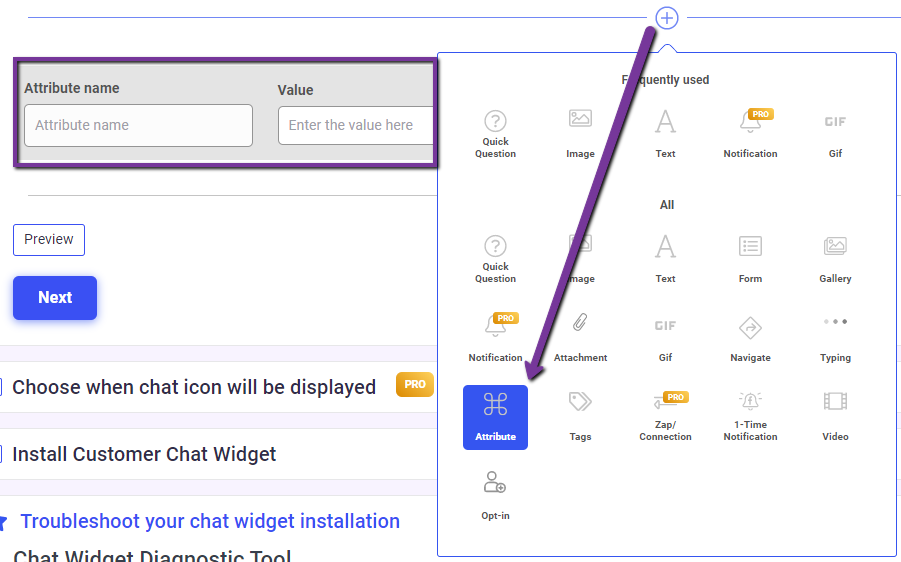
By adding a custom Attribute or Tag, you’ll be able to segment audiences for chatbot drip campaigns via Messenger, text message marketing, and more that can be triggered through chatbot automation.
Requesting an email address is great whether or not they come from Facebook or web chat.
Although Facebook knows the email address of each user, they won’t provide it to you unless the user explicitly agrees.
Now that we’ve reached the stage where an automation sequence has captured the customer’s information, you can steer the conversation in any direction that you like, such as:
- Providing a menu of options to ask what they need help with today.
- Triggering a lead notification in email or mobile app.
- Jumping into the conversation for live chat takeover.
Step 8: Set advanced display rules for desktop, mobile, page-specific autoresponders, etc.
Although you don’t need to set this up initially, you may want the chat widget to show up only on mobile or only on desktop.
In our example, we’ve selected both.
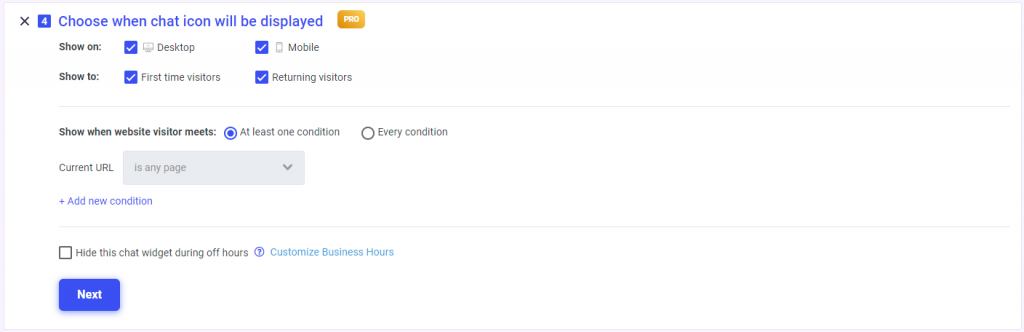
You can also select which page(s) you want the widget to be displayed. For example, you can create one widget for your Pricing page and another widget for your Blog page.
This means that your Facebook live chat widget will have different dialogues depending on which page your site visitors are on.
In our example, we’ll use the same chat sequence across our whole site, but it’s important to be aware that these options exist.
There are many different levels that you can go to when adding Facebook live chat and a chatbot widget to your website, however, it’s important not to get too complicated for your initial setup.
Start by testing out one or two live chat widgets and get a good feel for what’s working before creating five or more page-specific dialogues.
Step 9: Install the Facebook live chat plugin on your website
The next step is to install the Facebook live chat code on your website.
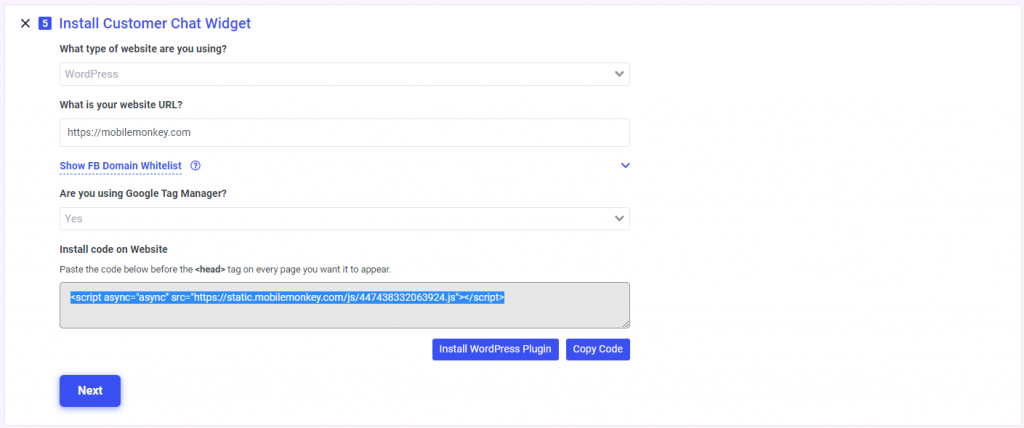
Make sure that your website domain is white-listed inside Customers.ai. This step is only required if you are using Facebook Messenger as one of your website chat options. Facebook won’t show their chat widget on any domain that’s not whitelisted.
Now it’s time to install the code on your website.
As mentioned already, the code is very quick and easy to install. It’s a single line of JavaScript.
Simply copy and paste the JavaScript where you normally install scripts on your site. This could be in the HEAD section of your website or through a tool like Google Tag Manager.
Next, when the script is installed, it’s time to activate the widget inside of Customers.ai.
Step 10: Verify the Facebook live chat widget is on the website and the autoresponder is working
Be sure to test that everything’s working as intended from a user perspective.

View the page on which the Facebook live chat widget is installed in an ‘Incognito’ browser window. This way you’ll ensure that you won’t be logged in to Facebook or your Customers.ai account.
Congrats! You’ve added Facebook live chat to your website.
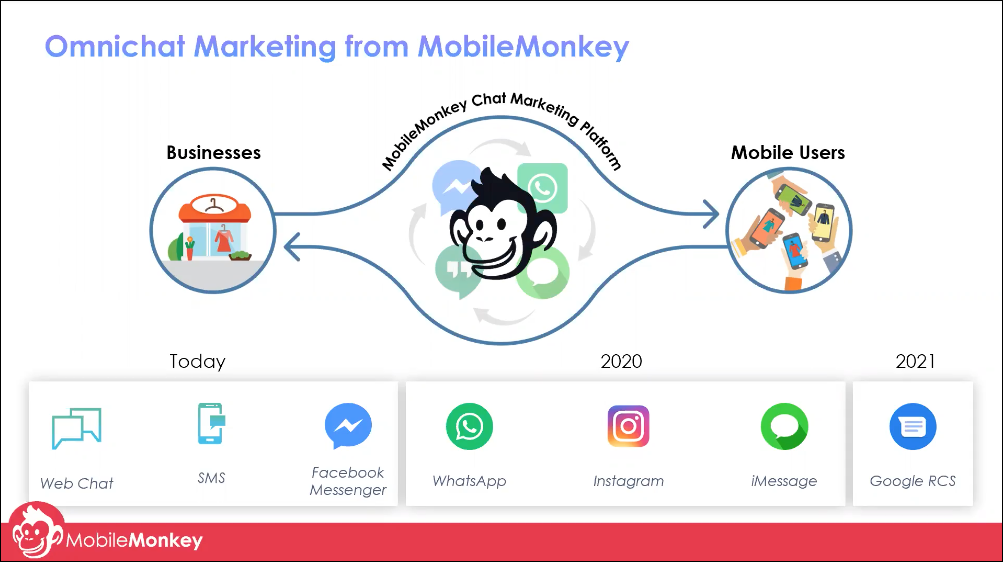
The Benefits of OmniChat by Customers.ai
Here at Customers.ai, we understand the challenges that come with relying on Facebook Messenger as the foundation of your online chat experiences.
Not everyone uses Facebook or Facebook Messenger, and in different parts of the world, it’s not the go-to messaging app.
We also understand that the smallest challenge to a user’s experience can disrupt the flow and send them in another direction to find what they’re looking for.
That’s why we’ve created OmniChatⓇ, a universal chatbot that works across platforms and allows you to chat with those audiences all from one unified inbox.
What do we mean by that?
Customers.ai is an omnichannel chatbot that enables companies to proactively engage with audiences on their website, Facebook Messenger, SMS text messaging, and other popular web chat applications.

Customers.ai web chat is compatible with every available browser and doesn’t require a Facebook login to use.
It also works seamlessly with all other Customers.ai chat marketing automation tools.
Facebook Live Chat for Customer Support
You may not know this, but live chat that’s only built for your website is far less powerful compared to web chat on your site powered by a smart, omnichannel chatbot.
Customers.ai uses OmniChatⓇ technology and chatbot marketing automation to instantly connect customers and prospects to brands through Facebook Messenger, native web chat, SMS text messaging, and other popular messaging apps.
One of the major advantages of Facebook Messenger customer chat with chatbots is persistent conversations tied to customer profiles.
Live chat and other on-site chat platforms don’t keep a history of chats and they certainly don’t tie chat history to a rich customer database that can inform marketing objectives.
Because we’re using Facebook Messenger, conversations can happen on mobile, desktop, in the Messenger app, on Facebook, and within your website chat widget. All with a unified chat history.
But what if your website visitor doesn’t use Facebook Messenger?
Customers.ai OmniChat can be set up to offer your web visitor a no-login-required web chat widget instead.
Another benefit to Facebook Messenger customer chat powered by a Customers.ai chatbot is that it costs less than live chat software that needs to be staffed by live human operators.
Team chat tools and a unified inbox
Chatbots combined with humans make for the best customer support. When a live agent is needed, the chat can easily be handed over to a live agent at just the right time.
The ability to take over for the chatbot is available at any time a la live chat operator takeover. So when a hot lead comes in or the bot can’t answer a tough customer question, you can be notified and follow-up.
All of the Facebook Messenger contacts you capture from your chatbot marketing tactics can then be added to your other Customers.ai marketing channels.
That way, if they visit your website, you’ll be able to view that data, send automated and targeted messages based on your previous interaction, and opt them into other campaigns. And you can do this all from one chat inbox, on one platform.
Here’s what the live chat, unified inbox looks like on Customers.ai:

Learn how to quickly create a chatbot for any WordPress website. Or, if you’re not using WordPress, follow our Facebook Messenger customer chat widget installation instructions for Google Tag Manager.
Facebook Live Chat: Important Next Steps
- Create a free Facebook Messenger bot today with Customers.ai.
- Talk and learn about chatbots with other enthusiasts. Join Customers.ai Island, a Facebook group of over 35k marketers and entrepreneurs that are ready to support you.
- Advance your marketing performance with Chatbot University, a free chatbot tutorial and training area for chat marketers.